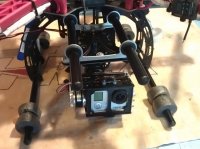
Aeroxcraft Brushless Gopro Gimbal

CrashMaster

Member
What is the distance between de two holes (with the gromets) in the top plate (exactly!)? Maybe it fits on my landing gear from quadframe.
The top plate holes are:
Front holes 85mm
Back holes 28mm
Front to back 80mm

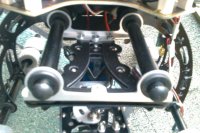
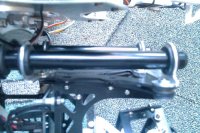
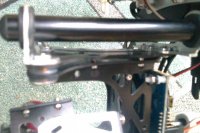
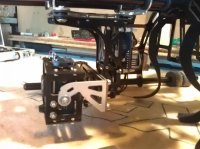
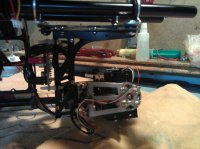
The mounting Plates - ie. the aluminium one centre to centre are 70mm the tubes which go through them are 10mm
The distance between the two aluminium mounts is 87mm but are mounted with three bolts and could be turned to make the gap either 80mm if one turned or 73mm if both were turned.

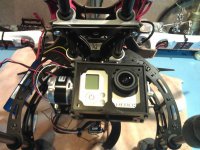
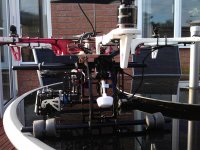
Mine is slightly different to the one shown on Rob's website http://www.aeroxcraft.com/images/brushless1.jpg. I don't know if that is because I have the silicone as oppose to the standard rubber. However, here is mine below.

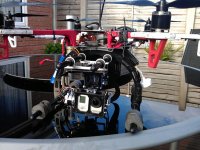
View attachment 12151 View attachment 12152 View attachment 12158 View attachment 12161

The last one is a cat trying to see what is happening. Cute little stray made her home here only 6 weeks ago.
 

Attachments

  • IMAG0702.jpg
    IMAG0702.jpg
    147.1 KB · Views: 221
  • IMAG0703.jpg
    IMAG0703.jpg
    149.9 KB · Views: 199
  • IMAG0704.jpg
    IMAG0704.jpg
    146 KB · Views: 207
  • IMAG0701.jpg
    IMAG0701.jpg
    140.6 KB · Views: 173

B

Bengit

Guest
Received 2s lipo today, changed connectors, fitted to F550 (Aeroxcraft Landing gear), straight from box works well. Needs a slight bit of tweeking when software/manual is complete and looking forward to the 90deg fix (not connected tx to pitch yet). Overall am very impressed with build and first results.......No jello either, not in direct sunlight but looks promising. Thanks Rob

Some pics

View attachment 12166View attachment 12163View attachment 12164View attachment 12165View attachment 12167View attachment 12168

Sorry about the quality of some of the pics.
 

Attachments

  • IMAG0368.jpg
    IMAG0368.jpg
    109.9 KB · Views: 190
  • IMAG0369.jpg
    IMAG0369.jpg
    105.8 KB · Views: 241
  • IMAG0370.jpg
    IMAG0370.jpg
    123.9 KB · Views: 186
  • IMAG0371.jpg
    IMAG0371.jpg
    137.9 KB · Views: 187
  • IMAG0373.jpg
    IMAG0373.jpg
    143.9 KB · Views: 516
  • IMAG0374.jpg
    IMAG0374.jpg
    141.6 KB · Views: 440


SjaakZwart

Member
The distance between the 2 tubes between the battery plates (see photo) is 85mm. Mmmm, it's getting interesting!

umesedag.jpg


Sent from my iPad using Tapatalk HD
 

CrashMaster

Member
You may be able to mount it directly onto those bolts using the aluminium plates and some rubber bushes and over sized washers. As the front and back plates are identical that may work directly using the battery plate mounts. How about contacting Rob and asking him just to send you the top mounting plates and the sheet between them and try to fit them. If that works you just need the gimbal and bolt it on with the 3 vibration isolators. I would go for the silicone as you don't have the legs from Aeroxcraft which are isolated using silicone again to attach to the bottom plate of the F550.
 

Phil550

Member
If you're not going to connect the pitch control to the TX, does anyone know how to change the attitude of the gimbal to point down at say 20 deg, as per the gimbal control in the Naza Assistant?
 

CrashMaster

Member
If you're not going to connect the pitch control to the TX, does anyone know how to change the attitude of the gimbal to point down at say 20 deg, as per the gimbal control in the Naza Assistant?
I haven't explored the software option yet but have a look at my temporary mod, (here) which works a treat to lower the angle.. It is trial and error to cut a wedge but make sure it is flat because the gimbal sets it's self up on boot and positions the small circuit board horizontal in both plains.
 

B

Bengit

Guest
If you're not going to connect the pitch control to the TX, does anyone know how to change the attitude of the gimbal to point down at say 20 deg, as per the gimbal control in the Naza Assistant?

My undestanding was at the moment you can connect the Tx for pitch angle....its just that 90deg is not available. Will be having a go at linking my Tx up tonight, never got round to it at the weekend.
 
Last edited:

B

Bengit

Guest
You may be able to mount it directly onto those bolts using the aluminium plates and some rubber bushes and over sized washers. As the front and back plates are identical that may work directly using the battery plate mounts. How about contacting Rob and asking him just to send you the top mounting plates and the sheet between them and try to fit them. If that works you just need the gimbal and bolt it on with the 3 vibration isolators. I would go for the silicone as you don't have the legs from Aeroxcraft which are isolated using silicone again to attach to the bottom plate of the F550.

Just to say I have the Aeroxcraft legs, I have not bought the silicone isolation kit (either for the legs or the gimbal) and am getting no vibes/jello. The basic isolators are working fine for me....


Phil550

Member
I haven't explored the software option yet but have a look at my temporary mod, (here) which works a treat to lower the angle.. It is trial and error to cut a wedge but make sure it is flat because the gimbal sets it's self up on boot and positions the small circuit board horizontal in both plains.

Good lateral thinking!
If you find out how to do it in the software, please let us know!
 

B

Bengit

Guest
My undestanding was at the moment you can connect the Tx for pitch angle....its just that 90deg is not available. Will be having a go at linking my Tx up tonight, never got round to it at the weekend.

Connected up gimbal pitch control, about 30-35deg +/-, need software to sort out range (DX8, altering travel had minimum impact, altering sub trim seems to **** up movement). Connected Hero3 to Dji Iosd, works fine as expected, the problem is that the extra weight of the lead/connection upsets the balance of the gimbal at startup, had to hold the gimbal horizontal to ensure that the initial setting were ok. Could always connect the lead after initialisation (after thought)...will try that.
 

SjaakZwart

Member
Little sidequestion: what do you guys think of the quality of the landinggear of AeroXcraft (for the F550)? On a dutch forum they say it's quite fragile? I've my doubts because I allso read some positive postings. Maybe I'm gonna buy a set (AeroXcraft landing gear + brushless motors).
Does anyone already have some (flying!) videos so I can judge the quality (and what settings do you have the Gopro set) of the gimbal? I allready saw the video on the website of AeroXcraft!
What are the suggestions for vibration dempers?
 

CrashMaster

Member
Little sidequestion: what do you guys think of the quality of the landinggear of AeroXcraft (for the F550)? On a dutch forum they say it's quite fragile? I've my doubts because I allso read some positive postings. Maybe I'm gonna buy a set (AeroXcraft landing gear + brushless motors).
Does anyone already have some (flying!) videos so I can judge the quality (and what settings do you have the Gopro set) of the gimbal? I allready saw the video on the website of AeroXcraft!
What are the suggestions for vibration dempers?
As for the quality of all the AeroXcraft stuff it is excellent and what the Dutch guys may think is that because it looks flimsy it is. However, it is structurally very strong and flexible, relying on engineering and design rather than brute strength 'H' Section RSJs to remain strong. On the other hand if I fell out of the sky from 100 feet I would expect it to break but haven't tried that..... yet. I did have a motor fail and spiraled down from 10-15 feet and bounced into the inverted grass cutter position.... broken props but no broken landing gear or gimbal. I also had a scary moment when descending fast and had little power left to slow the decent and hit the ground square on the skids at about 10 mph. It bounced back about 5 feet and came in for another landing with no damage at all -All due to DJI's inability to beta test firmware preferring paying customers to do it for them.
I haven't done any videos yet because of the firmware problems and may go back to the old firmware. Also breaking props and motors on several flight has meant that my trust of the machine has been shattered for the time being too.
 

B

Bengit

Guest
Little sidequestion: what do you guys think of the quality of the landinggear of AeroXcraft (for the F550)? On a dutch forum they say it's quite fragile? I've my doubts because I allso read some positive postings. Maybe I'm gonna buy a set (AeroXcraft landing gear + brushless motors).
Does anyone already have some (flying!) videos so I can judge the quality (and what settings do you have the Gopro set) of the gimbal? I allready saw the video on the website of AeroXcraft!
What are the suggestions for vibration dempers?

Would recommend the landing gear to anyone, excellent quality, goes together easily, very rigid.

I have the landing gear fitted to my F550, I have no vibrations at all through the Brushless Gimbal. I did not buy the uprated vibration set for the landing gear or the uprated silicone dampers for the gimbal. Would recommend that you try before paying the high prices for the silicone dampers.

Still messing with my F550 but will post some vid when i can, all i can say is that I am very happy with the Aeroxcraft Hardware, see previous comment wrt the gimbal.
 

SjaakZwart

Member
Thank you so much for these clear answers!! Thumbs up. If there will be any videos: I'll keep following this thread!
 

B

Bengit

Guest
Has anyone received a link to software/finished manual from Aeroxcraft, mailed them but no response. I need the 90deg pitch setting resolved.
 

CrashMaster

Member
I had an e-mail from Rob last week explaining what to do but have not managed yet because of driver issues with my systems. He was going to get back to me again but nothing for 3 days.

Housing
To turn the housing over, all you have to do is take the sensor off and refasten it the other way up, so that the components on the sensor board are facing downwards.

Software and voltages
The software is here:
https://code.google.com/p/brushless-gimbal/downloads/list

The version loaded on the board is 048. If you download the files _048.rar and extract them (winrar is an app that can extract them) , there's a GUI for that version. bl-tool2_048_AHa.exe

To change the input voltage it's a case of changing the MaxPWM settings for each axis. If you increase the input voltage then you need to decrease maxPWM, and vice-versa.

Tilt
The tilt can be increased to 90deg but the software that's loaded (v48) can't handle it properly. There's some new software (BruGi_049A_r45) for it than works but unfortunately the tuning is different so I've got to find the best settings again. I did some limited testing with it yesterday and it was working well. I'm going into work tomorrow to get it sorted and tested.

I've just typed up some instructions on how to update the software and change settings. (SEE BELOW)

Let me know how you get on. If it's too much then we could perhaps swap out your gimbal or the board.

Cheers
Rob
----------------------- Note from me not Rob ----------------------
Below is not for the faint hearted because you can burn your board if you do it wrong
--------------------------------------------------------------------------------​

The latest software (BruGi_049A_r45) is here:
https://code.google.com/p/brushless-gimbal/downloads/list

It's a 2 stage process.
1) Uploading the software
2) Adjusting the settings to suit the gimbal.


1) To upload the software:

a) Extract the zipped files to a folder.

b) Download Arduino from here http://www.arduino.cc/

c) Run the Arduino application and open the file _BruGi.ino

d) Connect the board to your PC. If you have any issues with the driver, quite likely if your using a later version of window then the latest drivers are here http://www.ftdichip.com/Drivers/VCP.htm We found that windows XP seems to just work straight away with no messing about. More info about it here: http://arduino.cc/en/Guide/windows http://arduino.cc/en/Guide/UnoDriversWindowsXP

e) In Arduino, select the board type to Arduino Pro or Pro Mini (5V, 16 MHz) w/ATmega328.
View attachment 12259

f) In Arduino, select the com port that your PC assigned to the board, you can find it in windows device manager, under com ports. It will not be COM 1 like in the screenshot
View attachment 12260

g) You should now be ready to upload the software to the board. In Arduino, click the upload button
View attachment 12261

It will compile the code and then upload it to the board. If you get any errors it's likely to be a com port / driver issue.


Once complete it should say 'Upload done'.


2) Adjusting the settings.

a) You need to download and install this: http://www.activestate.com/activetcl

b) Once installed, find the GUI file (bl-tool2_049.tcl) in the files you extracted earlier and double click it.

You should then have the GUI window, like this:
View attachment 12262

Make sure the com port matches the boards com port.

Click Connect and if all is well you should now be able to start tuning up.

It's essential you have the GoPro in the gimbal when you're tuning.


From memory, yesterday I was getting somewhere in the right region with:

Pitch
I=10
P=19
D=30
maxPWM=70


Roll
I=10
P=28
D=30
maxPWM=140

Poles should be 14

RC-Min and RC-Max are the angles for the RC control. Absolute give you a different RC control method and rcGain affects the speed of one of these modes.

Dir is the direction the motors move. Effectively the same as turning round the motor connectors on the board. The effect is more subtle than it sounds, hard to describe...I set them so the gimbal under-compensates rather than over-compensates.


I - affects the speed the gimbal moves to where it should be. Sounds counter intuitive, but I find the lower the value the better.
P - Is the gain
D - Is used to damp out oscillations.
maxPWM - is the power sent to the motors. This is affected by the input voltage to the board. If you increase the input voltage then you need to decrease maxPWM, and vice-versa.

P and MaxPWM are your main adjustments. Get them too high and it will vibrate like mad, get them too low and the gimbal won't compensate enough or not have enough power to move properly.

When you change a setting make sure you click save, the setting will stay in the memory of the board until it is powered down. To get the settings to stick you need to click 'save to flash', this is where the board loads it's settings from at power up.

Test the results by moving the gimbal around rather than moving the housing by hand. Once your happy with it, try flying it. You might find that vibrations getting through to the sensor set off oscillations in the sensor/board feedback loop. If that happens lower the gain or power a little.

It's a juggling/balancing act between all the numbers to find that sweet spot.
 

Attachments

  • 1.jpg
    1.jpg
    16.1 KB · Views: 351
  • 2.jpg
    2.jpg
    15.7 KB · Views: 251
  • 3.png
    3.png
    10.5 KB · Views: 265
  • 4.jpg
    4.jpg
    21.6 KB · Views: 277

RTRyder

Merlin of Multirotors
Has anyone received a link to software/finished manual from Aeroxcraft, mailed them but no response. I need the 90deg pitch setting resolved.

A known problem with the Martinez controller board, the recent .49 beta release supposedly addresses the problem. Alexmos controller boards do not have the tilt issue they work at 90 degrees tilt. I haven't yet had a chance to test the .49 on the Martinez board, mine is on the shelf at the moment waiting for me to finish modifying one of my specialized FPV frames to take a B/L gimbal and the Martinez will be put on that setup, all the rest of my B/Ls have Alexmos boards, more expensive but a lot less problematic than the Martinez IMO.

Ken
 

Top