B
Bengit
Guest
Has anyone received one yet?
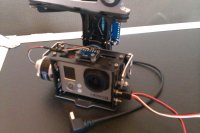
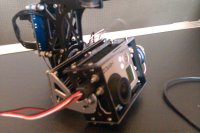
Yes it arrived today but no instructions or indication how to set it up. It looks very good quality but without instructions I will not take any risk of frying the board. My first thought is how do I connect the camera to the AV because there is no room unless I invert the camera and come out where the gimbal motor is.
Yes it arrived today but no instructions or indication how to set it up. It looks very good quality but without instructions I will not take any risk of frying the board. My first thought is how do I connect the camera to the AV because there is no room unless I invert the camera and come out where the gimbal motor is.
Went out and bought a 2S 1300mAh lipo tonight and just hooked it up. Didn't appear to need setting up, gimble held position very well as I moved it about. There was a little judder from time to time, maybe this is the firmware upgrade that was mentioned. Intend to add the 2S to the payload
I have a couple 7.4v loops used for AV monitor. Are you saying you just hooked it upto the +- on the board and it sprang into life?
How about the RC pitch cable?
Yes that was it, the gimbal went true- horizontally and vertically - as for the rc pitch cable hmm. I'd assumed I would have to alter the attitude of the gimbal to point down via the firmware. Unless you could advise me otherwise. This lack of a manual is a bit of a bummer.
Are you running your wkm on 14.8v? If so you will be able to alter the input voltage via the setup software when it is made avaible. I have to say it is bad form for Rob to distribute something without manual or software.
Thanks for the response, yes I run on 14.8v....just ordered a 2s just in case though. Was hoping to get in the air this weekend but the lack of a manual and software will knock that on the head...doh!
The trouble is that the products are good quality and obviously work well but I need this to work correctly, understand how to change it and convince the EuroUAs/CAA it makes little or no difference or even improve my machine or it can not be fitted and used at all.