Hi Guys
I have been working on a new design for a Camera / Photography Rig and I would like to get some feedback from you all. Please feel free to jump in and let me know what you think. I would hate to be heading in the wrong direction!
I decided to approach the design from a slightly different angle. I wanted something that can be assembled easily with cheap materials. (Laser cutting is required but this can be done surprisingly cheaply) I have chosen 1/8 (3.75mm) Light Ply as its light and strong and I believe it to be suitable for the job.
Im sure most people would like to see Carbon or G10 but one big draw back of these materials is you normaly have to use fasteners and spacers which add weight. The nice thing about the 1/8 lite ply is that you fix it all together then use thin CA to wick into all teh joints. So the over all structure is light and strong. Admittedly it makes it a little more dificul to repair. It can be done but is a more involved than un bolting a broken part and bolting on a new one. However I hope to have the parts at such good prices you could just replace whole assemblies an not bother to repair.
I realised that most of the AP ships around seem to have a camera gimbal that is designed to fit onto an existing airframe.
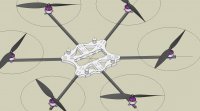
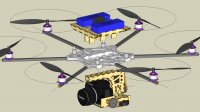
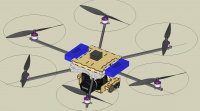
I decided to design my airframe around the camera gimbal but also make it so the camera gimbal can be mounted on another airframe easily. The Airframe is a simple frame that can be swapped out for a different configuration. If you start out with a Quad but want to upgrade to a Hexa its a simple process and should be fairly quick and easy. My first frame will be a Flat Hexa but anything can be done. I may decide to bolt the motors through the Arms or use a simple motor mount that is cheap and readily available from BlueSkyRC such as This one and This one. Basically any common motor arm combination can be achieved.
So
Camera gimbal first
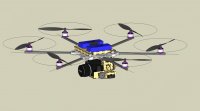
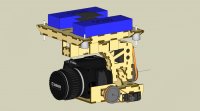
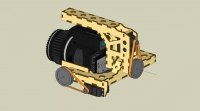
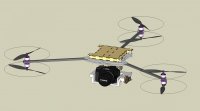
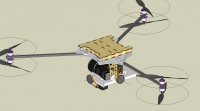
I decided to follow the VerticalView camera mount general layout but address some of its issues.
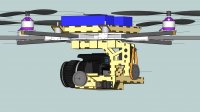
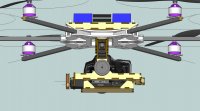
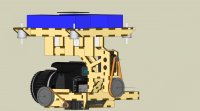
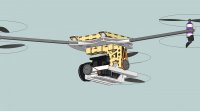
The main camera platform roll axis is held in place by 4 ball races to remove any flexing
The pivot shaft is intended to be a cut down main shaft from a 450 size heli so will be 6mm Diameter and made from hardened steel. Should be easy to cut with a Dremel cut off wheel and if your clever and cut it in the right spot, you should not need to drill it which could be difficult.
The Camera platform pitch axis is also held in place by 4 bearings 2 on each side. Also to be cut down 450 size Heli Main shaft. To be able to use the part of the main shaft that already has the holes drilled you may need to cut down 3 main shafts. However 450 size clone heli parts are super cheap!
All Bearing on the camera gimbal will be the same Flange type and all the same dimensions for easy maintenance and parts supply. (I have yet to finally specify the bearings)
I also believe that the best method to move the gimbal is via belt drive. Please can you guys recommend a drive ratio? What is the drive ratio on the Vertical View mount? Once I know the most common drive ratio I will be able to source the Belts and Pulleys.
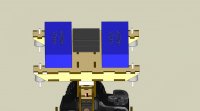
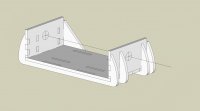
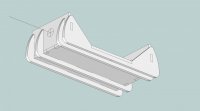
The Gimbal rigidly mounts to the main Radio equipment platform but can also be easily removed.
The Main platform is also designed to mount the FC and the Main Battery Packs. Its this platform that is mounted ontop of the main Airframe via Gelmec Isolation Dampers. The actual spec of these dampers is yet to be finalised and will be determined by talking to the Gelmec engineers and experimentation. Servos I intend to use are Hyperion Atlas DS20FMD as thats what I have in tehspres box! Specs are HP-DS20-FMD 53(Full specs can be found herehttp://www.hyperion.hk/dn/at-ser/atser-mainspecs.pdf) T
hey are full size servos so any full size servo of your choice will fit.
I hope the pictures make the above a little easier to understand. As they say a picture paints a thousand words!
I have calculated the volumes of the materials used and added up the weights of all the other components and I arrive at these figures. Please bear in mind that these are estimates. I have attached a spreadsheet so you can see my estimates please let me know if you think I have overestimated or underestimated some of the components.
Flat 6 Hexacopter All Up ready to fly weight with Canon T2i and 2 x 4s 3000mah packs is estimated at 4.6Kg
Airframe on its own ready to fly is estimated at 2.8Kg Camera mount with Canon T2i would be estimated at 1.54Kg
Main Airframe specs are as follows
Hexa Config diameter of about 800mm
Arms are 10mm Square carbon tube. This may be increased to 12.25mm or ½ inch.
Prop range from 10 inch – 14 inch
Motors AXI 2814/20 or 22 or equivalent
ESCS 40 amp Turnigy / Hoby Wing etc
FC Wooking-M (weight estimates are based using this)
So
I would be grateful to hear your thoughts before I have the first prototype cut. As and when I make any changes updates I will let you know. Once I have finalised the design you guys may be able to convince me to release the drawings Open Source style. I would also maybe offer frame kits and parts for sale if we end up with a good workable solution.
Cheers All
Ben
I have been working on a new design for a Camera / Photography Rig and I would like to get some feedback from you all. Please feel free to jump in and let me know what you think. I would hate to be heading in the wrong direction!
I decided to approach the design from a slightly different angle. I wanted something that can be assembled easily with cheap materials. (Laser cutting is required but this can be done surprisingly cheaply) I have chosen 1/8 (3.75mm) Light Ply as its light and strong and I believe it to be suitable for the job.
Im sure most people would like to see Carbon or G10 but one big draw back of these materials is you normaly have to use fasteners and spacers which add weight. The nice thing about the 1/8 lite ply is that you fix it all together then use thin CA to wick into all teh joints. So the over all structure is light and strong. Admittedly it makes it a little more dificul to repair. It can be done but is a more involved than un bolting a broken part and bolting on a new one. However I hope to have the parts at such good prices you could just replace whole assemblies an not bother to repair.
I realised that most of the AP ships around seem to have a camera gimbal that is designed to fit onto an existing airframe.
I decided to design my airframe around the camera gimbal but also make it so the camera gimbal can be mounted on another airframe easily. The Airframe is a simple frame that can be swapped out for a different configuration. If you start out with a Quad but want to upgrade to a Hexa its a simple process and should be fairly quick and easy. My first frame will be a Flat Hexa but anything can be done. I may decide to bolt the motors through the Arms or use a simple motor mount that is cheap and readily available from BlueSkyRC such as This one and This one. Basically any common motor arm combination can be achieved.
So
Camera gimbal first
I decided to follow the VerticalView camera mount general layout but address some of its issues.
The main camera platform roll axis is held in place by 4 ball races to remove any flexing
The pivot shaft is intended to be a cut down main shaft from a 450 size heli so will be 6mm Diameter and made from hardened steel. Should be easy to cut with a Dremel cut off wheel and if your clever and cut it in the right spot, you should not need to drill it which could be difficult.
The Camera platform pitch axis is also held in place by 4 bearings 2 on each side. Also to be cut down 450 size Heli Main shaft. To be able to use the part of the main shaft that already has the holes drilled you may need to cut down 3 main shafts. However 450 size clone heli parts are super cheap!
All Bearing on the camera gimbal will be the same Flange type and all the same dimensions for easy maintenance and parts supply. (I have yet to finally specify the bearings)
I also believe that the best method to move the gimbal is via belt drive. Please can you guys recommend a drive ratio? What is the drive ratio on the Vertical View mount? Once I know the most common drive ratio I will be able to source the Belts and Pulleys.
The Gimbal rigidly mounts to the main Radio equipment platform but can also be easily removed.
The Main platform is also designed to mount the FC and the Main Battery Packs. Its this platform that is mounted ontop of the main Airframe via Gelmec Isolation Dampers. The actual spec of these dampers is yet to be finalised and will be determined by talking to the Gelmec engineers and experimentation. Servos I intend to use are Hyperion Atlas DS20FMD as thats what I have in tehspres box! Specs are HP-DS20-FMD 53(Full specs can be found herehttp://www.hyperion.hk/dn/at-ser/atser-mainspecs.pdf) T
hey are full size servos so any full size servo of your choice will fit.
I hope the pictures make the above a little easier to understand. As they say a picture paints a thousand words!
I have calculated the volumes of the materials used and added up the weights of all the other components and I arrive at these figures. Please bear in mind that these are estimates. I have attached a spreadsheet so you can see my estimates please let me know if you think I have overestimated or underestimated some of the components.
Flat 6 Hexacopter All Up ready to fly weight with Canon T2i and 2 x 4s 3000mah packs is estimated at 4.6Kg
Airframe on its own ready to fly is estimated at 2.8Kg Camera mount with Canon T2i would be estimated at 1.54Kg
Main Airframe specs are as follows
Hexa Config diameter of about 800mm
Arms are 10mm Square carbon tube. This may be increased to 12.25mm or ½ inch.
Prop range from 10 inch – 14 inch
Motors AXI 2814/20 or 22 or equivalent
ESCS 40 amp Turnigy / Hoby Wing etc
FC Wooking-M (weight estimates are based using this)
So
I would be grateful to hear your thoughts before I have the first prototype cut. As and when I make any changes updates I will let you know. Once I have finalised the design you guys may be able to convince me to release the drawings Open Source style. I would also maybe offer frame kits and parts for sale if we end up with a good workable solution.
Cheers All
Ben