The Movi M5 Review Continues!
It's been a few weeks since we've kicked off the process of bringing our Freefly Movi M5 review to life and a whole lot has been learned so far. Let's backtrack a little bit and bring everyone up to speed on where we're at. Photos courtesy of Freefly Systems.
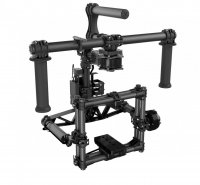
Overall construction of the Movi M5 is excellent and it is capable of carrying cameras ranging from smaller point-and-shoot cameras up to full size DSLR's like the Canon 5D MkIII. The parts fit together very well and generally work as nicely as you'd expect them to. The manual is well written and it is obvious that a lot of effort has gone into both the descriptions and graphics making it very likely that your initial experiences will be both positive and successful.
The
User Guide is very helpful and has six chapters. Chapters One, Two, and Three should be reviewed prior to receiving your Movi M5 and throughout the process of unboxing and first use of your new gimbal. The lessons learned in these chapters ought to stick well enough that you won't need them again unless you have a problem later on. The gimbal is easy enough to learn and the mechanisms intuitive enough that a little hands-on time will quickly turn you from novice to seasoned vet (veteran, not veterinarian).
Two pages worth mentioning are Page 3 which explains the operation of the included battery charger and Page 19 which outlines the steps to install and run the Freefly Configurator (GUI). (The Freefly Configurator runs perfectly via a Bluetooth connection with my Android powered Motorola Razr but it wouldn't install properly using the Next browser that I typically use. Switching to the Chrome browser resolved the problem and allowed the software to download and install properly.) You'll likely refer back to these two pages but everything else in Chapters One, Two, and Three should stick pretty well the first time through.
As you get started you'll make adjustments by loosening lever-actuated clamps so that specially designed fittings can be slid along carbon fiber tubes. There is enough action in the clamps to allow the fittings to slide easily along the tubes. Should any of the clamps eventually lose their gripping ability they can be tightened by turning the socket head bolt opposite the clamping lever.
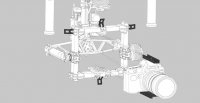
The camera attaches to the Movi M5 via two fixed aluminum extrusions (Upper and lower, attached to the camera with screws) that slide into fittings on the gimbal. These extrusions move in and out very easily so be sure to have one hand on the camera to keep it from falling when loosening the clamps that hold it in place.
View attachment 18490
A detail not specifically addressed in Chapter Two is the likely need to reposition the side bars of the camera cage down when using smaller cameras. Smaller cameras will require you to raise their position during vertical tilt balancing (Pages 9 & 10) and this will likely cause the tops of the vertical bars to hit the Movi's upper frame when the gimbal is compensating left or right in roll. Page 8 explains how to mount the camera by adjusting the top cross-bars to match the height of the camera but to make it so that the verticals won't hit the upper frame, both the upper and lower cross-bars need to be loosened so that the left and right verticals can be slid downward to a lower position. The position of the camera relative to the tilt axis will stay the same but the verticals will be lower thus eliminating interference of the different frame parts above the camera. When switching from smaller to larger cameras this may be an additional adjustment that will have to be accommodated (reversing what you've done for the smaller camera, in my case a GH3 with a 12mm prime lens) but it is easy enough to accomplish and so it isn't a huge problem.
View attachment 18491
IMPORTANT.....there are wires running throughout the Movi M5 which will affect the balance and movement of the gimbal if they become twisted. The most noteworthy wire is the one that runs through the right side tilt pivot point to the sensors under the lower camera mount. Unpowered brushless gimbals are very happy to flip and turn on a whim as you're working on them and it's easy to lose track of this wire's condition. By letting a few twists of it go unnoticed it will interfere with your efforts to balance the tilt axis and with the stabilization of the camera. Keep it from getting twisted though and you'll be fine.
Chapter Three explains the transition from hand-held mode to multi-rotor mode (terrestrial to aerial) and it shouldn't take more than five to ten minutes to complete this process once you've done it a few times. For what it's worth, having the included stand nearby makes it a lot easier.
View attachment 18492
Moving right along to Chapter Four we get to work using the Freefly Configurator software to tune the Movi M5 for our specific combination of camera and lens. This is where Freefly's Movi gimbals really stand out....they can be used with a wide variety of camera/lens combinations and require only a relatively small amount of tuning and balancing with each change of equipment. The settings used to tune the operation of the Movi M5 are the Stiffness, Gyro Filter and Output Filter.
The Stiffness settings (Tilt, Roll, and Pan) will be used the most. As explained in the user manual, “
The 'Stiffness' setting adjusts the degree to which the Movi tries to correct for unwanted camera movement. The 'Stiffness' setting needs to be set as high as possible without creating unwanted oscillations.” Increase stiffness too much and the whole gimbal assembly will vibrate so much that you'll see and hear it. Reduce the stiffness enough and the vibrations will stop.
With a little practice you'll learn to tune the Movi M5 by feel using light fingertip pressure to feel when the oscillations are barely there or not there at all. I've learned to give the gimbal a tap with my finger while holding it very lightly to see if the tap causes the GCU to send out tremors (similar to a doctor hitting your knee to test for your natural reflexes). I've yet to discover what constitutes optimum tuning but I'm working on it.
") IMPORTANT.....Freefly publishes a very helpful spreadsheet with suggested settings for some of the more common camera body/lens combinations. These settings may not be perfect for every user but they will give users a good idea if they're on the right track when getting started or when trying something new. The spreadsheet can be found HERE
IMPORTANT.....Freefly publishes a very helpful spreadsheet with suggested settings for some of the more common camera body/lens combinations. These settings may not be perfect for every user but they will give users a good idea if they're on the right track when getting started or when trying something new. The spreadsheet can be found HERE
'Majestic Mode' is another term you'll encounter a lot in the process of learning to tune and operate the Movi M5. Majestic Mode is available on both the Pan and Tilt axis and with it the Movi M5 will filter out smaller movements while still allowing the operator to smoothly make larger pan and tilt movements. It's a tough task for the gimbal to do this as the GCU has to accurately interpret the small movements from the larger movements and follow along without messing up your shots. It's a feature used in single operator mode and mostly when on the ground although it can also be used when airborne without a second/camera operator. Majestic Mode and related tuning are explained thoroughly on page 22 of the User Guide.
The controls provided for the second/camera operator via a standard RC transmitter can be broken up into the need-to-have and the nice-to-have. Need-to-have controls would be the mode switching channel and gimbal control channels which both work via switches and sticks on the transmitter. Nice-to-have controls include speed adjustments for the pan and tilt axis, trim adjustment for the roll axis, and a kill switch that immediately shuts down the gimbal when necessary. These controls can all be accessed by a second operator when being used on the ground or in the air.
The three position gimbal mode switch (Page 28 of the manual) does different things depending on if the gimbal is configured for
ground or
airborne use (Use the Movi Configurator GUI to switch between ground and airborne modes).
The first position of the switch is the Dual Operator mode and this is the same for both ground and airborne use. It enables an RC transmitter to actively control pan and/or tilt of the camera while automatically keeping the camera level in roll (Roll can be trimmed at any time using the rudder trim on the radio). The gimbal will work to maintain a fixed heading for the camera (aka Heading Lock) until it is directed to move via the Pan control (Right Tx stick left or right). In Dual Operator mode the tilt axis may or may not be controlled by the second operator and so it is possible for the gimbal to be left in Tilt Majestic Mode although this would only make sense on the ground.
The second position for the three position mode switch is Majestic Mode (on the ground) or Home Mode (in the air). Majestic Mode has already been explained but Home Mode will return the gimbal to a forward facing position to help the pilot with orientation when returning from a flight for landing.
The third position on the ground and in the air is Kill Mode which enables the operator to shut down the gimbal completely in the event of a malfunction or emergency where further gimbal movement might cause damage to the helicopter or the gimbal itself.
For the money you'd expect the experience of buying and operating a Mōvi M5 to go well with success never in doubt. In conducting this review I'm happy to say that the Mōvi M5 has lived up to expectations with a top quality manual, sensible mechanical design, software features that expand its utility beyond basic stabilization functions, excellent quality parts/fitment, and, most importantly, performance that is industry leading without an overly lengthy or technically difficult learning curve. Add to all of that that the Mōvi gimbals are already seeing aftermarket accessories being released and you're looking at a very worthwhile investment for your professional media operation. For the user that hugs the blurred pro-hobbyist boundary, the Mōvi M5 will serve you well for what will likely be years to come.
Should you encounter problems with your Movi M5 there are two pages of definitions in the User Guide (Pages 23 and 24) as well as two pages of troubleshooting guidelines (Pages 32 and 33). MultiRotorForums.com has an increasingly active group of Freefly users so also keep in mind that help may be just a forums post away. More serious problems and warranty issues can be addressed via an RMA process that begins at the Freefly website.
We will continue to post here as we continue to fly and become more familiar with the Movi M5.