Darson Hall
Member
Watched the first video of the unboxing. The suspense was killing me... Had to find out. Was late for work. Will be watching. Best of luck.
-Darson
-Darson
SOOOOOOooooooo tired of farking around with the Alex firmware, floating gyros and typical do the same thing expect different results tuning... Like many others am a half second and twitch from this review and an M5...
")
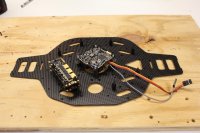
Are you stacking the BLs on top of each other? Special German heat sink between? Also, how do you program the ESCs? From within the MKTool? Do you have an advance timing in mind you'll start with for testing?
looks like you coming along quite nicely. I'm putting my money on Friday...Saturday rain date.
Watched the first video of the unboxing. The suspense was killing me... Had to find out. Was late for work. Will be watching. Best of luck.
-Darson
SOOOOOOooooooo tired of farking around with the Alex firmware, floating gyros and typical do the same thing expect different results tuning... Like many others am a half second and twitch from this review and an M5...
The trouble is....it's just a review from a guy I don't know. Whatever review you come up with will be the TRUTH....and yours might be more fun to watch.....can't wait.
BTW: Is your lady on vacation, or how did you manage to free up so much "quality time" for your build.....???
Great work so far in an impossible taime frame....
Chris
still remaining to be resolved, where to put some LED's and which wireless video frequency to use? I've been using 5.8ghz but I also have a complete 1.3 mhz system here complete with a IBcrazy Tx antenna.
any opinions on the two options?
still remaining to be resolved, where to put some LED's and which wireless video frequency to use? I've been using 5.8ghz but I also have a complete 1.3 mhz system here complete with a IBcrazy Tx antenna.
any opinions on the two options?
) so more on that later this evening!