first build thread: lessons and learning to follow...

Motopreserve

Drone Enthusiast
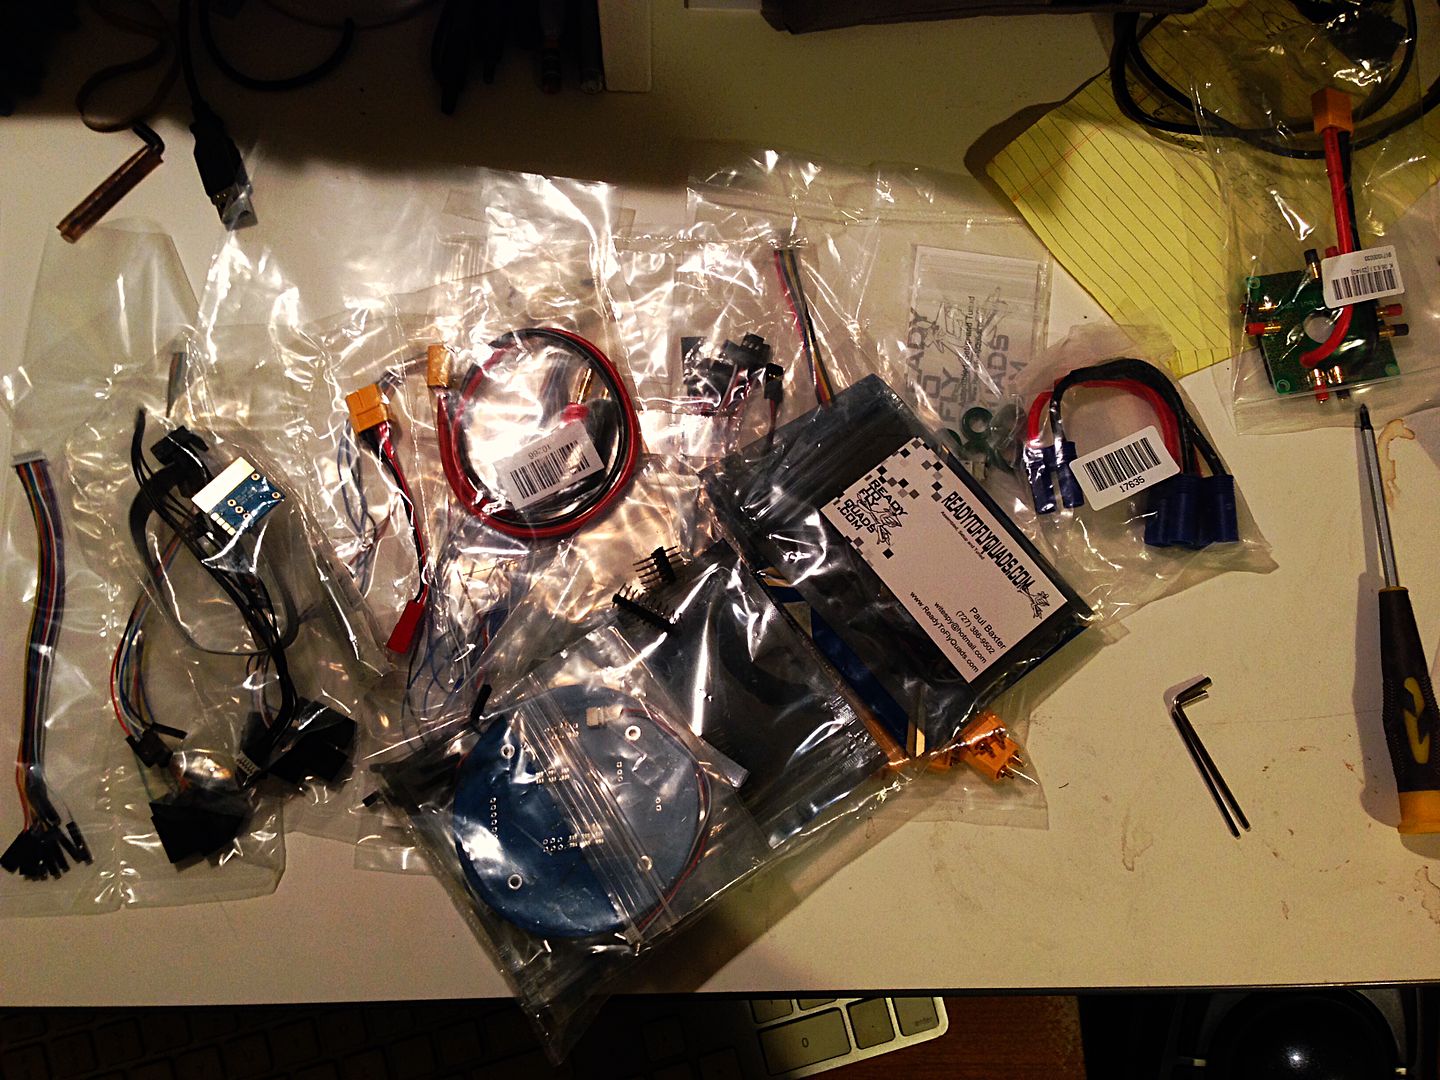
Diving headlong into the world of quads for the first time. After a ton of research, shopping on 48 web sites, 2 unanswered posts on 2 different forums for quality check opinions, I finally just decided to trust the info I'd found and eCalc, and go for it! Been waiting on the parts for what feels like forever, but most everything arrived today...

The majority of gear was purchased from Hobby King. I snagged the parts for the build as well as some of the basics needed (battery charger, extra nylon hardware, connectors, ESC flashing tool etc). They seemed to have decent prices, and availability from one place for most everything was a plus.


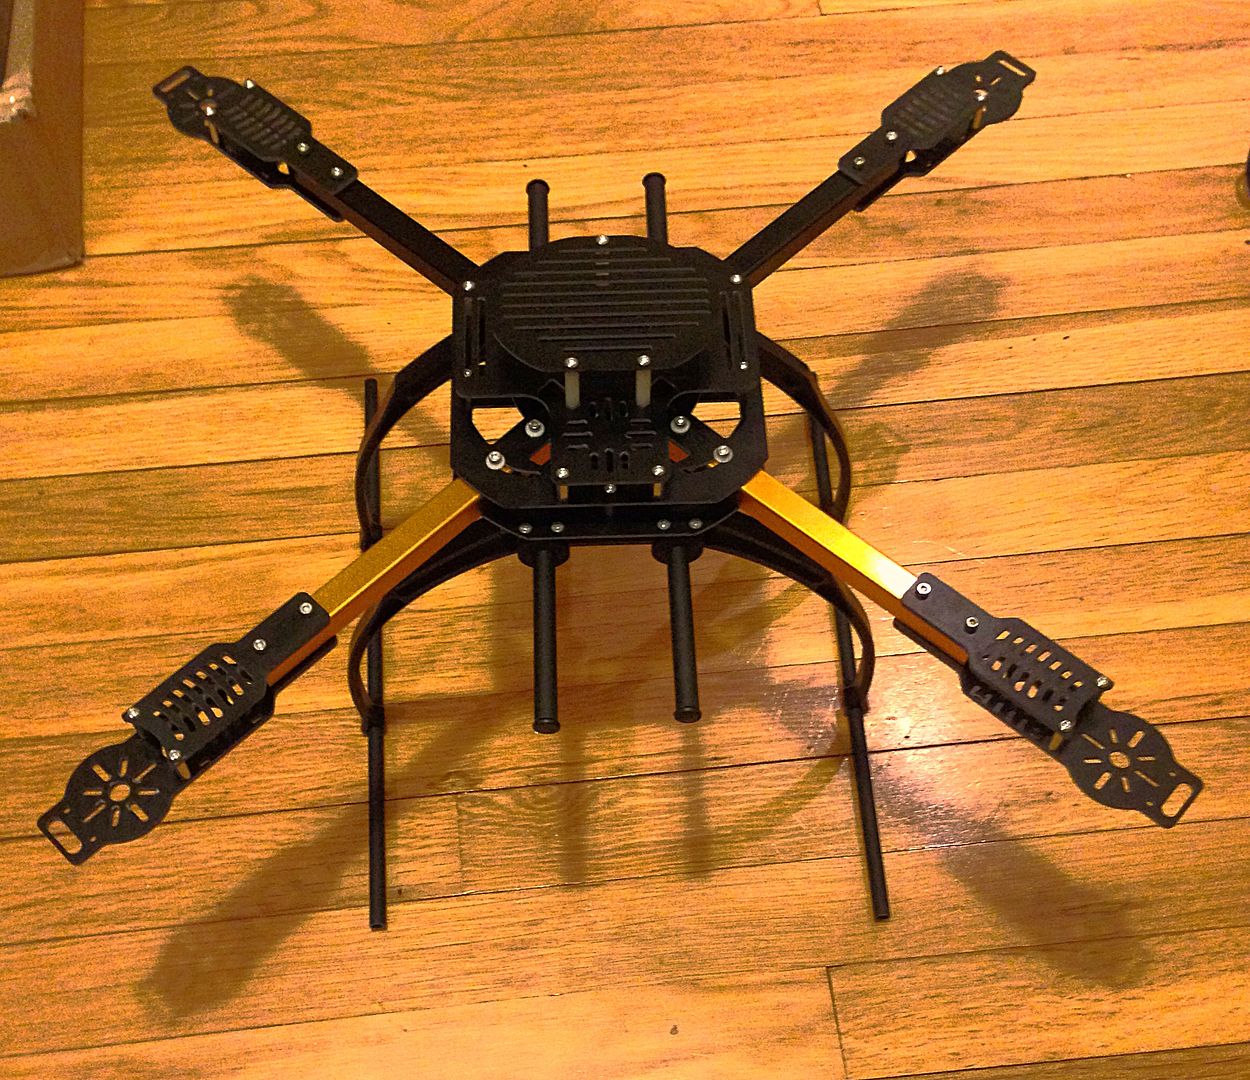
Basing this quad on the hobby king x650f. Seemed to have some decent room for stashing electronics and reportedly decently crash resistant. I just put it together loosely so I can plot out where all the electronics will go. Later ill mod the ends of the arms/motor mounts to better fit the ESCs and loctite everything in snug.


For a noob, the real challenge will be to get the Witespy MultiWii Pro ez3.0 rigged up and running right. I ended up purchasing a few extras from Paul that will probably be added later. Baby steps and all...

here are we go...
 

Motopreserve

Drone Enthusiast
A little progress...

Finally got a chance to work on the build today.

First thing: flash the ESCs. I didn't want to wait until I had them on all nice and neat , and THEN remember I was supposed to do that. :) Used the SimonK software (another donation/contribution is in order) with the latest version that was in the repository. I saw a video of a guy who only cut back the heat shrink enough to get to the chip - so I followed his lead and did the same. Flashed it, slapped a little wrap back over it - and still have the sticker/info partially visable.

I then soldered all the bullet connectors onto the ESCs and got the heat shrink tidy.


I ended up ordering a power distro board for this build - and after cramming it into the space between two of the frame plates - I'm really wishing I had just made my own harness. The way I have it now is neat and keeps things out of the way, but it was a pain in the d*ck to get the leads into the female ends once it was buried in there!

Next up was some loctite on the screws in the frame and getting the motors mounted so that I could run the wires. I thought I had a "vision" of where everything should be before getting started, but I really found that you have to get the parts on the frame to see it. I ended up changing everything!


Tomorrow is where the going gets tough. I need to do all the ESC programming & calibrations, set the TX up to work with the Witespy FC, and figure out the futaba R7008sb receiver (which has the WORST excuse for a manual I've ever seen - and the transmitter manual is rough at best)...

Oh boy! Onward....
 

Motopreserve

Drone Enthusiast
Getting a little closer. The frame is back together - the layout is now probably a little top heavy. Need some alternate hardware to lower it. For now it stays while I calibrate and tweak the multiwii. Need to move on. It looks like a Japanese rock garden structure...


Motopreserve

Drone Enthusiast
Need to calibrate the ESC/throttle today, as well as dig into the settings for the multiwii (which seems like will be an ongoing project!). Got a chance to balance the props last night. Ended up getting the "Top Flite" magnetic balancer on recommendation here. The props I started with (I bought several sets) were Gemfan composite props.


trix

Member
nice build going on here , im in the same boat as you and ordering parts for my quad but i just wanted to know wich battery u are using
 

Motopreserve

Drone Enthusiast
Thanks trix. I'm trying to keep sane and organized at the moment dealing with the FC. I knew there'd be a learning curve to the multiwii - but good grief! You could program this thing to run the space shuttle if you tweak it enough... Being familiar with arduino is not enough!

The battery: ended up going with the turnigy nano-tech line on the recommendation of several members here. I got the 3S 5000mah 35c from hobby king. It's heavy at nearly 300 grams (I weighed it), but I'm hoping I can strike a balance between weight and flight time (the never ending struggle it seems). I'm realizing I may have to change some components - but it seems that these batteries should serve me well for this build and possibly future ones too, if I care for them correctly.

Scott
 

trix

Member
you got a heavy one there :p that is for sure the never ending battle but i think im going to give up my two batteries for a what larger one with a higher c rating .
semss like we are into the same stuff , rc and arduino :) love that hing but i'm not going to mess up your clean build anymore so have great time tinkering with it and keep us up to date with your progress , i will to

Trix
 

Motopreserve

Drone Enthusiast
No worries! You're the only person that even posted anything in this thread besides me :) I'll keep posting though - and hopefully this thing will fly soon. Of course the snow on the ground will not help...
 

COMike93yj

Still Building!
Awesome job on the build so far Moto!!!

It truly does look like a Japanese Pagoda!!

What did you get for a power distro board? Could you have made a wire harness that you could zip to the arms/frame and eliminate the extra plate of the power distro board?

I think that is what you are getting at right? Some quads have the power distro built into the frame but I am still trying to decide if that would be OK for me. Seems that in a crash a wire harness would be easy to just reconnect if needed.

I like the looks of your balancer!

Apologies for not responding earlier but as you know my recovery has been a tad bit rough and today is essentially the day I can actually type on the forums ;)
 

Motopreserve

Drone Enthusiast
I ended up getting THIS power distro board. I think I'm fine with it for now - but I think the homemade one would offer more flexibility, and would only take a few minutes to solder. Might be one of the changes I make as the build progresses. The frames with the internal power seemed cool at first, but then I began to worry about the possibility of shorting something out accidentally. Not sure if this is an issue with these frames, just my gut reaction.

The balancer is pretty swank. It actually wasn't costly, and is fully magnetic - the shaft floats on a magnetic field between two magnets.

No worries on the delay. Just work on healing and you will be fling before you know it!


Motopreserve

Drone Enthusiast
Progress...

Made some progress with my understanding of both the multiwii format and the Futaba as well. At this point, small gains feel like massive victories...

I took time out from researching to protect some of the super-small wires that plug various components into the multiwii board. While I know I can't crash-proof this whole quad, I'm trying my best to shore up preventable accidents waiting to happen...


The harness' that connects the ESCs, RX channels and OLED screen (for onboard adjustments like a KK2 has) are made with what seems like microscopic wires. Afraid they'd get torn in a crash - I decided to slide some heat shrink over it. The challenge is to use a small enough size, while still being able to get the end connectors through. These are all using the small type that are used on 1C batteries (don't know the name). So I grabbed some string, tied it onto one end, and snaked the string thru the heat shrink. That way a slight tug when it gets lodged in there allows it to make it all the way through to the end.


I'm hoping this might be a little more protected and safe, as well as more tidy.


Motopreserve

Drone Enthusiast
Not much testing I can do with a few inches snow on the ground, and another 10" on the way...

After reading all the battery safety and procedure threads I could, and hearing the horror stories about these Lipos going up in flames, I decided to devise a make-shift charging bunker until I can get something more permeant going.

I had an aluminum box that I wasn't using, bought at a garage sale with some great tools in it. I was suckered by the scrawl the previous owner had made on the outside.


Had some sand at the shop, put a garbage bag in the bottom as a liner, and filled it with the sand. Then I cut some cardboard (I know, it's flammable, but I don't have a battery bag yet) as a place to put the battery without getting sand in the connectors.


Temporary, and hopefully never has to be tested...
 

jbrumberg

Member
Thanks for sharing Scott. Good work. I'll be following your build. I am still awaiting delivery of some parts that I forgot to order on my H.A.L. project and some additional parts and materials that I want to use for modifications. BTW- I love your charging bunker. :)
 

Motopreserve

Drone Enthusiast
Thanks for sharing Scott. Good work. I'll be following your build. I am still awaiting delivery of some parts that I forgot to order on my H.A.L. project and some additional parts and materials that I want to use for modifications. BTW- I love your charging bunker. :)

Thanks J! Good luck on your build. The excitement turns to torture as you await your parts... I was fortunate enough to think of ALMOST everything from the get-go, so I was able to get most of the build done fairly quickly. The only things I need now are small stuff that may make life a little easier/safer - like a battery charging bag!

My mother always said "necessity is the mother of invention." I would amend that to include "battery explosion paranoia is the father of invention!" :dread:
 

COMike93yj

Still Building!
Scott!

Awesome repurpose of the tool box! I am also pretty paranoid about the battery issue. My wife would kill me if I burned the house down! LOL
 

Motopreserve

Drone Enthusiast
Definitely don't want to burn the house down!

I am finally putting the 'discharge to storage level' feature of my charger to use for the first time. I had charged it up for testing, but will not be doing much of that in the impending snow... I put the battery in the makeshift tray inside the sand lined box and ran the wires out under the lid. Ultimately I'll drill a hole in the permanent box I make.


The one thing I forgot to mention in the other post was that I picked up an extender for the balancing plug. My aim was to use it only for running a longer lead for the onboard battery alarm I bought - but it came in handy for running the balance function on the charger - keeping the charger on the outside of the sand bunker. For some reason the main +/- leads are plenty long, but the balance wires are not.

And here it is in action. I set an alarm to go off on both the charger and my phone to check it. Doing this storage discharge indoors, as the first of 10" of snow is falling outside in the 4 degree weather. Seems like that's too cold for the battery in the garage...


Top