Tarot T810 build log

Old Man

Active Member
You're not supposed to let the air out of it;) No, a hissing sound is not normal. Should be silent.

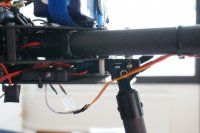
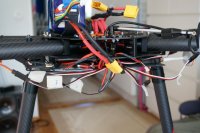
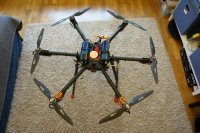
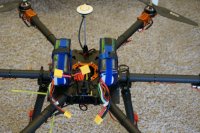
Put mine, with the Eagle Tree Vector, into the air for the first time last Sunday. The Vector can handle the size of it but I kept getting an sBus error message the repeatedly generated auto land. I wasn't using the best batteries, some slight puffy 6000mA 4s packs that are soon to be disposed of. Amperage maxed in the 30-ish zone.


Old Man

Active Member
Too many years of gas two strokes and things that go boom. My hearing is not good enough to hear what you reference.
 

Well, it should be possible to hear at max volume. It could be normal beeping if it would be "cleaner" so and, like the one from ESC. But I've never heard such "noisy" beeping from electronic devices
 

eskil23

Wikipedia Photographer
Sounds just like an old 28.8 kbaud modem. ;-)
Anyway, it is not supposed to hiss, it is supposed to play a little tune of status beeps.

Another thought; I don't know how your are planning on mounting that carbon fiber plate on your drone, but if the Naza is not mounted dead center it will not fly good. It looks like you have mounted the power distribution board in the center instead.
 

Ok, so it should give some sound together with blinking. Let's assume that I'm too paranoidal.
Should it be precisely in the center? Manual says "close to center". Do a few cm matter?
 

Landing gear mounting. Tarot retractable gear TL96030 was selected due to necessity to remove it from the field of view of camera during video panning.
http://www.tarot-rc.com/index.php?main_page=product_info&products_id=1263
Probably, the most ugly piece of equipment in this drone. Mounting brackets has holes at 28 mm distance, while standard 6 brackets keeping unfoldable booms have 32 mm distance. Replacing one of brackets and drilling two 3mm holes with 28 mm distance in between right next to holes with 32 mm doesn't sound wise. It would be easier if this brackets would have just all-through thread, without hole distance change. Well, attached them to the booms outside of frame
View attachment 24629
Another pair of holes on the leg mounting plate is again at stupid 20 mm distance, had to drill the bottom plate. Why not make 32 mm distance to fit to existing holes?! Moreover, threaded holes on the mounting plate are so close to the plate body, that bolts can be inserted only from the other side. Bolts heads are now inside of the body and it would be pain to tighten if they get loose.
View attachment 24630
The final disappointment was brought by the control unit TL8X002. Very lousely made, connectors tend to fall out from the body. Body is fixed with Allen screws with the tiniest hex I've ever seen. Pain to disassemble to fix.
 

Attachments

  • DSC00511.JPG
    DSC00511.JPG
    55.2 KB · Views: 321
  • DSC00507.JPG
    DSC00507.JPG
    88.6 KB · Views: 283

Power distribution system.​
I was following an advice to keep it as modular as possible. Wiring is made of 4mm2 (approx 11 AWG) cables. Next time I'll use silicon coated wires, they are more flexible. Tarot power distribution hub was used. http://www.hobbyking.com/hobbyking/...wer_Distribution_Hub_for_OctoCopter_1pc_.html
22V wires from the bottom go to the electronic deck. Tightening bolts for arms were replaced with Allen bolts to save space. A piece of plastic card was mounted under the power hub to avoid shortening of bolts by the conducting carbon frame.
View attachment 24631 View attachment 24632 View attachment 24633 View attachment 24636 View attachment 24637 View attachment 24638
 

Attachments

  • DSC00486.JPG
    DSC00486.JPG
    136 KB · Views: 305
  • DSC00488.JPG
    DSC00488.JPG
    96.6 KB · Views: 311
  • DSC00498.JPG
    DSC00498.JPG
    94.7 KB · Views: 301
  • DSC00483.JPG
    DSC00483.JPG
    48.8 KB · Views: 308
  • DSC00613.JPG
    DSC00613.JPG
    127 KB · Views: 280
  • DSC00618.JPG
    DSC00618.JPG
    53.1 KB · Views: 277

Electronics were mounted on a 2mm thick A5 (15x21 cm) carbon plate. Carbon plate was attached by 4 M3 x 60 mm bolts (rather rare thing to find, had to order it from UK) into holes leading through mounting brackets. Plus two bolts and nuts on sides, through some free holes. 2x1cm nylon spacers were used to provide 2cm clearance. Wiring looks messy, will fix it later.
View attachment 24639 View attachment 24640 View attachment 24641
 

Attachments

  • DSC00610.JPG
    DSC00610.JPG
    133.8 KB · Views: 261
  • DSC00615.JPG
    DSC00615.JPG
    56 KB · Views: 298
  • DSC00614.JPG
    DSC00614.JPG
    87.3 KB · Views: 288

Tarot CW and CCW adapters appeared to have too long threadless part, so couldn't tighten props. Need to find some properly sized washers
http://www.rctigermotor.com/html/2013/adapter_0916/73.html
Therefore, used adapters supplied with props. Nevertheless, it would be nice to use the above mentioned adapters, it can make props removing for transportation easier.
View attachment 24642

Primary control will be performed by Futaba 8J. Camera will be operated from Walkera devo F4, which has a build in screen. An additional SMA connector was installed for Boscam external antenna
View attachment 24643
 

Attachments

  • DSC00626.JPG
    DSC00626.JPG
    100.8 KB · Views: 261
  • DSC00593.JPG
    DSC00593.JPG
    132.8 KB · Views: 319

Assembled, without gimbal. Weight 5.0 kg.
I'm going to order Arris 3D gimbal, so total weight will be 6.5 kg, while thrust at 50% should be 5.65. I hope, it is still possible to get reasonable flight time with it.

View attachment 24644 View attachment 24645

Maiden flight
 

Attachments

  • DSC00624.JPG
    DSC00624.JPG
    156.3 KB · Views: 276
  • DSC00630.JPG
    DSC00630.JPG
    111.3 KB · Views: 645

Hm, confused about flight duration.
First and second safety limits in Naza software are 23.10 and 22.20 (3.85 and 3.70 V/cell correspondigly). I have 2x6Ah 6s batteries.
Attached 1.5 kg weight (total 6.5 kg vs 5.64 kg thrust at 50% and 7.8 kg at 65% according to specs) and performed test flight at 1m height over grass. After 5:30 min got Naza led alarm. Battery voltage was 23.7 (3.95 V/cell) and upon recharging, 1.6 Ah were loaded into each one.
Next flight was 8 min, end voltage (measured 15 min after landing) was 23.1 V (3.85 v/cell). Upon charging 2.6 Ah was consumed.

So, certainly longer flight time should be available (12 min?). What should I do with low voltage alarm? Apparently, under the load, voltage drops lower.
 

Dylan M

Which Switch...
Yes, voltage will drop under load. Be careful compensating for it, each craft/payload/lipo set will be different... That is why they allow you to change where your voltage alarms are actually triggered. Glad you got her up and running, I am fond of this frame as well..
 

eskil23

Wikipedia Photographer
Wkm-voltage.png

There are fields for compensation for loss in the NAZA assistant. You can measure the loss by measuring the battery voltage when idle and under full power (you better tie your t810 down good when measure voltage under full load).
 

Glad you got her up and running, I am fond of this frame as well..

Thanks :)
Yes, I'm going to do carefully research on that. Just wonder is it possible to get to the situation, when:
A*h from battery are not fully consumed yet, but voltage drops below acceptable due to high load?

And what ACTUALLY happens when Naza detects 2nd alarm level? Does it decrease copter slowly or just drops it down?
 

Eskil23. I've ordered voltage meter with beeper, so I can check voltage during flight, then land and check again. Will take a while to collect enough of data points, but I'll manage. Just wonder what could be reasonable limits?
 

MadMonkey

Bane of G10
What do you guys think would be the max payload weight to still get 10+ minutes of flight time out of one of these? I'm eyeballing a Gremsy H3 gimbal to carry a GH4... not sure if that would be too much or not.
 

What do you guys think would be the max payload weight to still get 10+ minutes of flight time out of one of these? I'm eyeballing a Gremsy H3 gimbal to carry a GH4... not sure if that would be too much or not.

As I mentioned above, my setup is clearly overweighted (related to motors). Nevertheless, so far I got 8+ min flying time draining 2x3.6 A*h (out of 2x6 A*h) with 1.5 kg additional weight (total weight 6.5 kg)
 

Got my first accident, fortunately minor. At the last moment of landing, when landing gear just touched the ground, strong gust of wind flipped the machine with props still rotating.
How sensitive are carbon props to scratches? Should I replace these two:
View attachment 24685 View attachment 24686
 

Attachments

  • DSC00658.JPG
    DSC00658.JPG
    63.5 KB · Views: 284
  • DSC00655.JPG
    DSC00655.JPG
    62.7 KB · Views: 313


Top