Motopreserve
Drone Enthusiast
Review: DJI Phantom 2 with Zenmuse H3-2D Gimbal
For the past several years, if you have been looking for a self-contained, ready to fly (RTF) quad, chances are you’ve stumbled on the DJI Phantom line of multi-rotor helicopters. Due to an active marketing campaign the Phantom line has become ubiquitous throughout the RC industry and, although the Phantom has its competitors, there seem to be more Phantoms out there flying than any other single offering. If you’re interested in getting started in aerial video, chances are you’ve at least considered one of the Phantoms… admit it, you know you have. When I first got obsessed with multi-rotors, the appeal of a pre-built system was tempting but the tinkerer in me overrode the lure of simplicity. After a ton of research I eventually chose to purchase and assemble the components myself but with that choice came a host of challenges including mining the Internet for information, sourcing parts and a mountainous learning curve. Having chosen the path of utmost resistance, I was well into puttering with my Multiwii code, modified frames and learning to tweak gimbal software when MultiRotorForums.com came knocking.

As fate would have it, Bart from MultiRotorForums.com shipped a package to my door for review. Out of the box popped a DJI Phantom 2, complete with Zenmuse H3-2D gimbal, brand-spanking new and ready for some aerial video. Although you may have read reviews of the Phantom in the past, hopefully this review can provide a unique perspective – that of moving from scratch-built quads to Ready-To-Fly (RTF), instead of the more common other way around. Despite my leanings toward the DIY aesthetic, I relished the idea of just unpacking this quad, charging up some batteries and launching it into the clear blue sky.

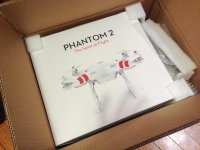
Packaging and Unboxing:
Everyone has seen unboxing videos, and I think we all know that packaging doesn’t make the product. Despite knowing this, when a product arrives in a spiffy box it just seems to inspire confidence. Like Apple before them, DJI pulled out all the stops, wrapping this quad like a thing of beauty. The Phantom 2 comes complete with everything you need to fly except 4 AA batteries for the transmitter (Tx). Although my inner-child wanted to tear into this box like a 5-year old banshee on Christmas morning, the complexities of a multi-rotor (yes, even this RTF one) had me checking myself. Fearing I’d break something before the review even got started, responsibility kicked in and the unboxing was more “for Pete’s sake, don’t drop anything!” Removing it from the box you will find the quad almost fully assembled, requiring only the flight battery to be charged, AA batteries installed in the Tx, and the props spun onto the motors. This is the type of simplicity that has appealed to countless consumers and this approach challenged my preconceived notions and skepticism about the quality possible with a prefab multi-rotor helicopter.


Contents:
The Phantom 2 kit includes; the quadcopter (which is self-contained in a bright, white shell), flight battery, transmitter, 8 props (4 spares), a few tools, hardware and some literature. This package is meant to get you up in the air quickly where you can then work to hone your piloting skills. Except for a single proprietary “Can-bus” port for gimbal power and data, the body of the Phantom 2 hides all the ‘brains behind the operation,’ with everything tucked neatly inside.
First impression after handling the Tx for a bit was that it was rather flimsy. The radio lacks the physical size and weight of the more popular name brands, and with only 2 switches and a single potentiometer lever on the back (for gimbal pitch adjustment), it’s clearly meant for use with this specific craft. Enthusiasts who find the radio limiting, or not up to par with their tastes, also have the option to bind easily with a Futaba radio.
Moving on I singled out the flight battery and charger only to discover that this is a very different type of Lipo. The 5200mah battery is sheathed in a plastic frame with LED indicator lights facing the rear of the quad. These lights serve double duty as a handy “fuel gauge,” letting you know how much charge remains during flight, as well as a charge-status indicator back at home base. The kit includes a special charger which hooks up to the battery in only one way, eliminating the fear of accidentally switching polarity and causing trouble. Rational or not, there is something less threatening about this battery and I found myself not at all worried it might burst into flames.
One of the few things necessary to “assemble” the quad is placing the props on the motors. The included props are specific to the DJI line of motors, with an internal self-tightening nut inside the hub – making the install a breeze. One drawback to this system is that there is a “hubcap” on the top of the hub, which prevents balancing the props. A quick turn to YouTube and I found a makeshift way to balance using a DuBro balancer and some silicone tubing. The package also includes some hardware and a few tools. Despite laying out all of my assembly tools prior to opening the box, it seems DJI had thought of everything, and I never touched my own gear to get this thing flight-ready. Some basic paperwork is included in the box (rare nowadays), but you’re encouraged to visit the web site to get full the scoop on the craft.
The last thing I’ll say about the contents; I would have liked to see the transmitter come with a rechargeable battery. Although disposable AA batteries are cheap, it would be nice (and responsible) to balance the overall package by including a rechargeable battery pack for the transmitter. For me, the appeal of the advanced-feature flight battery was offset a bit by this omission.
The following is a quick (VERY QUICK AND PAINLESS!) look at the unboxing and contents.
Software:
I started charging the Lipo and scooted over to the DJI website to get familiar with the Phantom 2 and to see what info I could gather before diving into my first flight. Much like the packaging, the website is slick and polished, reminding us once again that the folks at DJI have not skimped on their presence. After reading through the marketing splash page, I eventually found my way to the support section. Here the most recent firmware and software can be downloaded as well as manuals and quick-start guides.
The first thing you need to do is download software to connect with each component of the package. Although the main Phantom software (GUI) has limited input to each of the components, to fully adjust parameters you need to download 3 different interfaces. The internal Naza V2 flight controller (FC), Tx and the H3-2D gimbal all have their own software. This seemed more complicated than necessary, especially for an RTF quad with simplicity at its core. Inexplicably, despite having Mac versions for both the FC and Tx software, the gimbal GUI is not yet Apple friendly. But let’s dive in; it’s time to start downloading…

Battery fully charged (love those indicator lights!) and the Assistant Software GUI downloaded, I followed the instructions and connected the Phantom 2 to my computer and was immediately prompted to update the GUI software. I did so, and afterward I was prompted to download and install newer firmware for the Naza FC. Once you’re all set with the various updates, onscreen lies the full potential of this multi-rotor, with one interesting caveat. The default firmware setting that the Phantom 2 ships with has a limited number of functions. These default settings are a simpler, more basic beginner mode. But it only takes the click of a mouse to access the full features, which are tucked away for when you are ready to utilize them. I found this to be a nice touch, erring on the side of caution and safety for those that are just getting started in the hobby. The software install is fairly painless, although at this point I only had a sketchy Windows netbook to download the gimbal software. The reputation of the Zenmuse series is strong, so I hoped it would be unnecessary for my initial flights...

TO BE CONTINUED…
Attachments
Last edited by a moderator:
")


