Picloc 3x setting experience etc.


Not really a picloc issue, but does anyone know where to source a 72 tooth servo wheel for my SAvox roll servo? Preferably in the us. I know 1001copters sells a kit, but I am just looking for the wheel.


daniel, no internet connection is needed. Just connect the picloc to your computer via USB and start toolz. Then press the 'connect' button to establish communication between the picloc and picloc toolz. You may need to change your com port if it will not connect.
 

daniel

Member
Thanks!

daniel, no internet connection is needed. Just connect the picloc to your computer via USB and start toolz. Then press the 'connect' button to establish communication between the picloc and picloc toolz. You may need to change your com port if it will not connect.


GeorgeM

Member
Anyone having issues connecting a DX7 to Picloc ? If you have one, is it working OK ??
I'm asking because there may be a bug in my DX7 code for Picloc. I would appreciate an answer.

I'm also trying to add the JR11X ( Spektrum ) compatibility.... should be good news for owners of this radio. ( still not succeded yet, Jesper.... Sorry !!!.. Please keep using separates.. RX inputs i1 to i5 for now )


GeorgeM

Member
Im trying not to make too many successive updates, by combining improvements in one go. Next version is v0.56 ( .55 is already available from the usual place ).
Be sure to use both firmware build 0055, and Toolz v0.55 ) otherwiZe, there'll be argumentZ between Picloc and Toolz. ;]


flytofly

Member
George, i'd sure like one of those fancy PicLoc thingamajigs! Contacted you and Kopterworx with no reply. Please let me know what I must do to preorder. Thanks so much.
 

GeorgeM

Member
@flytofly ... send me an email and in the subject pls write what you want in caps.


this way, you'll be able to reserve a unit from next incoming batch which is already hot.
 
Last edited by a moderator:


flytofly

Member
MKS HV-787 360 mod

Received a pair of MKS HV-787s and decided to document the 360 modification for anyone interested. It was pretty straight forward similar to most other servos.
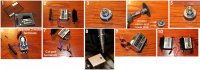
1. MKS HV-787
2. remove 2 screws located at top and 4 screws located at the bottom
3. remove the main gear.
4-5. Dremel the rotational stops on both top and bottom of the main gear (dremeling is the method I used. there may be other methods)
6. locate the motor's 2 power terminals on the board then desolder them. These 2 terminals hold the board in place similar to most other servos.
7. The pot is glued in place inside the servo's case so you will have to render the pot useless in order to remove it. Once you have the board remove you can either solder a new set of longer pot wires directly to the board or use the existing pot wires.
8. Drill a neat little hole in the aluminum case. Sand down any rough edges that may cut any wires.
9. Route your wires through the new hole and solder the board back in place. A dab of silicone should be used to fill the hole you've drilled.
10. You're done. Obviously you'll have to replace the pot with shiny new external one.

View attachment 2244
 

Attachments

  • MKS-HV-787.jpg
    MKS-HV-787.jpg
    138.2 KB · Views: 395
Last edited by a moderator:

Hi everybody.
Does someone work with a Jeti Box and PL 3X ?

I tried with the Jetibox mini and the old standart version, but it always says " waiting for device " .
Its the same if i plug the box directly into PL or if i use the Telemetrie via Jeti RMK 2.

Do you have different experience ?

Regards Jochen
 

hexacop

HexaCop
Today I had problems to get the picloc connecting via the USB cable to the PC. After several attempts I found out the picloc USB socket worked only if I pushed the cable into a certain position with my hand.
I decided to open the picloc case and have a closer look to the electronics inside the box.
You won't believe it but the USB jack was soldered only with the two ground pins of the outer metal shield. None of the 5 pins of the USB jack was soldered to the PCB. Seems it worked fine for a while but after I have pushed the cable a few times into the USB jack it stopped working.
As I'm experienced in soldering SMD parts I did fix it myself and i'm happy it works again. I hope this little bug is not hitting anyone else.
 

Top