mattsPVC
Member
View attachment 3465View attachment 3466
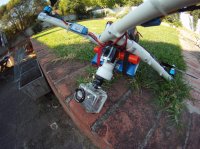
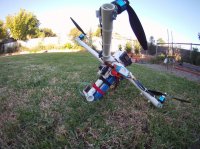
My new PVC T-QUAD design. AN UPDATED VERSION ON PAGE 3
My aim on this build was eliminate the propellers from the gopro's field of view.
And to have a central mass for better stability.
Total cost for the frame would be under $20.
DJI Naza flight controller
Gemfan 9x4.7 props (himodel.com)
NTM Prop Drive Series 28-26A 1200kv & NTM 28 series prop set (from hobbyking.com)
Advance 20A ESC
FPV Gear from (rangevideo.com)
Total Flight weight 1420 grams (with Gopro Camera in housing) NEW GOPRO ANTI-VIBRATION MOUNT, ON PAGE 4
3s 3000mah 25c Zippy Flightmax Battery (Approx 7-8 Minute flight time)(hobbyking.com)
Materials used & Measurements:
Class18 PVC Pipe 15mm
Arms x4 @ 20cm
Centre joiners X4 @ 3cm
Down tube x1 @ 5cm (for Gopro mount)
Cross Tubes x2 @ 5cm (for Gopro mount)
And 5x 15mm T's connecters.
Motor mounts made from: GO TO PAGE 3, I SHOW YOU HOW TO MAKE THEM
Carinya Make a Bracket http://www.carinya.com.au/make-a-bracket?id=24
or the lighter method,
fabricated out of 25mm square aluminium tubing (will need a dremel tool, to help you make these)
And fixed with 3mm x 30mm bolts & M3 lock nuts.
The main body is glued together with PVC cement.
The arms are fixed with three screws.
For the mounting of the Naza Controller I used a sample sheet of wooden flooring laminate.
Build instructions:-
1. Cut the PVC tubing to size.
2. Glue centre body together. (hint! to get centre body level, put 20cm arms in main body then step on main body on flat surface before glue sets, you will only have seconds to do this)
3.make motor mounts.(hint! to get the correct motor fixing holes on your motor mounts make a template out of clear thin rigid plastic (ie from some packaging) drill a hole for centre shaft then place clear plastic sheet on bottom of motor, punch holes in plasic where the screw holes are. Then place plastic tempate upside down on your motor mount to give you the hole locations.)
4. Mount motors on arms with propellers & insert into main body.
5. To get your 4 motors and propellers level with main body. Turn your Quad upside down & place on level surface (ie. table). use a ruler to measure distance from outside edge of propeller to table, both sides of propeller should be equal distance to table, if not trist arm till equal distance. Repeat for the other 3 arms.
6. Drill 3 holes in each T adapter and arm. Fix with 3 screws.
7. Mount Flight controller on sheet of laminex. Fix to main body, Take some time in aligning controller, needs to be pointing foward between two arms.
The DJI Naza settings are as follows:
Pitch 95%
Roll 95%
Yaw 90%
Vertical 70% (Have set up as remote adjust (X2) on radio, variable from 50% to 170%, slow vertical movements to fast vertical movements)
Pitch Atitude 85% (Have setup as remote adjust (X1) on radio 85% for fast flying, 52% for slow stable flying, & 40% for super slow stable flying)
Roll Atitude 75% (Have setup as remote adjust (X1) on radio 75% for fast flying, 46% for slow stable flying, & 40% for super slow stable flying)
Radio & Transmitter: JR DSX9 MK2 2.4G DSM2 Transmitter w/RD921 Receiver (Mode 2) from hobbyking.com
This is my current FPV. (first person view). set up.
Ground station:
1x 1.3ghz 8dBi Patch receiver antenna. from rangevideo.com
1x 1.3GHz 3dBi Antenna. from readymaderc.com
2x standard 1.3ghz receivers. from rangevideo.com
1x Eagle Eyes FPV Ground Station. from hobbyking.com
1x Fatshark video goggles. from hobbyking.com
1x 3s 2200mah battery. from hobbyking.com
Quadcopter:
1x 1.3GHz 300mW audio/video transmitter with standard antenna. from rangevideo.com
1x 900MHz / 1.3GHz low pass filter. from rangevideo.com
1x KX-6 Micro color CCD camera. from rangevideo.com
1x Camera to harness cable set. from rangevideo.com
1x Wire harness for video transmitters. from rangevideo.com
1x 3s 500mah battery. from hobbyking.com
Attachments

Last edited by a moderator: