You are using an out of date browser. It may not display this or other websites correctly.
You should upgrade or use an alternative browser.
You should upgrade or use an alternative browser.
Build TBS Disco modded to X8 AQ FC and ESC32
- Thread starter BorisS
- Start date
Hi BorisS, I am not an expert but aluminium alloys with Magnesium and silicon would posibly be the material to use (6000 series).
Wrought alloys (From Wiki)
6061 aluminium alloy
(available in Angle, Channel, Hex, I-Beam, Pipe, Plate, Rectangle, Rectangle Tube, Round, Sheet, Square, Square Tube, Tube)
<!-- /firstHeading --><!-- bodyContent --><!-- tagline -->
6061 is a precipitation hardening aluminium alloy, containing magnesium and silicon as its major alloying elements. Originally called "Alloy 61S" it was developed in 1935.[SUP][1][/SUP] It has good mechanical properties and exhibits good weldability. It is one of the most common alloys of aluminium for general purpose use.
It is commonly available in pre-tempered grades such as 6061-O (solutionized) and tempered grades such as 6061-T6 (solutionized and artificially aged) and 6061-T651 (solutionized, stress-relieved stretched and artificially aged).
The International Alloy Designation System is the most widely accepted naming scheme for wrought alloys. Each alloy is given a four-digit number, where the first digit indicates the major alloying elements.
I do not know if this info is helpfull, I assume you are looking for an alloy that is easy to machine otherwise its going to cost a fortune to manufature these arms, you could make a pattern and a mould and then have them cast?
Regards Bruce[/SUP]
Wrought alloys (From Wiki)
6061 aluminium alloy
(available in Angle, Channel, Hex, I-Beam, Pipe, Plate, Rectangle, Rectangle Tube, Round, Sheet, Square, Square Tube, Tube)
<!-- /firstHeading --><!-- bodyContent --><!-- tagline -->
6061 is a precipitation hardening aluminium alloy, containing magnesium and silicon as its major alloying elements. Originally called "Alloy 61S" it was developed in 1935.[SUP][1][/SUP] It has good mechanical properties and exhibits good weldability. It is one of the most common alloys of aluminium for general purpose use.
It is commonly available in pre-tempered grades such as 6061-O (solutionized) and tempered grades such as 6061-T6 (solutionized and artificially aged) and 6061-T651 (solutionized, stress-relieved stretched and artificially aged).
The International Alloy Designation System is the most widely accepted naming scheme for wrought alloys. Each alloy is given a four-digit number, where the first digit indicates the major alloying elements.
- 1000 series are essentially pure aluminium with a minimum 99% aluminium content by weight and can be work hardened.
- 2000 series are alloyed with copper, can be precipitation hardened to strengths comparable to steel. Formerly referred to as duralumin, they were once the most common aerospace alloys, but were susceptible to stress corrosion cracking and are increasingly replaced by 7000 series in new designs.
- 3000 series are alloyed with manganese, and can be work hardened.
- 4000 series are alloyed with silicon. They are also known as silumin.
- 5000 series are alloyed with magnesium.
- 6000 series are alloyed with magnesium and silicon, are easy to machine, and can be precipitation hardened, but not to the high strengths that 2000 and 7000 can reach.
- 7000 series are alloyed with zinc, and can be precipitation hardened to the highest strengths of any aluminium alloy.
- 8000 series is a category mainly used for lithium alloys.[SUP][citation needed][/SUP]
I do not know if this info is helpfull, I assume you are looking for an alloy that is easy to machine otherwise its going to cost a fortune to manufature these arms, you could make a pattern and a mould and then have them cast?
Regards Bruce[/SUP]
Last edited by a moderator:
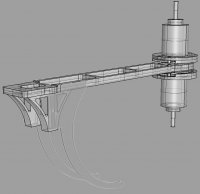
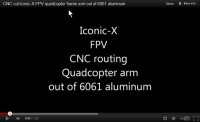
Hi just adding the alloy info, he is also using 6061 to produce his arms for the QAV500
http://www.youtube.com/watch?feature=player_embedded&v=xftlVtoHUPY
View attachment 7697
http://www.youtube.com/watch?feature=player_embedded&v=xftlVtoHUPY
View attachment 7697
Attachments
BorisS
Drone Enthusiast
bruce you made me think and yes this is the better approach I think
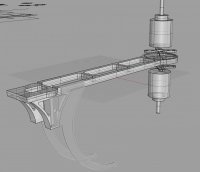
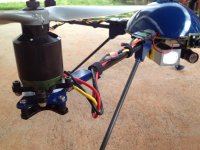
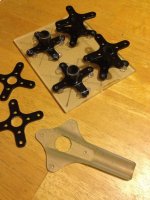
Normal motors mounting is possible and coax setup with these little mounting crosses that come along with the motors. Less weight and costs than producing own mooting plates. This should do it !
<dl class="file" style="margin-top: 0px; margin-right: 0px; margin-bottom: 4px; margin-left: 0px; padding-top: 0px; padding-right: 0px; padding-bottom: 0px; padding-left: 0px; font-family: Verdana, Arial, Helvetica, sans-serif; display: block; "><dt class="attach-image" style="margin-top: 0px; margin-right: 0px; margin-bottom: 0px; margin-left: 0px; padding-top: 0px; padding-right: 0px; padding-bottom: 0px; padding-left: 0px; width: 682px; max-height: 350px; overflow-x: auto; overflow-y: auto; text-transform: none; font-weight: bold; font-family: Verdana, Arial, Helvetica, sans-serif; "></dt></dl>View attachment 7718
Attachments
Hi BorisS, the finalarm.jpg looks good, using the motor cross seems like the easiest / best approach.
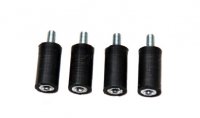
I do not know if this would be of interest to you, just mentioning it because with two motors on each arm vibration might become a problem.
I found this http://www.helifreak.com/showthread.php?t=385525 to be an interesting idea and seems failsafe using mounting crosses as in your design and ordinary cheap bobbins (I assume soft type).
View attachment 7723
View attachment 7724View attachment 7725View attachment 7726View attachment 7727
regards - bruce
Attachments
Last edited by a moderator:
This is not the way it should be done as it is not failsafe and when (not if) the bobbins break, well it will not be good.
http://diydrones.com/profiles/blogs/hexa-frame-continues-anti
View attachment 7730
Regards bruce
http://diydrones.com/profiles/blogs/hexa-frame-continues-anti
View attachment 7730
Regards bruce
Attachments
BorisS
Drone Enthusiast
Adding some dampens to the motors is a good approach. I have just seen to may attempts come and go. To get the right mixture of isolation vibrations but also keeping the stiffness for the motors, can't be a universal approach for all frames and different weight of setups, motors props etc.
Lets see what happened if I have vibration issues i will certainly consider this !
Thanks
Boris
Lets see what happened if I have vibration issues i will certainly consider this !
Thanks
Boris
BorisS
Drone Enthusiast
Some of you asked me for the final prices:
4 Arms with all parts and Landinggear Alu its provided from me and with G10 Landinggear provided from the CNC guy:
€ 433.- a € 108,25
12 Arms with all parts and Landinggear Alu its provided from me and with G10 Landinggear provided from the CNC guy:
Preis: € 698.- a € 58,17
Its pretty expensive although the thread cutting is not done by the CNC guys we would have to do it afterwards ourselves. Alltogehter 8 threads would have to be cut into the ALU.
4 top of the arm to attach them to the TBS plate, 2 at the bottom of the Stils to attach them to the TBS bottom plate and 2 into the stilts from the side to attach the landinggear.
Reminder what its about:
View attachment 7763View attachment 7764View attachment 7765
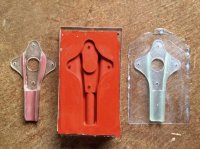
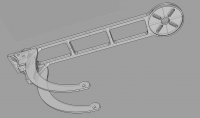
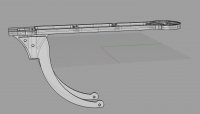
The arms will be able to take 11" props compared to the original DJI arms.
Arms can be used in Coax configuration and normal quad. Like said threads have to be done afterwards. The landing gear is only attached by one screw to the stilts and the second hole you see going through the landing gear and the free space in the stitls, will connect the two landing gear parts with
the dampeners seen below. I wanted this to create some flex in the landing gear so the stress is not completely on the arms if there is a hard landing. If one set up dampners is not enough a second hole can be drilled and another set of dampers can be fitted to the spacing in the stilts on the front side. The end of the landing gear will be attached to each other again probably with the dampeners but a smaller version. So just like with the CS8 landing gear the landing gear will come together closer than were it is attached to the arm/stilts.
View attachment 7766
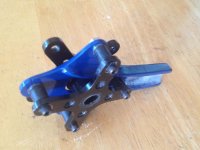
One thing i don't know is in which state the ALU plates are going to reach me. Could be a rough surface before and for sure after the CNC action. So something like this is going to happen again:
View attachment 7767
or I am going to use a ALU spray this time, not sure yet never tried the product.
http://www.alu-verkauf.de/vmchk/ALUMINIUM-SPRAY
To tell the truth i would prefer to have a set done for me and and to have some made if one of you want some. There can always be a mistake and than i don't want to have caused anyone time money etc.
To make this clear I am plainly doing this for the fun of it and I am providing the Material. So there is zero money for me on this no aspiration to make money on this, since its my hobby and thats the way it should stay.
If one of you is interested and wants to take the risk tell me before Monday. It want to get this project of my desk and into the air !
4 Arms with all parts and Landinggear Alu its provided from me and with G10 Landinggear provided from the CNC guy:
€ 433.- a € 108,25
12 Arms with all parts and Landinggear Alu its provided from me and with G10 Landinggear provided from the CNC guy:
Preis: € 698.- a € 58,17
Its pretty expensive although the thread cutting is not done by the CNC guys we would have to do it afterwards ourselves. Alltogehter 8 threads would have to be cut into the ALU.
4 top of the arm to attach them to the TBS plate, 2 at the bottom of the Stils to attach them to the TBS bottom plate and 2 into the stilts from the side to attach the landinggear.
Reminder what its about:
View attachment 7763View attachment 7764View attachment 7765
The arms will be able to take 11" props compared to the original DJI arms.
Arms can be used in Coax configuration and normal quad. Like said threads have to be done afterwards. The landing gear is only attached by one screw to the stilts and the second hole you see going through the landing gear and the free space in the stitls, will connect the two landing gear parts with
the dampeners seen below. I wanted this to create some flex in the landing gear so the stress is not completely on the arms if there is a hard landing. If one set up dampners is not enough a second hole can be drilled and another set of dampers can be fitted to the spacing in the stilts on the front side. The end of the landing gear will be attached to each other again probably with the dampeners but a smaller version. So just like with the CS8 landing gear the landing gear will come together closer than were it is attached to the arm/stilts.
View attachment 7766
One thing i don't know is in which state the ALU plates are going to reach me. Could be a rough surface before and for sure after the CNC action. So something like this is going to happen again:
View attachment 7767
or I am going to use a ALU spray this time, not sure yet never tried the product.
http://www.alu-verkauf.de/vmchk/ALUMINIUM-SPRAY
To tell the truth i would prefer to have a set done for me and and to have some made if one of you want some. There can always be a mistake and than i don't want to have caused anyone time money etc.
To make this clear I am plainly doing this for the fun of it and I am providing the Material. So there is zero money for me on this no aspiration to make money on this, since its my hobby and thats the way it should stay.
If one of you is interested and wants to take the risk tell me before Monday. It want to get this project of my desk and into the air !
Attachments

Last edited by a moderator:
BorisS
Drone Enthusiast
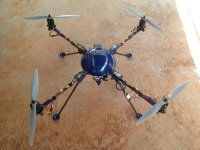
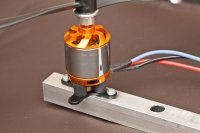
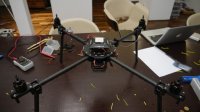
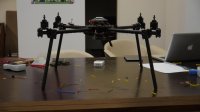
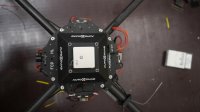
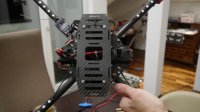
Okay still don't have my parts, but i decided to test the AQ FC on a different frame for now.
I must say i am impressed by what can be done with it ! Hope to have it in the air tomorrow !
The frame is actually also very nice and price wise interesting If i remember correctly around 180 Euros the way it stands here.
View attachment 8122View attachment 8123View attachment 8124View attachment 8125
Boris
Attachments
Last edited by a moderator:
Aah thanks a lot Boris, PM sent!
-meme
-meme
Hi Meme I'll get one lasered for you on Monday send me your adress via pm and I will send it out on Monday !
Arms I should get this coming week than lets see how good they are etc.
Boris
BorisS
Drone Enthusiast
meme made a thread with the explanation for the two parts
http://www.multirotorforums.com/sho...-3-Lense-Proctection-How-to&p=77724#post77724
http://www.multirotorforums.com/sho...-3-Lense-Proctection-How-to&p=77724#post77724
MombasaFlash
Heli's & Tele's bloke
<dl class="file" style="margin-top: 0px; margin-right: 0px; margin-bottom: 4px; margin-left: 0px; padding-top: 0px; padding-right: 0px; padding-bottom: 0px; padding-left: 0px; font-family: Verdana, Arial, Helvetica, sans-serif; display: block; "><dt class="attach-image" style="margin-top: 0px; margin-right: 0px; margin-bottom: 0px; margin-left: 0px; padding-top: 0px; padding-right: 0px; padding-bottom: 0px; padding-left: 0px; width: 682px; max-height: 350px; overflow-x: auto; overflow-y: auto; text-transform: none; font-weight: bold; font-family: Verdana, Arial, Helvetica, sans-serif; "></dt></dl>View attachment 9955
Dunno when you ever find time to sell houses or build MR's, let alone fly them, with all these neat 3D visualisations that you produce for every stage of each project!