Aeronavics / Droidworx SJ8 V2 build - problem with gear rail

Walky000

Member
Hey guys,
I'm building my first MR, the SJ8 v2. Got it in the recent Spring sale.

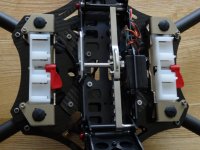
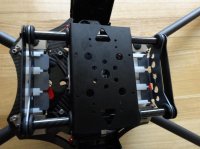
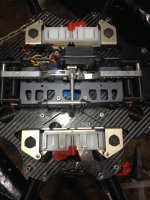
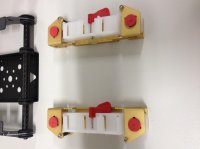
I started building it and from what I can see, after building the gear rail assembly (quick release) I have discovered that I may have an incorrect part.

Looking at the build manual, the QR levers are both supposed to face the front of the craft, and when I position them that way, the one with the QR lever on the open side of the bracket fits to the front of the assembly as it should, but the rear bracket will only fit with the QR lever pointing rearwards, as the slots in the white nylon part that slide onto the gear rail are facing the wrong way.

I am guessing these 2 white plastic bits have a front/rear being 2 separate parts with the slots for the rail to slide into being opposing, so it looks like I have 2 front or 2 rear.

Am I just crap at jigsaw puzzles, or do I need to go back to Droidworx and get them to send the correct part?
 

Attachments

  • IMG_0458.jpg
    IMG_0458.jpg
    145.5 KB · Views: 298

Quinton

Active Member
Your setup looks correct.
TBH to me when I was putting it together, it seems that DW used the same parts twice, but made them both work for the same job instead of making 2 different parts (If that makes sense).
On the back the red release knob fits in nicely with the cutout in the metal plate, while the other side the release knob is just sitting on the plastic. When I first set it up it just looked completely backward.

On the metal bit that goes into these plastic things, you will notice it can go in "either way" as there are 45 degree cut outs, so one goes in the front way the other goes in backwards.
The hardest part of putting things together was this rail, as the rubber grommets are a nightmare to get in, actually I need to take mine apart again as 2 of them are in upside down.
The other picture shows the quick release plate half way in.
Unless I have a wrong part or set it up wrong also :)


View attachment 13896View attachment 13897
 

Attachments

  • gearrail.jpg
    gearrail.jpg
    134.1 KB · Views: 310
  • quickrelease.jpg
    quickrelease.jpg
    132.9 KB · Views: 373
Last edited by a moderator:

Walky000

Member
Quinton,
Thanks for taking the time, and going to the trouble mate, I really appreciate it.
I think I get it now, one of the white plastic bit slides onto the fluted rail from the front, but to me I thought they both had to go on the inside if that makes sense and slide over the flutes toward the outside. I'll take another look tomorrow when I'm back in the studio where I'm building it.

Again mate, many many thanks. :)
 

Quinton

Active Member
No Worries, I didn't get it first time either and thought it was wrong, then my wife showed me it :)
She gets it from building the kids lego parts every day!
The build gets easier after this part, believe me its what took me the longest.
 

kloner

Aerial DP
that threw me off too in the manual...... the white hanger on the gold metal looks strange, can see why they went to the ti color.......

Mine started life like quintons, but it was inducing vibes cause it didn't sit right with the hanger and it was a pain to get on and off....We did ours like this, after flipping it around there is no way for it to leave even not locked and it lines up perfect with the gimbal..... slight stretch to get it on and off,,,,,, the way you pull it apart is a natural feel and simple. thumbs on the plastic, fingers under the hanger on the gimbal

View attachment 13898
 

Attachments

  • 003.jpg
    003.jpg
    139.9 KB · Views: 331

Quinton

Active Member
That is interesting, I am holding off on a gimbal until the Canon 5D Zenmuse is released to see what it is like, it is between that, the GH3 or the Besteady one, so I am not jumping into a gimbal decision, I want it to be right.
Works out this stuff is really expensive, what I have learned is you need to pay for the better gear right from the outset, otherwise you end up buying things twice.

Theres me "thinking" I bought a really good soldering iron from Maplins 48w upto 450 degrees Celcius, but I am really struggling even soldering the XT90s with it as seems to be not enough heat going through quick enough along with the 10 AWG battery terminals, so will have to look at a more powerful gas one tomorrow. Either that or I am just crap at soldering..good excuse anyhow to buy better gear.


Maverick

Member
That is interesting, I am holding off on a gimbal until the Canon 5D Zenmuse is released to see what it is like, it is between that, the GH3 or the Besteady one, so I am not jumping into a gimbal decision, I want it to be right.
Works out this stuff is really expensive, what I have learned is you need to pay for the better gear right from the outset, otherwise you end up buying things twice.

Theres me "thinking" I bought a really good soldering iron from Maplins 48w upto 450 degrees Celcius, but I am really struggling even soldering the XT90s with it as seems to be not enough heat going through quick enough along with the 10 AWG battery terminals, so will have to look at a more powerful gas one tomorrow. Either that or I am just crap at soldering..good excuse anyhow to buy better gear.

Well Quinton,

I have the same soldering iron as you, and it works fine on the big stuff, but you'll need two of these to make life a lot easier...

http://www.amazon.co.uk/gp/product/B004GZA7Z8/ref=oh_details_o00_s00_i00?ie=UTF8&psc=1

OR

you can use the liquid version, here :

http://www.amazon.co.uk/gp/product/B000BQPX8W/ref=oh_details_o09_s00_i00?ie=UTF8&psc=1

AND

Also, make sure your solder is 60/40 tin/lead, and its cored flux... :

http://www.amazon.co.uk/gp/product/B002L5Y8R8/ref=oh_details_o08_s00_i00?ie=UTF8&psc=1
 

Maverick

Member
that threw me off too in the manual...... the white hanger on the gold metal looks strange, can see why they went to the ti color.......

Mine started life like quintons, but it was inducing vibes cause it didn't sit right with the hanger and it was a pain to get on and off....We did ours like this, after flipping it around there is no way for it to leave even not locked and it lines up perfect with the gimbal..... slight stretch to get it on and off,,,,,, the way you pull it apart is a natural feel and simple. thumbs on the plastic, fingers under the hanger on the gimbal

View attachment 17544

Kloner,

This picture is incorrect... You know that, rite...?
 

Quinton

Active Member
Thanks for the replies..
I thought it was the soldering iron myself but maybe you are right, better solder might be a good start.

Looking at the Droidworx PDB manual it recommends at least an 80W soldering iron.
http://droidworx.co.nz/assets/PDB_mounting-021.pdf (page 2)
Thankfully my dealer from Multirotorcraft UK did a really good job of this part for me I would have struggled.


kloner

Aerial DP
and it works perfect.... way better than the copmplete slide on like you guys show.... We fly this thing 2-3 days a week, gimbal off several times a day, absolute perfect footage from the three gimbals that ride it..... I also have it like this on a disco and a hex, way preferred imo. don't see how anybody can find that red lock when it's like you guys are running was the most annoying part....

_DSC1498_595.jpg


i.php
 

Maverick

Member
Cool!!!

I didn't think it could work any other way, only the way DW designed it... You should show DW this.....
 

Quinton

Active Member
At the moment, I don't see a problem with the "correct" setup, easy enough to get on/off, but then again I don't have a gimbal attached yet.
Where did you get the yellow shock absorber grommets from?
 

Walky000

Member
Where did you get the yellow shock absorber grommets from?
They come with the V2 kit, at least mine did. I just bought 2SJ8 kits in the srping sale, and both with red and yellow gromets.

Thanks gents for your help on this issue, I have solved it (for now) as shown by Quinton. I am intrigued by your decision Kloner to buck the trend, and I will certainly keep in mind your configuration if I have vibe dramas.

I agree with you Quinton in that you must buy the best stuff straight up. No mucking about, just suck it up and pay. This will carry my D800/D4 and SONY FS700, possibly Red's so I'm not going to skimp on a few bits and pieces.

What I am having a dilemma with is motor/ESC choices. There seems to be plenty, and like most people I want it to lift an elephant for an hour at a time, so working out the compromises is the hard part. I like the power of the AXi 4120/20, but not the 380gms weight. I will lift DSLR's most of the time, and I have been looking at the AMP Epic 500kv motor (very similar to the KW10 it seems) which they use to build Red lifters, and I wonder how lifting DSLR's on that config would go for flight duration? Sure it will lift it (it lifts Red's) but how much more flight time would I get lifting 2kg loads?

I wonder if I'm better off getting lower kv motors, drive them with biggest props that fit?

dilemma.....
 

kloner

Aerial DP
I like the tiger 3520 on 15x5...... does gh3 to reds all with same gains, same setup... only thing we swap is the gimbal that is always setup per cam....


the new black damps are better than the yellows for the gh3-dslr
 
Last edited by a moderator:

Walky000

Member
That is smooth Kloner. How is your flight times with a Red on those motors, and what battery are you using if I may ask.


Are the black dampers harder or softer? cant find them on their site? I have a pre titanium QR plate that only came with red and yellow.
 

cbpagent72

Member
I am building my skyJib right now as well and I must admit that the rail had me stumped for a bit. Your gear rail looks correct.

Btw I am soldering my pcb and this soldering iron works awesome for me.

http://www.hakko.com/english/products/hakko_fx951_set.html#productNav

Sent from my SPH-L720 using Tapatalk 2
 
Last edited by a moderator:

Top