Running before walking. How to build this copter?

Hey guys!

I had been toying with the idea of building myself a multicopter, but I was pretty hesitant about it because I had little knowledge of what I was doing and I'm broke. But as a thanks from my sister for some wedding junk, she bought me a GoPro and a Bumblebee quadcopter! I have no idea of what I'm doing with it, and I posted to r/multicopter and the guys there gave me some solid info, but I'm much more comfortable with the forum setting than I am with Reddit. They pointed me in a direction of what kind of things to buy, as the set wasn't quite complete (my sis didn't know what she was doing either, she had to ask friends for help) so I'll post some pictures, as they speak more than my little knowledge.
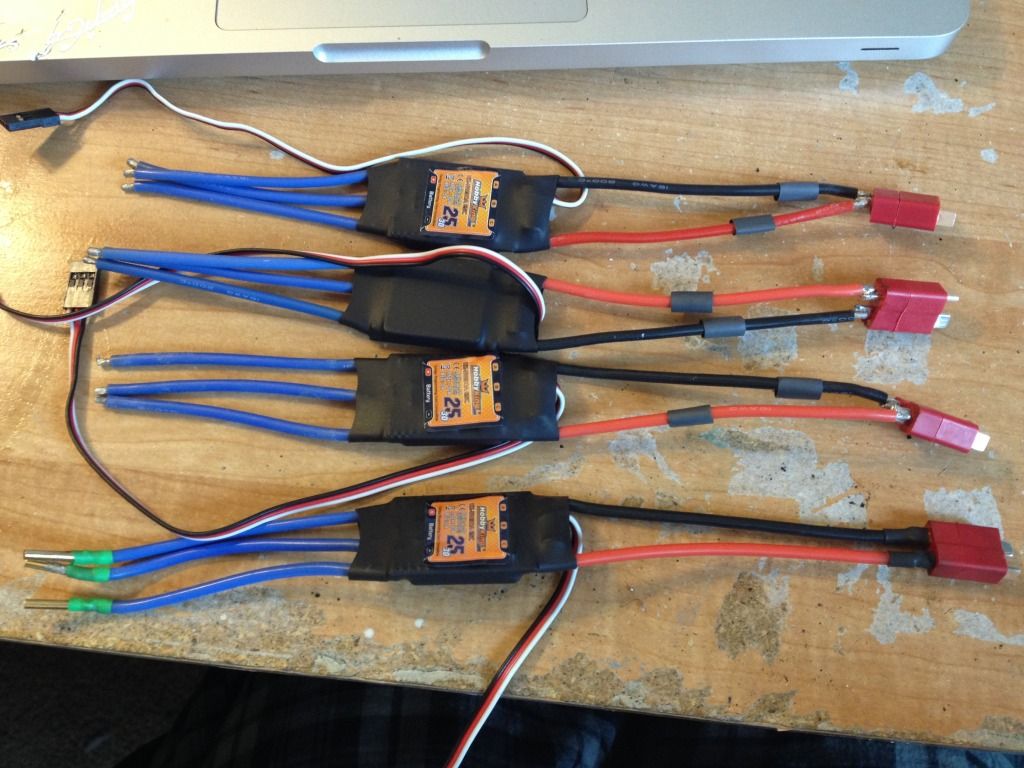
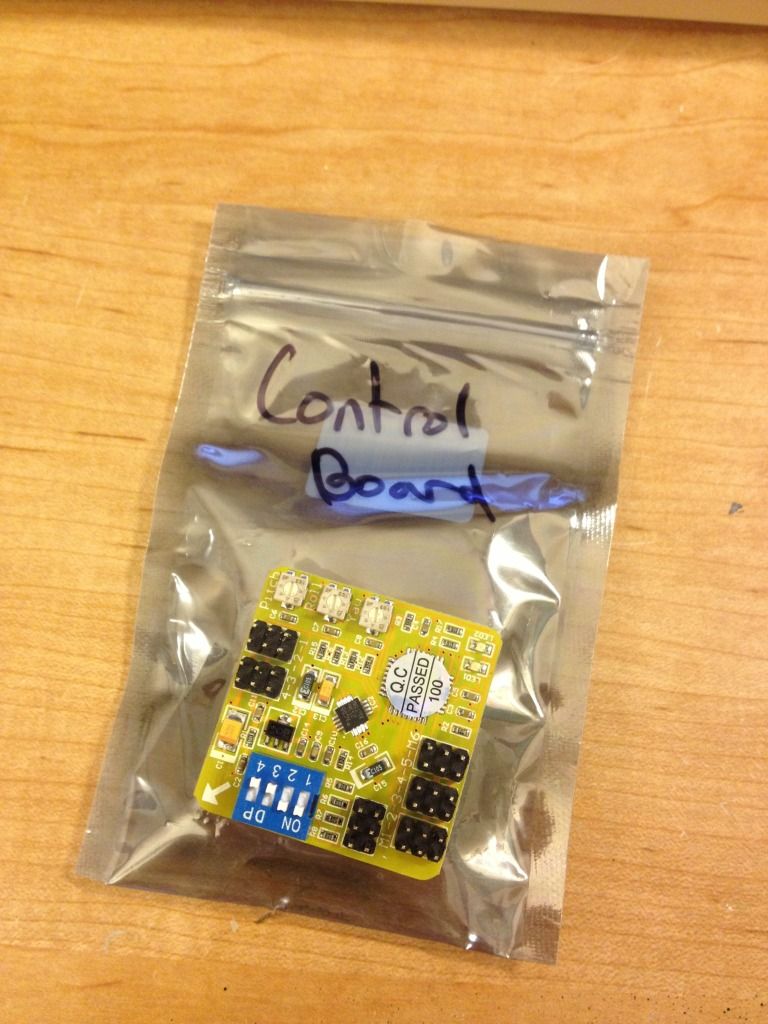
Stuff in the box:
photo2.jpg

photo3-1.jpg

photo4.jpg


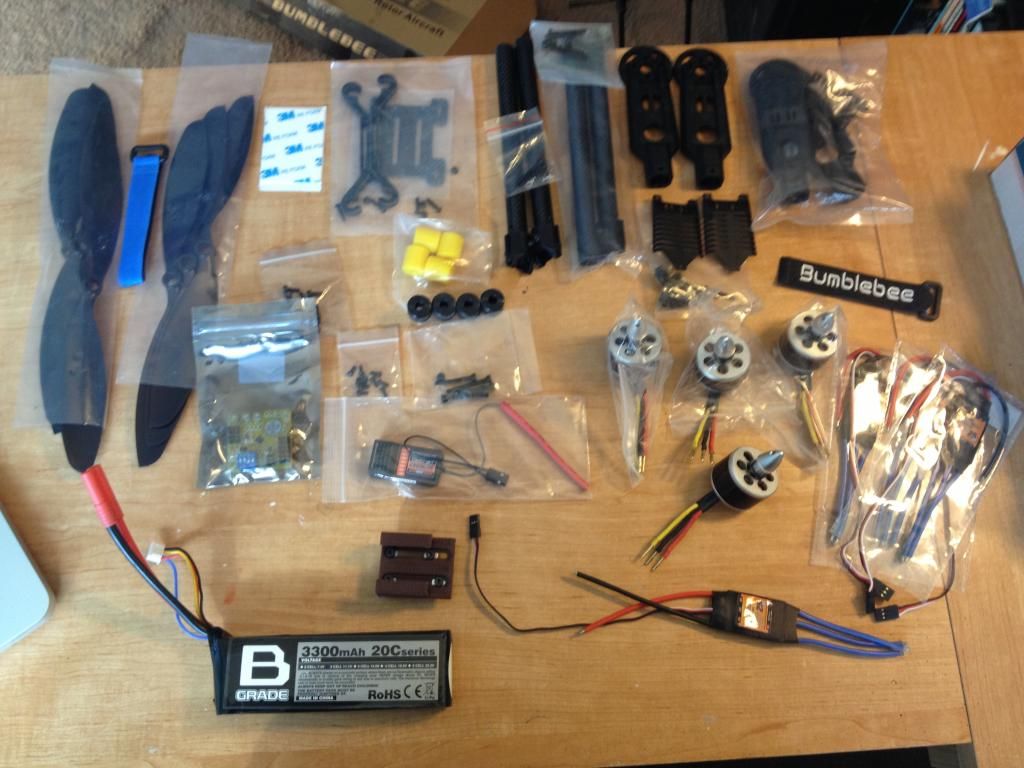
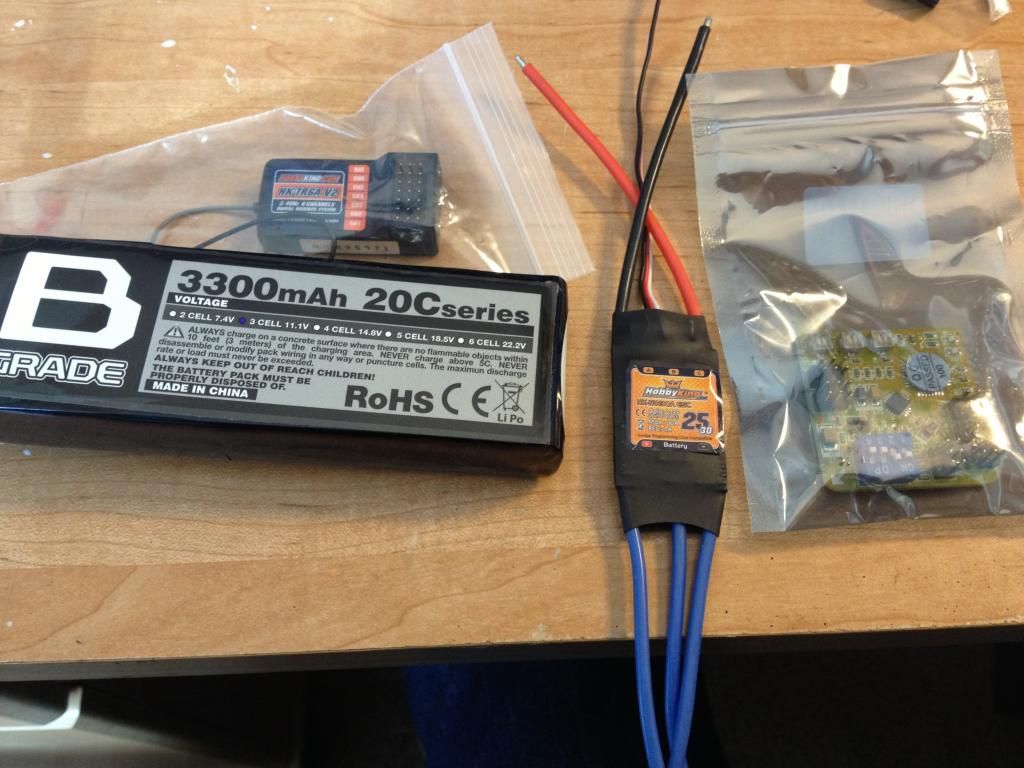
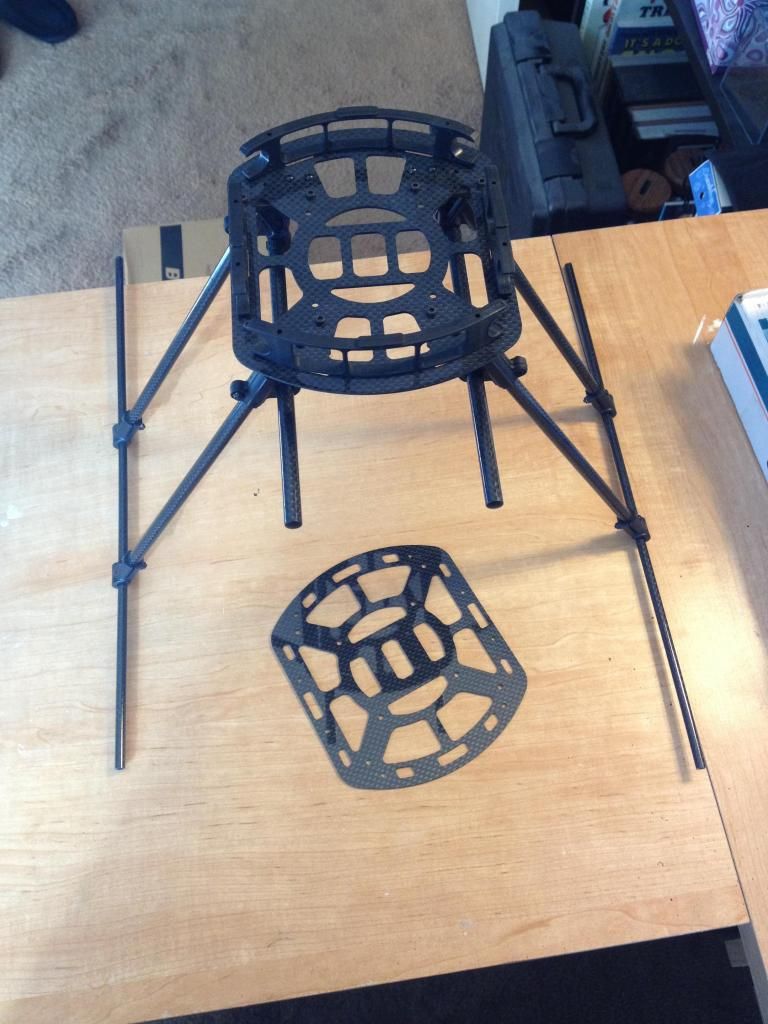
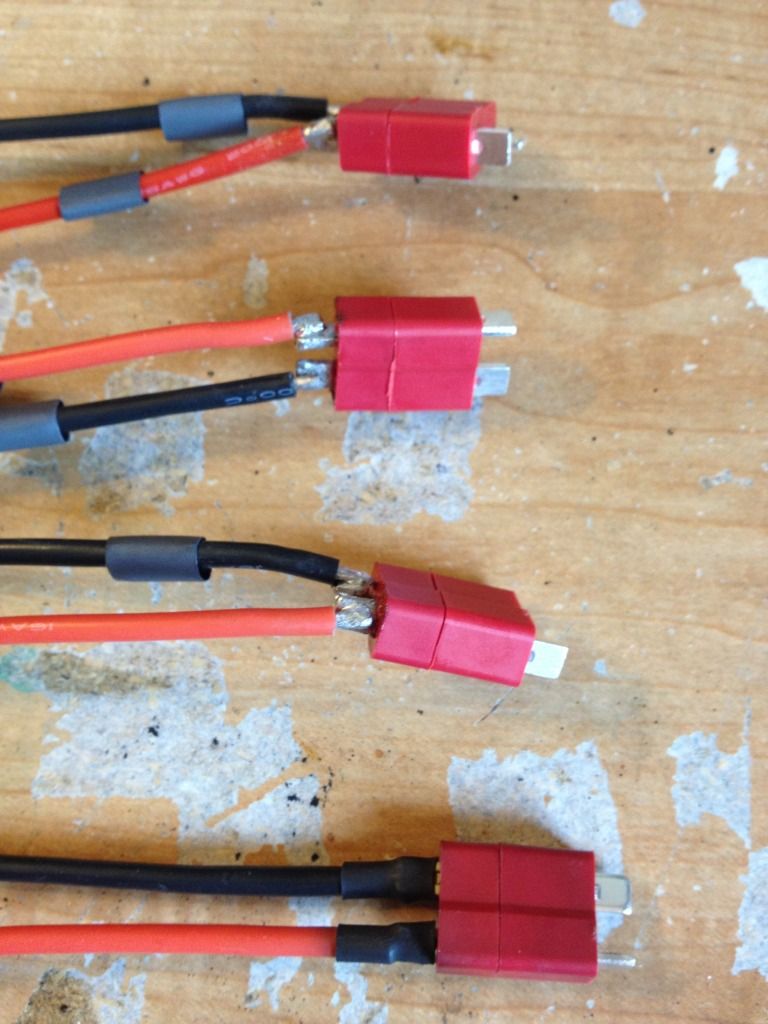
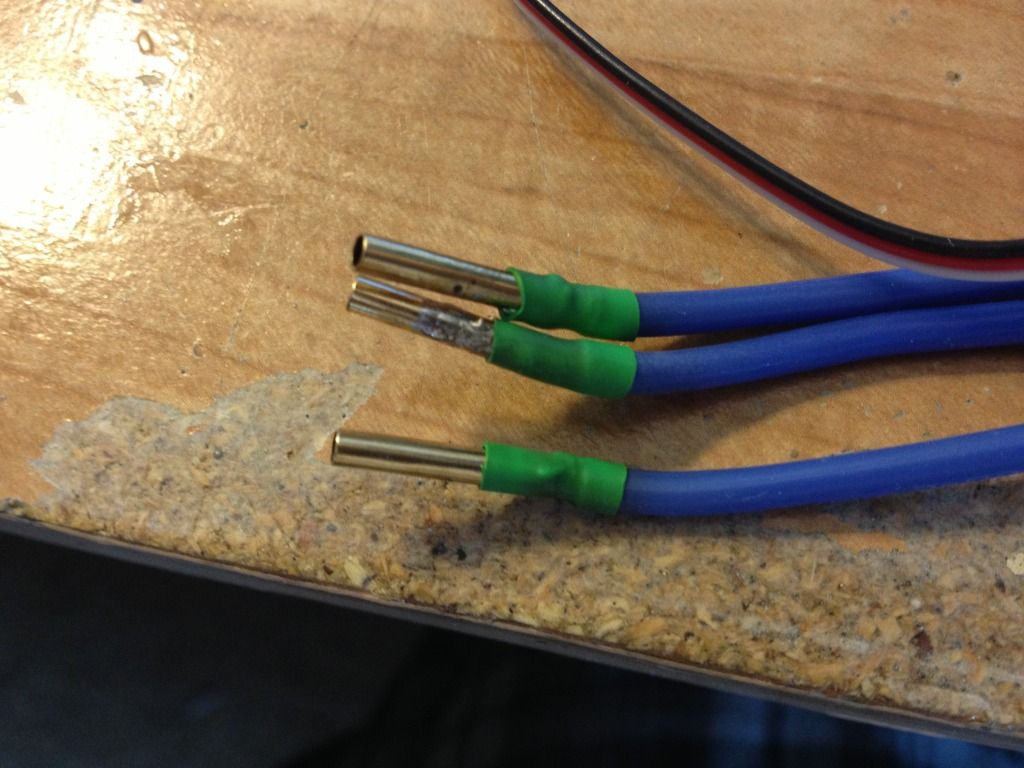
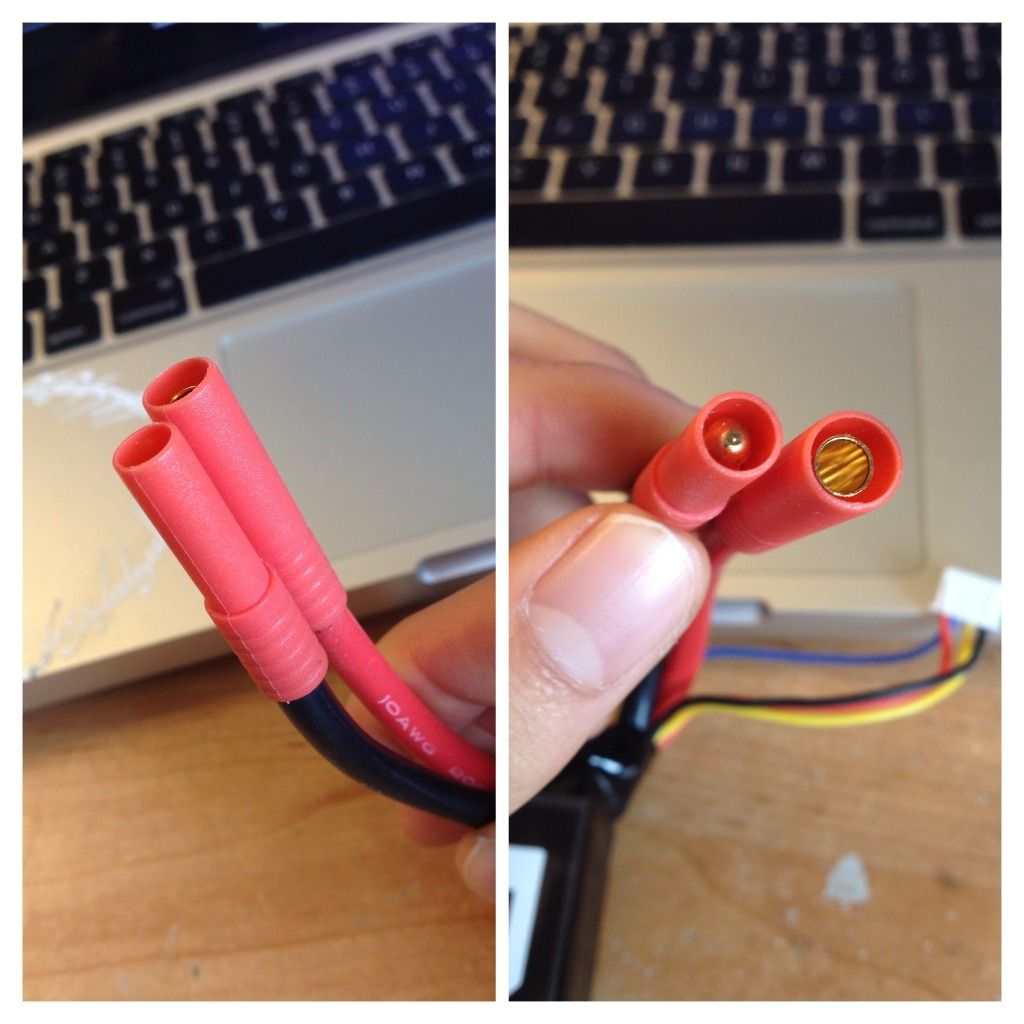
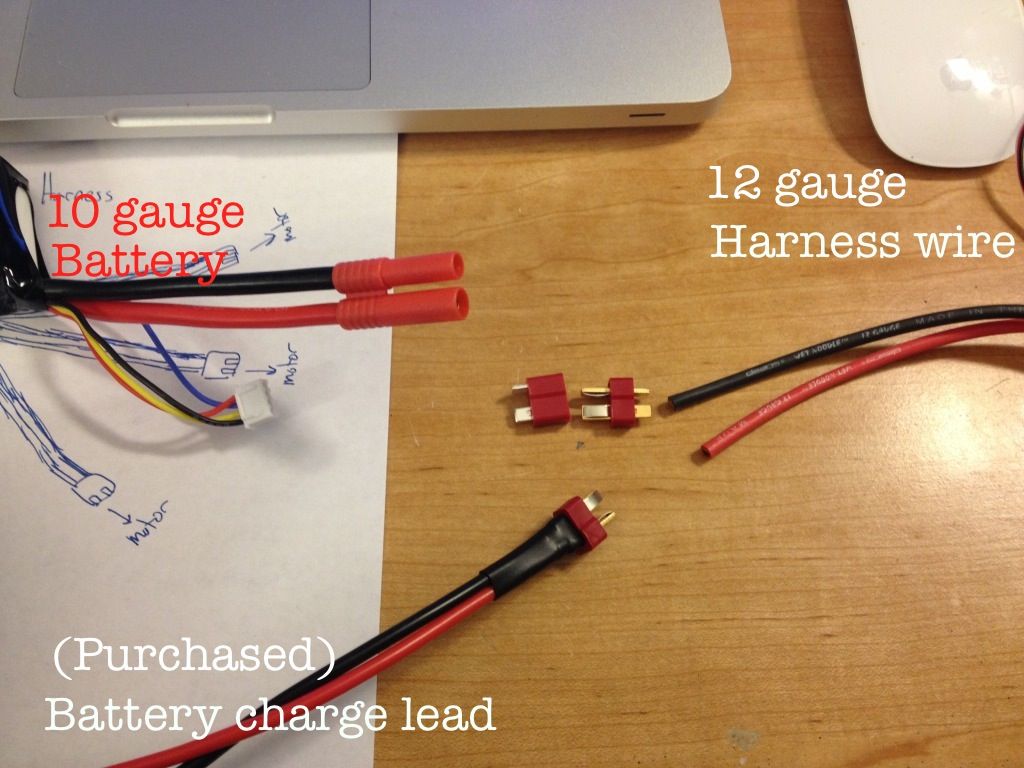
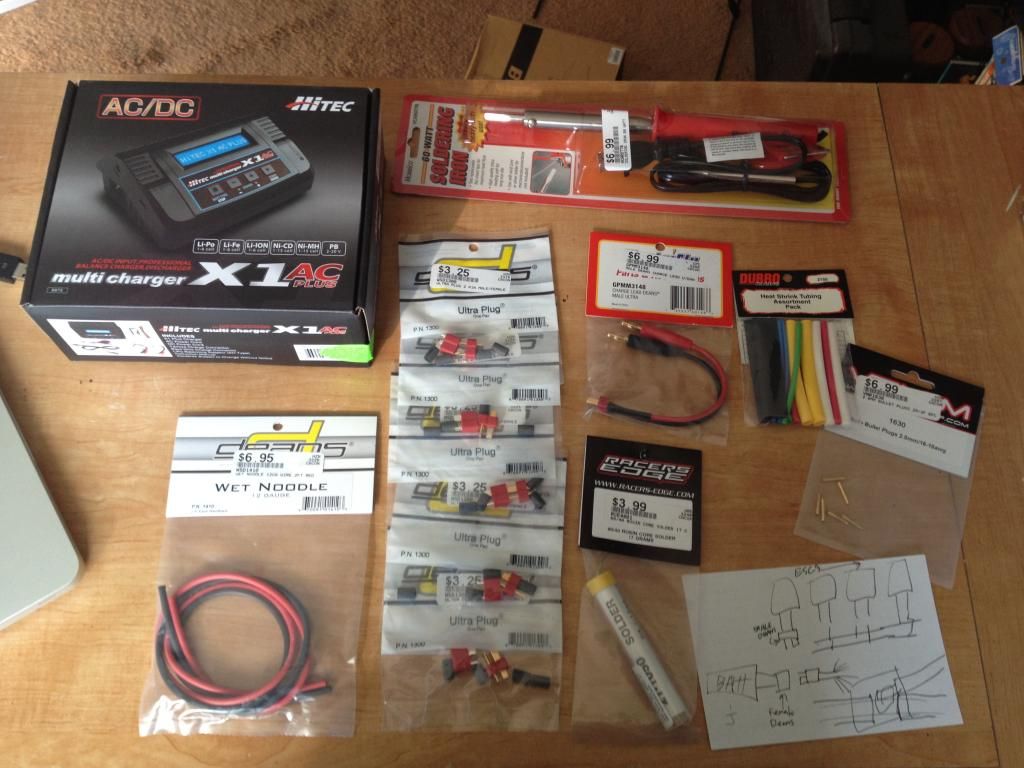
Since I was down at uni, I didn't know of the best place to get the missing connectors and such, so I sat on this guy for a month until I was able to get home and hit the hobby store yesterday. I brought the instruction manual I found online and the box and just asked "what do I do? They said I need bullet connectors and a four way wire harness?" The guy was able to hook me up with 3 bullet connectors, but they were out of stock for the rest. He also provided me with a battery charger and some other bits like Ultra Plugs...which I have no idea of what they do...

Here's a pic!
photo5.jpg


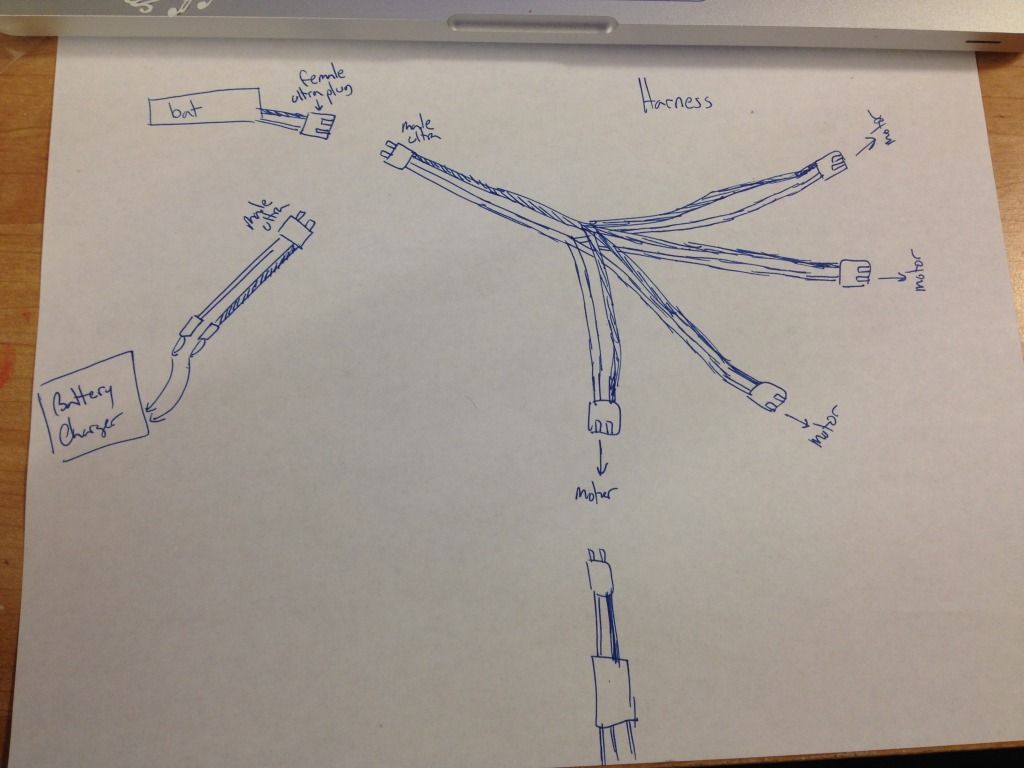
I am so terribly lost. Here's the instruction manual, if it'll help you help me... I'm a broke uni student getting ready for the holiday expenses, so hopefully there aren't many more things I need to buy. I know for certain that I need another few sets of bullet connectors and that power harness, but is there anything else? And my soldering skills are quite poor; I soldered some board for my underwater ROV and...it failed. (might have gotten wet, which wasn't my fault. ;) ) I've watched this video quite a few times, but I can't really figure out whats what. Not sure why, the video is so straight forward... Any help you'd be able to provide would be greatly appreciated! :livid: I'll be in town until Friday, so if I need to buy more stuff that I can't find online, I have a bit of time.

Tldr: I'm an idiot with a built it yourself quadcopter. Where to I start and what else do I need to buy?

Thanks a bunch!!
 

Do you have any experience with a soldering iron? If not, you are about to learn. Don't let this overwhelm you, it seems like a lot at first, but once you understand what does what and what goes where, putting it together is like a very intricate set of legos. If legos required soldering.

My advice is to start here to get an understanding of what all these parts are and what they do:

http://www.youtube.com/watch?v=7DHoLYf5pMA

Disclaimer, I have not watched this video, but it appears he starts from the beginning and has a series taking you through a whole build.
 

Oh sweet! I have very limited soldering experience; both through-hole and surface mount combined is less than five times.

Thank you. :) I think I've watched part of the first video before in my small bit of research before planning. I'm on the third video now, so hopefully he'll be able to get me through this build! He's very descriptive in his instruction! Thanks a bunch.


Motopreserve

Drone Enthusiast
This video series is really amazing. Thanks multirotorxy8!!! I'm very comfortable with soldering but also very new to this whole thing, and I think his videos would help anyone new to this hobby.

Good luck with your build. It looks like it will be fun and a learning experience.

Oh sweet! I have very limited soldering experience; both through-hole and surface mount combined is less than five times.

Thank you. :) I think I've watched part of the first video before in my small bit of research before planning. I'm on the third video now, so hopefully he'll be able to get me through this build! He's very descriptive in his instruction! Thanks a bunch.
 

COMike93yj

Still Building!
Here is a video that I was watching the other day.....I have little soldering experience (just some wires, PC stuff) but found this video very entertaining and informative. He goes through the basics of soldering and some of the tools you may need.

http://www.youtube.com/watch?v=J5Sb21qbpEQ

You have an awesome sister for getting that all for you!!!! Give her a big hug and thanks!
 

Truth be told I hadn't watched them before. I checked it out now and see it revolves around hoverfly, however the basic principles apply to any flight controller. And yes, you will be a solder-pro by the time you are done. If you aren't, you will gain lots of experience fishing your quad out of various trees or sweeping the parts up off the ground, as bad solder joints are to blame for a lot of failures. Good to get some practice in first on some unimportant stuff to make sure you aren't ending up with any cold joints.
 

Motopreserve

Drone Enthusiast
I was pretty impressed how little he was pushing company products. Pretty straight forward how-to, and a few cool tricks for MULTIROTOR specific parts (3.5mm bullets are common on motorcycles - but most often just crimped).

I think his mellow attitude put me at ease about the task ahead (my first build) :) Again thanks for the link.

shortsonfire, don't worry about the soldering. Grab a few extra connectors - and make sure you have plenty of wire and shrink wrap. You can always snip and redo. It's oddly cathartic - and eventually you grow to love the smell! In the meantime, get a small fan that will move fumes away from your work area. :)


Truth be told I hadn't watched them before. I checked it out now and see it revolves around hoverfly, however the basic principles apply to any flight controller. And yes, you will be a solder-pro by the time you are done. If you aren't, you will gain lots of experience fishing your quad out of various trees or sweeping the parts up off the ground, as bad solder joints are to blame for a lot of failures. Good to get some practice in first on some unimportant stuff to make sure you aren't ending up with any cold joints.
 

http://www.youtube.com/watch?v=J5Sb21qbpEQ
You have an awesome sister for getting that all for you!!!! Give her a big hug and thanks!

Hell yeah my sister is awesome (ran both Tough Mudder and the Spartan Beast with me)!! Started watching that vid you linked and he's going over the iron... Mine was $7 and is the fixed plug-in garbage he says not to buy...oops!


Hey, wow! So I started soldering last night... in my room... and the whole house stunk! Even with windows wide open, the door closed, and the fan on, the smell leaked downstairs and my parents were not pleased. Slept with the windows open, I think I'm okay. Next time its outside for this!

Would you guys mind taking a look at my first solders? I hope they're not cold...
E1AF291E-6195-482D-9456-BA8103E640FC-2537-0000023B3F5F9F0B_zpsd5efb4e3.jpg

D2A82D5A-AB05-45D2-B4CE-5F424CA48CEA-2537-0000023B47B9B472_zps1a167b20.jpg


I'm not too pleased with these bullet connectors. The wire wouldn't fit in the hole that was provided, so I had to trim the wire a tiny bit. Pretty sloppy, but hopefully when I get the other three sets in the mail, they won't be so bad.
271194A5-3A9C-4FB2-BC3D-72453054CB8D-2537-0000023B4F57A166_zps1fd9c8f4.jpg


On reddit some time ago when I first posted, a user suggested I watch this video. I talked to him about it, but I'm still pretty confused about why I'd need to add a new battery connector when I could just have my wire harness plug directly into the battery. Could anyone provide a further explanation?

Thanks for the tips so far guys!
 
Last edited by a moderator:

Motopreserve

Drone Enthusiast
Without watching the video - I would assume having the plug is so that you can easily swap/take battery off your copter. Were you thinking of hard wiring it???

As far as your work so far - make sure you tin the wires thoroughly before you begin to solder wire to wire. You want the whole area of wire covered in a thin (sometimes not so thin) layer of solder - so the whole thing should look silver, before you tough wire to wire. Make sure that your connections are solid before you heat shrink them - you do NOT want the heat shrink to be holding the connection, giving you a false sense of security, until the craft drops from the sky like a lead balloon.

Try practicing on some raw wire first until you get the end connections nice and tight. They maybe fix up those ESCs you have there. You should be able to get satisfactory connections with just about any iron if you practice. The nicer ones (like in the video) are definitely best for proper heat control - which definitely helps and comes into play the more you solder.
 

Without watching the video - I would assume having the plug is so that you can easily swap/take battery off your copter. Were you thinking of hard wiring it???

I was going to put this kind of connection on the wireharness. I figured I'd just match whats already there instead of adding my questionable soldering.
C7A7AE44-41CD-4E8C-A368-0C11EE39E2B2-2537-000002440BE7F7A7_zps53bad55b.jpg


I was also under the impression that the wire ends on the ESCs were already tinned, but I'll probably go and retin them when I get back down to uni.
 

Motopreserve

Drone Enthusiast
Oh, gotcha. Yes, I think you just match them. I thought you were suggesting snipping and hard wiring them onto the frame for good - never to be removed :)

There is a photo that shows a close-up of your red connectors (deans or whatever they're called). I thought I could see copper. You don't want to see copper. Also realize that not every factory job wil be perfect - so you might have to touch up what they sent you. I'll watch that video to see specifically what they were referring to...

So far, you are moving and grooving. Keep up the good work!

EDIT: just watched the video. Everything they say makes sense - just a little quicker and more Hollywood. :). The other guy is a little more concise - but they're getting the same quality connections. I think what I was seeing on you joints was that the wires seem to be sitting on top of the channel of the connector. The wire should slide right in there, into a welcoming puddle of solder.
 
Last edited by a moderator:

Motopreserve

Drone Enthusiast
HERE is another decent series with some cool how-tos. This particular link shows battery lead soldering.

Keep in mind that when soldering the larger (smaller number) and smaller gauge wire, this is when the control of heat from the iron becomes more important. Thicker wire (like the battery leads) needs more heat to liquify solder and thinner wire needs less to keep from melting the insulation. This is when you may find yourself coveting a higher quality soldering iron.
 

HERE is another decent series with some cool how-tos. This particular link shows battery lead soldering.

Wow that link was great! I wish I had seen that before I soldered the ultra deans for my ESCs. Its been a month and I'm back at home, ready to work on my harness! I made a sketch just to make sure I knew what I was doing. I think its correct!
6578B913-22FE-43E8-856F-18D0E293F8A6-5649-000007C4F4BAA1C7_zps6bb5234b.jpg


But I've been looking at the last ultra dean that I have, and I wonder if its too small for the gauges I'm working with ( 10 bat, 12 harness). I'm not sure if size would matter in this case, just want to make sure before I work on that part!

962B4A5F-8B57-4500-8852-F75B6B1C588C-5649-000007C4FD8244C0_zpsd874188b-1.jpg


I wouldn't be against buying larger ultra deans, because the vid that Motopreserve posted has deans that seem a good size larger than the ones I'm using here.

Thanks again guys!
 

Motopreserve

Drone Enthusiast
Really it depends on the power running through the wiring, not the size of the wire itself (unless of course it just doesn't fit well for a solid solder connection). Figure out how much juice your battery is going to discharge, and that's how you determine which connector is correct. I'm not sure of Deans plugs ratings. I'm sure it's available online somewhere.
 

Ah okay. Seems like the deans are rated to 60A and the battery puts out 3300mAh, so I think it should be okay. I went ahead and started on one side of the harness. I think theres way too much solder on it, but I'm not sure if that makes a huge difference or not. I made sure to tin all the exposed wire before I started and the connection seems solid when I try to wiggle it with my hands.

3FE4A387-1D2E-4B31-9183-EB044C246B34-6092-0000087D75EFAF33_zps7fb366cb.jpg
24F9A3CE-456A-47AB-AACB-36F150D7B996-6092-0000087D7E19F8BF_zpsf9ae7402.jpg
 

Motopreserve

Drone Enthusiast
Can you fill/reduce that gap? Also, did you remember to put some heat shrink on there to cover that?

If you don't already own one, get yourself a solder sucker. They make removing solder a snap - and are worth their weight in gold when they allow you to start fresh instead of "letting it go" with bad soldering points.

Youre on your way!
 

Ah I couldn't fill the gap because I put heat shrink over that shortly after the picture. Finished all the soldering and I'm just about out of solder as well, probably not enough to go back and fill that. I'll definitely look into better equipment if I ever decide to make another or something similar, this $7 iron just isn't gonna cut it!

In any case, I've finished all the solders and now I think I'm on to wiring it up and getting it tested.

I have this thing, and it came in an unmarked static-proof bag. (Theres a barcode on the back, but it doesn't lead anywhere) After looking around some sites and stuff, I marked it as the control board. Not sure if thats what it really is.

562B5BA3-D5D9-4DD5-9DD8-2ABD474F4E44-6544-000008F16AA5508A_zps77b5a83c.jpg


I hooked up the 6 channel receiver to the ESCs to see if thats all I needed as instructed from the poorly translated manual. I turned the transmitter on and plugged the battery in and this is what happened: See vid.


Not really sure what I'm doing, so I googled it and this was the first thing that came up.
http://www.rcuniverse.com/forum/ele...brushless-motor-not-running-just-beeping.html
have a Futaba 9C and I placed the new electric 4*40 in the memory where I had a glow 4*40 (victim of a midair while trying to fly in a formation with another 4*40). I checked the end points for the throttle and saw that they were at 40% low throttle and 80% high throttle, I dialed both of these to 100%, hooked up the battery and tried the motor again. It worked.

I'm not sure what its talking about, but I'm really hoping that will be the answer to the beeping from my ESCs or motors.

Any ideas?
Once again, thanks guys!
 
Last edited by a moderator:

Motopreserve

Drone Enthusiast
That is a Flight Controller - you can see something like it HERE. But you DEFINITELY need a flight controller hooked up or nothing will happen. The receiver hooks up to the FC (to get info from the Transmitter) and then the motors also hook up to the FC. You're going to need to figure out some way to mount it (take note of the arrow) because there doesn't seem to be any mounting holes. It seems they sell a case for these types of boards on the main FC page of hobby king.

What at you will need to do while it's (sorta) hooked up the way you have it is calibrate the ESCs/throttle range. Check out this VIDEO. Find which channel is in the Tx/Rx is running the throttle. Then connect each motor servo wire to that channel. Follow the instructions in that video. Pretty simple. There is also the need to program the ESC for specific use with the multirotor (unless they have been pre-flashed with SimonK firmware). That is done via a programming board or through a series of stick movements. You can find videos for this as well.

THIS series is pretty well thought out and very informative. You might want to watch the entire series to get up to speed with the process/order of building these things.

Good luck.
 
Last edited by a moderator:

ultrafit

New Member
Thanks for the post, you are in the same position as me, wanting to have a quad but afraid of paying out for the parts and having a bucket of parts to show for it. Please keep posting your progress .

Charles
 
Last edited by a moderator:

Top