You are using an out of date browser. It may not display this or other websites correctly.
You should upgrade or use an alternative browser.
You should upgrade or use an alternative browser.
Prop balancing question
- Thread starter LeeT
- Start date
Carapau
Tek care, lambs ont road, MRF Moderator
Personally I don't like removing anything as you just don't know what you have taken out or what this does to the prop's structural integrity. I just use a bit of electrical tape over the leading edge. Never comes off and is really easy to do.
With all that said, Im not sure if top or bottom makes a huge difference although maintaining the curve on the top probably better maintains the aerodynamics of the prop so I would go for sanding on the bottom.
With all that said, Im not sure if top or bottom makes a huge difference although maintaining the curve on the top probably better maintains the aerodynamics of the prop so I would go for sanding on the bottom.
Scott Drysdale
Mixmaster
Excellent idea Droider..... I will try that from now on......
In the case of the new CF props, it is apparently the carbon fiber strands that provide 98% of the strength.... so cutting the surface strands by sanding seems like a bad idea.
In the case of the new CF props, it is apparently the carbon fiber strands that provide 98% of the strength.... so cutting the surface strands by sanding seems like a bad idea.
My prefered option for ease is magic tape on the underside of the prop. The other way is spray lacquer under the prop and sand that rather than the prop material its self.
D
Droider
Drone Enthusiast
Excellent idea Droider..... I will try that from now on......
In the case of the new CF props, it is apparently the carbon fiber strands that provide 98% of the strength.... so cutting the surface strands by sanding seems like a bad idea.
All part of the service Scott. You dont want to be going sanding carbon props :tennis:
Well you have a few choices...
Sand the whole blade top and bottom works fine for plastic props. You can also sand the trailing edge the side that doesn't cut into the wind. If you sand the side that cuts into the wind you lose effecancy as it changes the lift abilty the most important part of the prop is the belly at the hub on the side that spins into the wind. Do from the hub to the tip on the side that isn't cutting into the wind.
Sand the whole blade top and bottom works fine for plastic props. You can also sand the trailing edge the side that doesn't cut into the wind. If you sand the side that cuts into the wind you lose effecancy as it changes the lift abilty the most important part of the prop is the belly at the hub on the side that spins into the wind. Do from the hub to the tip on the side that isn't cutting into the wind.
No experience on the carbon fiber props yet, but the plastic props, I sand off the bottom side of the prop, no great reason other than you don't see it. As for changing the structural integrity of the prop, if you'r sanding that much, then the prop is crap and should be replaced. You can judge this by how much tape it would take to balance it with tape. More than two pieces of electrical tape going front to back and I'd ask for a new set.
I use 240 grit for initial and 400-600 grit for final adjustments. Go slow, a few strokes, remove dust, retest (flip on both sides when retesting) as you'r getting closer (i.e. it starts to tilt to one side slower and slower) move to higher grit sandpaper so it's making it as smooth as possible.
I sand pretty much the entire bottom side, staying 1/4" away from the leading and trailing edges (though the trailing edge isn't as importing), but I try to take more from the central to back area (front to back perspective) and more from the area closer to the hub. I do this to limit the amount of potential deflecting change that can come from thinning the prop.
For the hub, I go additive, use CA to add weight. It can be sanded if you go to far. Also, if you're worried about thinning your prop, you can put a thin layer of CA on the light side, to the point of over balancing it and then sand back to balance.
Mrtarango32
Member
Best prop balancer for tmotor props?
Carapau
Tek care, lambs ont road, MRF Moderator
As for changing the structural integrity of the prop
For plastic props I agree entirely however with carbon, not so sure. But why take the chance? Sanding on its own is destructive and irreversible. Putting some lacquer on first and sanding fine but sanding on its own? The only advantage I can see to sanding is a cosmetic one ie you don't see any tape on the blade. With that being the case I just don't see the point in sanding as the cons outweight the pros.
Best balancer for Tiger Props? The Dubro works very well, a high quality magnetic balancer should be better and the Dynex Hobby dynamic balancer is the best but expensive and rather complicated!
Yeah, that's why I specifically mentioned that I don't have any experience w/ Carbon Fiber props yet. I haven't looked into how thick the resin is and I'd not want to start cutting into the CF, that said, I'd most likely take an additive approach with them. I'd want to make sure I had something that bonded but didn't significantly react to the resin of the Carbon Fiber (which I haven't researched) if lacquer is commonly used for this, then I'd guess that's the way to go. That would be a hell of a lot easier to get a smooth finish in the end and the more smooth the air flow is, the better. That is add lacquer to the underside of the lighter prop. Don't worry too much about going over (should be able to test balance to make sure you're actually take to at least a little on the heavy side.) Then smooth the finish back w/ 600grit afterwards.
This takes me back to my reason for sanding, tape has edges, these edges even when 90deg to the prop edge will disturb air more than a smooth surface alone. The only real benefit I see of tape over sanding is it's easier.
"For plastic props I agree entirely however with carbon, not so sure."
I am, and I will let you all know how it works out. I have 8 12" carbon fiber propellers balanced in the horizontal plane. To do this I used a 500 grit metal sandpaper, then moved up to 800 and finally 1000. I like the sanding method because it is permanent. I also am not a fan of tape on the blades, not pretty.
To finish the blades I will use some even finer grits and polish with a buffer.
I sand the trailing edges too and it does change the shape slightly, but the flight controller will adjust for the difference which should be minimal.
I have made my own prop balancer using a needle and it is very sensitive which you can read about here: http://diydrones.com/profiles/blogs/a-diy-magnetic-prop-balancer
The key is to make sure that the center spindle it very balanced itself, test your props with the spindle in different positions, it should make no difference and the prop should settle in the same spot every time... Using this method, the props are very close to perfectly balanced and it is much more elegant to some other methods I have seen.
As for the sanding cutting the fibers, I try to keep the sanding light and toward the tip of the blade. The vast majority of the stress that the prop endures is close to the hub, how many times have you heard of a prop exploding in mid flight at the tips?
As for the hubs, if they are really out, I will balance with some lead tape...
CdA D
Member
Personally I don't like removing anything as you just don't know what you have taken out or what this does to the prop's structural integrity. I just use a bit of electrical tape over the leading edge. Never comes off and is really easy to do.
With all that said, Im not sure if top or bottom makes a huge difference although maintaining the curve on the top probably better maintains the aerodynamics of the prop so I would go for sanding on the bottom.
I agree with Carapau. The tape might not be pretty, but it works great. Try using black tape and think about the fact that at a couple of thousand RPM you won't see it anyway.
Scott Drysdale
Mixmaster
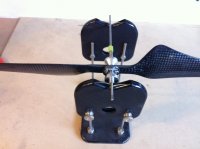
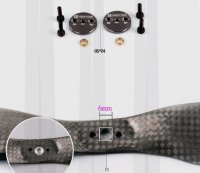
That is good information. With respect to the newer Carbon Fiber props that have the 3 holes in the hub, it is often the case with the Chinese clones of quality props such as Tiger Motor, that the center hole is off center. But in most cases the two outer holes are correctly positioned. So how does one balance these? Answer: Recenter the center hole by means of the following.....See photo below..... i.e., use a T-motor or equiv hub keeper/washer. Then proceed with hub balancing as usual.
BTW - The glossy appearance in these props is referred to as the gel coat layer so a little sanding is ok. But you know you have cut too deep when the sanding residue shifts from white to dark gray. And therefore adding a layer or varnish or lacquer to the lighter prop side is a good idea. While the hubs on these props is much smaller, hub balancing may still be required. Once again add magic tape to the lighter side of the hub and sand the other side very carefully.
Also when using iSeisometer IPhone app for motor/prop balancing, take a look at the z axis vibrations, i.e., the vertical plane or motor axial versus the radial vibrations. Vertical/axial vibration is the result of a prop that is lifting more efficiently on one side versus other or can also be a sign that the motor bell has run-out or there is a bent shaft or major bearing issueView attachment 18379.....
"For plastic props I agree entirely however with carbon, not so sure."
I am, and I will let you all know how it works out. I have 8 12" carbon fiber propellers balanced in the horizontal plane. To do this I used a 500 grit metal sandpaper, then moved up to 800 and finally 1000. I like the sanding method because it is permanent. I also am not a fan of tape on the blades, not pretty.
To finish the blades I will use some even finer grits and polish with a buffer.
I sand the trailing edges too and it does change the shape slightly, but the flight controller will adjust for the difference which should be minimal.
I have made my own prop balancer using a needle and it is very sensitive which you can read about here: http://diydrones.com/profiles/blogs/a-diy-magnetic-prop-balancer
The key is to make sure that the center spindle it very balanced itself, test your props with the spindle in different positions, it should make no difference and the prop should settle in the same spot every time... Using this method, the props are very close to perfectly balanced and it is much more elegant to some other methods I have seen.
As for the sanding cutting the fibers, I try to keep the sanding light and toward the tip of the blade. The vast majority of the stress that the prop endures is close to the hub, how many times have you heard of a prop exploding in mid flight at the tips?
As for the hubs, if they are really out, I will balance with some lead tape...
Attachments
Last edited by a moderator: