New Hexacopter Build, DJI A2, KDE 4012XF, Zenmuse-GH3

Bartman

Welcome to MultiRotorForums.com!!
Hi everyone,

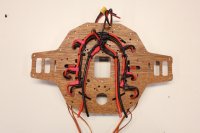
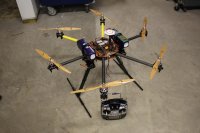
I've been working on a new build for the last few weeks and decided I'd do a build thread to show what I've been up to. It's a bit unique in some ways and pretty typical in others. This first video is how I start a build. Some people go to ecalc, I do a quick tally of what I'm planning to do and then consult performance charts to see if I'm in the ballpark weight and lift wise.


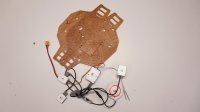
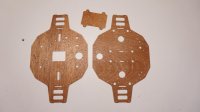
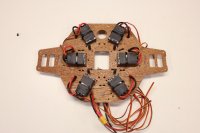
The build is actually pretty far along and I've got a bunch of photos that I'll post later this evening.

Keep in mind, the process shown in the video is iterative, you start with the best guess you can come up with for each line and then see how it looks when done. If it's very far off then you modify your selections to try to bring it into line with your goals. In this case the camera, camera mount, flight control system, and motors were pretty well set in stone. If the calculation was very far off then I'd have to maybe consider adding two motor motors, maybe smaller batteries, or something else that would improve the resulting outcome. Even though the video is sort of played like it's a first run of the numbers I had actually checked everything before getting started with the build so the numbers worked out ok in the video. I really did decide at that moment to reduce the arm lengths for 15" props instead of 16" props which would have been unnecessarily long for larger dia. props I would have never used.

Thanks!
Bart
 
Last edited by a moderator:

Bartman

Welcome to MultiRotorForums.com!!
I might as well get this first photo out of the way....

View attachment 17674

yup, that's 1/16" aircraft grade mahogany plywood. I've got a stash of it from an old project and when it came time to do a sample cut for my frame plates the plywood was there looking at me like, "I'm better than this, please don't humiliate me by cutting me into test plates for one of your helicopters! Please!". But, in looking at it I figured maybe we'd give it a try and actually fly it with the wood plates. So fellow site member and good friend Terry Kilby offered to cut a set for me and so far they're working out pretty well. I doubt the wood will have much crash-worthiness so we'll see how it all goes.

The frames were laid out specifically to make sense of this mess

View attachment 17673

and you'll see in the coming photos that it's all falling into place. :)
 

Attachments

  • 12-DSC08295.jpg
    12-DSC08295.jpg
    70.2 KB · Views: 314
  • 13-DSC08296.jpg
    13-DSC08296.jpg
    83.3 KB · Views: 347

Bartman

Welcome to MultiRotorForums.com!!
Next up was how the electricity was going to be run through the frame. I had been kicking around the idea of using bullet connectors between the batteries and the ESC's, modifying them to sit on a wire like this

View attachment 17675

but i was planning to put the power harness between the frame plates so having connectors in there wouldn't make much of a difference because I wouldn't be able to get to them anyway so the harness ended up looking like this

View attachment 17676View attachment 17677

and with it all mounted to the frame plate it looks like this (this is the underside of the top frame plate so the wires will be sitting just above the arms once the frame is assembled)

View attachment 17678

I'm using Hobbywing Pro 40A ESC's and I like to strip the cover from the ESC's, remove the wires and then use the solder pads to connect my wires directly to the ESC's. If I have a failure I'll just strip the heatshrink, remove the wires and put a new ESC in its place. With them all installed it looked like this

View attachment 17679View attachment 17680

a couple of extra sets of wires had to be worked in there for powering the flight controller and the gimbal and I had to use tube mounts for the arms to make sure I was going to have clearance to assemble the frame without wires being pinched. It's really tight and there are a few things I'd change if I were doing it again but it is mostly just how I wanted it to be.
 

Attachments

  • 17-DSC08303.jpg
    17-DSC08303.jpg
    51.8 KB · Views: 293
  • 19-DSC08305.jpg
    19-DSC08305.jpg
    49.3 KB · Views: 438
  • 18-DSC08304.jpg
    18-DSC08304.jpg
    41.7 KB · Views: 386
  • 03-IMG_0060.jpg
    03-IMG_0060.jpg
    113.3 KB · Views: 402
  • 02-IMG_0059.jpg
    02-IMG_0059.jpg
    107.4 KB · Views: 498
  • 16-DSC08300.jpg
    16-DSC08300.jpg
    61.9 KB · Views: 362
Last edited by a moderator:

Bartman

Welcome to MultiRotorForums.com!!
The lower frame plate has the A2's IMU and another plug module zip-tied in place so that also had to be pre-assembled before the frame halves could be joined.

The A2 may or may not work for me, I'm already over that hump and ready to see what I've got when I've finally got it but to get an A2 into your helicopter requires a good bit of negotiating with the wiring to keep it from becoming a mess.

So here's where the IMU for the A2 will go

View attachment 17681

there's a layer of soft velcro under it and it's held in place with a velcro strap.

It occurred to me after I had done the layout and sent the materials for cutting that the Pan motor of the camera gimbal was going to be directly under the IMU. The pan motor is basically a collection of strong magnets around a core of strong electromagnets so I'm worried the magnets will cause funky things within the IMU. It's too late to change it and if I'm unsuccessful then we'll all have a learned from my misfortune, no? in other words, I'm not changing it so let's hope it's ok there!
 

Attachments

  • 01-IMG_0057.jpg
    01-IMG_0057.jpg
    78.9 KB · Views: 241

Bartman

Welcome to MultiRotorForums.com!!
a detail that I had put off addressing was the problem of incorporating retractable landing gear into the design. I figured I'd design my own but time is quickly running out and this thing has to be flying soon so I looked around at what was available and went with the RC Timer retracts (thanks to those of you that chimed in with suggestions). The RC Timer retracts are meant for their clone S800 and so they come with all sorts of tubes and mounts that I didn't have time to incorporate into my set-up. Lucky for me the mounting brackets were almost exactly to the scale of the area where I wanted to mount them. That sort of looked like it might be the case when I ordered them but I was able to modify them a bit, tap a few holes and they bolted right on.

View attachment 17683View attachment 17682

the hole where the tubes pass through was filled with some wood dowel and holes were drilled/tapped through the aluminum and wood so that bolts could pass through the frame and down into the retracts.

in the future I'll have to mill four small brackets to clamp everything in place on the outboard sides but for now I've got zip-ties and nuts holding it together. What I like about this arrangement is that the weight of the batteries will sit directly over the mounting points of the landing gear so each battery's weight will be supported very directly by the gear reducing any stress the frame will have to support in a rough landing.

I've also relocated the tube clamps for the side arms out to the tips of the battery/gear pads so the weight of the gear when they're retracted will hang from the arm which will be supported by the lift of that motor. So everything should be working to keep everything else supported making life easier for my stressed out mahogany frame plates that are wondering how they ended up on my new hexacopter when they originally thought they'd be sheeting for a set of biplane ailerons!

You might notice in the second picture, the box tops from the KDE Direct motors have semi-circle cut-outs that make perfect arm supports when building multi-rotor helicopters! Thanks KDE!
 

Attachments

  • 10-IMG_0072.jpg
    10-IMG_0072.jpg
    109.1 KB · Views: 250
  • 11-IMG_0073.jpg
    11-IMG_0073.jpg
    140 KB · Views: 349

Bartman

Welcome to MultiRotorForums.com!!
Moving right along to the motors and booms, I'm using KDE 4012XF-400kv motors and 6S batteries. Like I said in the video at the beginning I think the combination will be plenty strong, a good match for the weight of the helicopter with 14" to 15" props while still leaving me room to go heavier if I want to up the size of the batteries or camera mount. The KDE motors use 14AWG wire so higher amps at heavier weights and larger props won't ever be a limiting factor.

Here's my stash of motors for the build and one out of the box....

View attachment 17705View attachment 17704

Last year when I was preparing to start manufacturing of my frames I had a batch of about 3300 boom clamp pieces made and about 500 motor mounts. The mounts have an arm for the ESC to attach to but I'm not doing that with this build so I've had to modify them accordingly. The arm snaps off and it's quick work to cut the remaining piece off and then clean it up with a file and some sand-paper. The motor mounts were originally designed to be good for anything from a Tiger MT2212 up to the Navigator MN4012's and everything in between so I was very happy to see they also fit the KDE motors. The hardware is all 3mm.

View attachment 17706View attachment 17707View attachment 17708View attachment 17709
 

Attachments

  • 15-DSC08298.jpg
    15-DSC08298.jpg
    70.9 KB · Views: 383
  • 14-DSC08297.jpg
    14-DSC08297.jpg
    65.1 KB · Views: 333
  • 04-IMG_0062.jpg
    04-IMG_0062.jpg
    44.5 KB · Views: 375
  • 05-IMG_0064.jpg
    05-IMG_0064.jpg
    69 KB · Views: 350
  • 06-IMG_0066.jpg
    06-IMG_0066.jpg
    61.8 KB · Views: 371
  • 07-IMG_0067.jpg
    07-IMG_0067.jpg
    64.1 KB · Views: 396
Last edited by a moderator:

Bartman

Welcome to MultiRotorForums.com!!
All that's left before mounting the arms and assembling the frame halves was to add some lights to the two rear arms. I like to use red LED's as I seem to be able to see that color the best when flying so I put six LED's on each arm and then a length of yellow heat shrink. Once the heat shrink is nice and tight I cut out the LED's with an Xacto knife holding the blade upside down so as to not damage the underlying LED traces.

View attachment 17710View attachment 17711
 

Attachments

  • 08-IMG_0069.jpg
    08-IMG_0069.jpg
    89.3 KB · Views: 222
  • 1-IMG_0754.jpg
    1-IMG_0754.jpg
    55.3 KB · Views: 214


Bartman

Welcome to MultiRotorForums.com!!
Nice looking build!

Thanks Mike.

Here are two photos showing the frame halves joined up

View attachment 17713View attachment 17712

I finally ordered a radio for this and it should be here by Wednesday. In the meantime I've been thinking about my wood frame plates and I've decided to reinforce the area around the landing gear. I plan to make some doubler plates tonight and I'll epoxy them into place to carry some of the stresses of a hard landing deeper into the frame rather than just leaving it to the wood that's there. Now that I think about it my epoxy will have to be compatible with polyurethane as I sealed the wood before beginning the build. Is that maybe the first time that sentence has been uttered in a multi-rotor helicopter build? it sounds more like a furniture repair thread than a heli build thread. :)
 

Attachments

  • IMG_0755.jpg
    IMG_0755.jpg
    134.2 KB · Views: 244
  • 09-IMG_0071.jpg
    09-IMG_0071.jpg
    142 KB · Views: 264

Bartman

Welcome to MultiRotorForums.com!!
Getting back at it now that my new radio has arrived. The plan was to use a new Taranis radio via the SBUS adapter that Futaba sells but my Taranis got caught up in a jinxed shipping container that was returned to Hong Kong for unknown reasons. With that radio officially declared MIA I had to bite the bullet and order what I knew I could get quickly and what I knew would work with the A2, a Futaba T14SG. That arrived a few days ago and I've finally got it bound to the A2's internal receiver and it's configured according to DJI's instructions, almost. They give a pretty good description as to which channels should be used for which functions but it isn't an exact channel/function map and a little bit of additional work was necessary to get it organized.

Earlier today I free-handed a couple of reinforcing plates to double the lower frame plate where the landing gear mounts. Not my nicest work but they'll do their job as long as necessary. If this all works as advertised I'll probably redo the frame plates in carbon fiber and lighten/revise the power harness in the process of moving everything over to the new frame plates. This is how the frame plates ended up earlier today

View attachment 17920

There are still a few loose wires to be secured and I've got to wire up a regulator for the retracts and LED's. Other than that it's about ready for it's maiden flight. The gimbal is standing by and ready to go flying so I'm anxious to get the first handful of flights out of the way and get the build completely done.

Here's where I'm at with the new hexacopter so far

View attachment 17923View attachment 17921View attachment 17922
 

Attachments

  • IMG_0788.jpg
    IMG_0788.jpg
    143.6 KB · Views: 220
  • IMG_0789.jpg
    IMG_0789.jpg
    134.9 KB · Views: 279
  • IMG_0790.jpg
    IMG_0790.jpg
    135.5 KB · Views: 423
  • IMG_0791.jpg
    IMG_0791.jpg
    139.5 KB · Views: 246
Last edited by a moderator:


Bartman

Welcome to MultiRotorForums.com!!
nice build bart :)
looks like quite a bit of money to be sending up in the air as well :)


Thanks for the reply, and yes it's a lot of money going up in the air! :)

The weather's breaking here so I think I'll get a first flight in today.

In reviewing the LED Patterns it seems the big ones to have committed to memory are

three rapid white flashes....Attitude Status Bad
two or three red flashes.....Less Than Six GPS Satellites in view
four red flashes.....System Error
continuous red flashes.....Compass Abnormal After Power On
continuous blue flashes.....Failsafe Mode Engaged
four green....IMU Calibration Lost (Re-calibration required)


So, if I'm flying and I see

More than 1 red flash at a time I know I might not have IOC (CL will work, HL or POI won't) or Failsafe functions available

Four or more red flashes, land immediately (maybe without even trying to fly back to my point of departure)
Three white flashes, land immediately
Four green flashes, land immediately
Continuous Blue Flashes, try not to interfere and monitor closely that Failsafe is bringing the helicopter back to the homepoint (whether it makes sense or not but I'll be prepared to go back to Manual mode to try to override if necessary)


If anyone's following along with A2 experience please feel free to correct me if my understanding of the manual is incorrect.

Here we go!
Bart
 

Bartman

Welcome to MultiRotorForums.com!!
well, after about an hour and a half of futzing, it has flown. it flew ok considering it's a new system for me but it needs some tuning to be done and then the camera mount has to be mounted. the flashing LED patterns are a bit unnerving, to be completely honest. it's flashing this, and blinking that and i'm trying to fly while also doing the equivalent of translating an ancient hieroglyph based language in my head. i'll have to work on remembering the different patterns better. but it did fly, and it's time to work on making it fly better and there's some tidying up to do as well so it's all safe and sound for the long haul.

who's still laughing at the wood frame plates? they appear to be plenty strong although the real test will come when the full weight of the camera and mount are on it. so far so good.

bart


djw43

Member
very unique looking aircraft, reminds me of the old wood Chris Craft, it grabs your attention.


Bartman

Welcome to MultiRotorForums.com!!
I hate to have to say it but this build is on hold until problems with the gimbal can be resolved. All up weight ended up being 16.75 which is just over what was projected in the first video. It's flying well with the newest A2 firmware but it's impossible to say how it will do with the gimbal installed as that won't happen for a while.

The retracts work and got my son's nod of approval when he saw them working for the first time. All in all the build has worked out well but until there's a working gimbal for it I don't really have a reason to fly it or keep working on it.

Bart
 

sk8brd

Member
Bartman- your not alone lots of issues lately it seems. When ever you get it in the air update this thread if you could as i been following the build closely as its very similar to the one i'm working out, minus the wood though-i'm much less creative...lol
 

sk8brd

Member
Bartman- do you remember what timing you were using on the esc's with those kde motors, low/med/high. i remember you said you were not having sync issues.
 

Top