matthew.wright5
Member
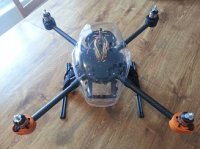
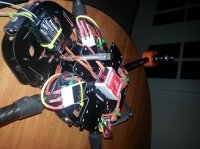
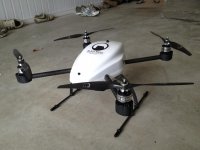
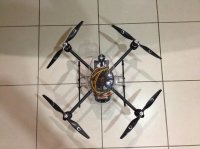
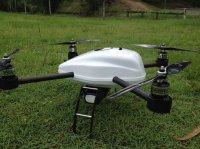
I have recently completed my build of the Droidworx CX-4. This airframe will be FPV specific. This CX-4 will be able to carry a load of approx 700 - 1000g. I will be soon adding lighting and completing my FPV setup. The CX-4 has proven to be a very capable Quad and will make for a good FPV flyer.
Specs:
Wookong M
AXI 2814/22 Short Shaft Droidworx Edition
DJI 30A ESC - Custom soldering and heatshrink
Spektrum DX7, AR6000
XOAR 13X6.5" Prop
Turnigy Nano-Tech 4S 6000MAH
Custom Power Harness
Photohigher CX-3
ImmersionRC EZOSD, Current Sensor, 600mw 5.8Ghz VT
DX201 Camera with DC auto-Iris
A few pictures (Got a bit carried away during building so not a great deal of pictures)
View attachment 3471View attachment 3475View attachment 3470View attachment 3468View attachment 3467View attachment 3473View attachment 3450View attachment 3451View attachment 3452View attachment 3469View attachment 3472View attachment 3449View attachment 3474View attachment 3477View attachment 3476
And a few observations about the CX-4:
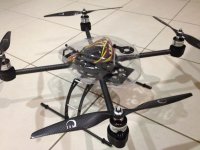
1. Overall construction
Very good construction, everything comes together for a snug fit and there is a lot of reinforcement. It is obvious droidworx have put a great deal of effort into making sure that he craft is as strong as possible. The manual needs updating though - there are some construction details missing. The missing parts are minor, for example - attachment of the gear plates, and locations for spacers. Because there is some minor details missing, I had to disassemble a few times in order to get the piece in the right spot. Minor point through. The craft is very strong and the polycarbonate shell can take a fair hit.
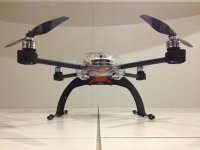
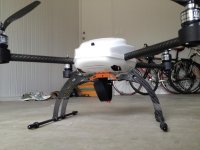
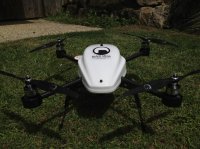
2. Landing gear
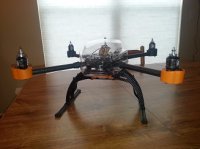
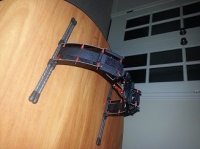
The landing gear is now 50mm wide instead of what I think used to be 25mm. This makes it a bit more rigid, and you can now suspend a big battery pack between the legs. Its the best spot to do it if you dont want to conceal the pack inside the shell, and lets face it - not too many batteries can fit inside the shell. I did have a minor crash early on whilst testing my Wookong - it jammed up, and the bird went down from 5m high whilst travelling about 5m/s. The only damage was to the carbon landing plates, which cracked along the holes drilled for the reinforcing bar (aluminium) because of this I cut my legs down to half way, which is actually better. More on that in a later post. The aluminium bracket that attaches the legs to the craft and holds the bottom shell on is quite weak - probably too weak. It deformed horribly on impact and took me a long time to fix with a hammer and vice, but the stress fractures are stil there so I need a replacement. Overall the cost of that one minor crash is gonna cost me $150 AUD
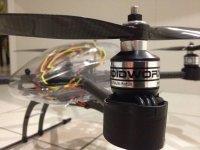
3. Props
13" props JUST clear the shell. And by just, I mean by 1mm at the rear. I was using XOAR precision pairs CF 13x6.5" to generate maximum lift, but I dont want a strike in mid air, so i'm going to sell and buy some 12" props of the same type. The props look awesome and they are pretty light too
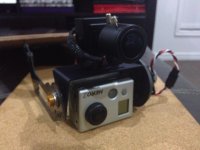
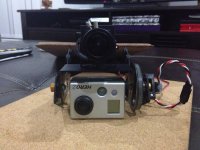
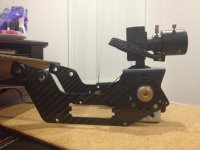
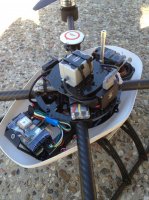
4. Gimbals
The CX-3 gimbal from Photohigher is a crazy awesome mount, but to use it the landing gear must be full length (or thereabouts) and you cant mount the batteries external under the gear because the SAVOX roll servo sits there. For me, This was a deal breaker so I am going to get a CX-1 instead, and that gimbal should work better for my FPV adventures anyway. Unfortunately the Photohigher mounts are expensive, but I think the majority of that is tied up in Labour, as each servo is wired up to an external Poti by hand (Kim's hand!).
5. Flight Time
With the current specs, I am lifting a 6000mah 4S Nano-Tech. From a full charge at 4.2V per cell, I am flying 10 mins and have a residual voltage of 3.8V. I assume off the top of my head this means I could get away with about 20 mins flight time, but that is not validated yet. I will try soon.
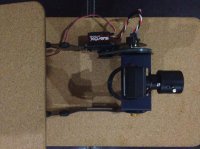
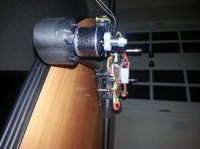
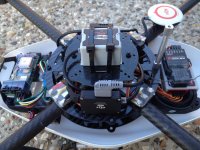
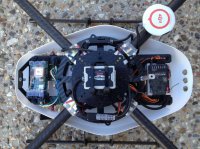
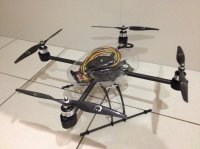
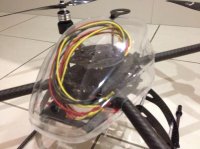
6. GPS mounting
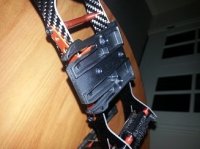
The CX-4 comes with some extra bits and pieces as spare. The kit actually contains enough parts to allow you to build a coax setup without having to purchase any spares. I used some of these spare parts to build a GPS mount for the Wookong which I have suspended off the rear left arm (as you look down on it). I know this creates drag and makes the airframe less efficient, but I believe that looking good is half the battle and I did not want to put up with a long cable coming out the arm and onto the top of the shell as I have seen in some builds. With the GPS in its current location I am getting full lock in 30seconds, with occassional drop out mid flight. I think my setup looks better than having a long pole sticking out the top of the CX-4 and its just as efficient.
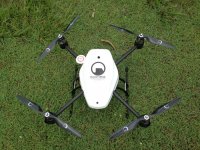
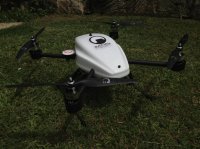
7. Painting
I really like the fact you can be a little creative with the paint scheme for the shell. I've seen some beauties out there. I really like the darker colours but it has been done to death. I went for Pearl White, with the carbon fibre fittings it looks awesome and is easy to see. When I put lighting inside the shell, at night the whole thing will light up like an Egg with an LED in it. Should be sweet. The sticker is a Black Mesa one I got from Redballoon.com. Black Mesa is the research facility from the Half Life Game series. I grew up playing it so this is my little homage to the game that pushed me in a Technical and mechanical direction with my hobbies.
Videos to follow!
Specs:
Wookong M
AXI 2814/22 Short Shaft Droidworx Edition
DJI 30A ESC - Custom soldering and heatshrink
Spektrum DX7, AR6000
XOAR 13X6.5" Prop
Turnigy Nano-Tech 4S 6000MAH
Custom Power Harness
Photohigher CX-3
ImmersionRC EZOSD, Current Sensor, 600mw 5.8Ghz VT
DX201 Camera with DC auto-Iris
A few pictures (Got a bit carried away during building so not a great deal of pictures)
View attachment 3471View attachment 3475View attachment 3470View attachment 3468View attachment 3467View attachment 3473View attachment 3450View attachment 3451View attachment 3452View attachment 3469View attachment 3472View attachment 3449View attachment 3474View attachment 3477View attachment 3476
And a few observations about the CX-4:
1. Overall construction
Very good construction, everything comes together for a snug fit and there is a lot of reinforcement. It is obvious droidworx have put a great deal of effort into making sure that he craft is as strong as possible. The manual needs updating though - there are some construction details missing. The missing parts are minor, for example - attachment of the gear plates, and locations for spacers. Because there is some minor details missing, I had to disassemble a few times in order to get the piece in the right spot. Minor point through. The craft is very strong and the polycarbonate shell can take a fair hit.
2. Landing gear
The landing gear is now 50mm wide instead of what I think used to be 25mm. This makes it a bit more rigid, and you can now suspend a big battery pack between the legs. Its the best spot to do it if you dont want to conceal the pack inside the shell, and lets face it - not too many batteries can fit inside the shell. I did have a minor crash early on whilst testing my Wookong - it jammed up, and the bird went down from 5m high whilst travelling about 5m/s. The only damage was to the carbon landing plates, which cracked along the holes drilled for the reinforcing bar (aluminium) because of this I cut my legs down to half way, which is actually better. More on that in a later post. The aluminium bracket that attaches the legs to the craft and holds the bottom shell on is quite weak - probably too weak. It deformed horribly on impact and took me a long time to fix with a hammer and vice, but the stress fractures are stil there so I need a replacement. Overall the cost of that one minor crash is gonna cost me $150 AUD
3. Props
13" props JUST clear the shell. And by just, I mean by 1mm at the rear. I was using XOAR precision pairs CF 13x6.5" to generate maximum lift, but I dont want a strike in mid air, so i'm going to sell and buy some 12" props of the same type. The props look awesome and they are pretty light too
4. Gimbals
The CX-3 gimbal from Photohigher is a crazy awesome mount, but to use it the landing gear must be full length (or thereabouts) and you cant mount the batteries external under the gear because the SAVOX roll servo sits there. For me, This was a deal breaker so I am going to get a CX-1 instead, and that gimbal should work better for my FPV adventures anyway. Unfortunately the Photohigher mounts are expensive, but I think the majority of that is tied up in Labour, as each servo is wired up to an external Poti by hand (Kim's hand!).
5. Flight Time
With the current specs, I am lifting a 6000mah 4S Nano-Tech. From a full charge at 4.2V per cell, I am flying 10 mins and have a residual voltage of 3.8V. I assume off the top of my head this means I could get away with about 20 mins flight time, but that is not validated yet. I will try soon.
6. GPS mounting
The CX-4 comes with some extra bits and pieces as spare. The kit actually contains enough parts to allow you to build a coax setup without having to purchase any spares. I used some of these spare parts to build a GPS mount for the Wookong which I have suspended off the rear left arm (as you look down on it). I know this creates drag and makes the airframe less efficient, but I believe that looking good is half the battle and I did not want to put up with a long cable coming out the arm and onto the top of the shell as I have seen in some builds. With the GPS in its current location I am getting full lock in 30seconds, with occassional drop out mid flight. I think my setup looks better than having a long pole sticking out the top of the CX-4 and its just as efficient.
7. Painting
I really like the fact you can be a little creative with the paint scheme for the shell. I've seen some beauties out there. I really like the darker colours but it has been done to death. I went for Pearl White, with the carbon fibre fittings it looks awesome and is easy to see. When I put lighting inside the shell, at night the whole thing will light up like an Egg with an LED in it. Should be sweet. The sticker is a Black Mesa one I got from Redballoon.com. Black Mesa is the research facility from the Half Life Game series. I grew up playing it so this is my little homage to the game that pushed me in a Technical and mechanical direction with my hobbies.
Videos to follow!
Attachments
-
 IMG_0094.jpg152.4 KB · Views: 841
 -
 IMG_0096.jpg149.3 KB · Views: 668
 -
 IMG_0097.jpg144.1 KB · Views: 637
 -
 IMG_0098.jpg147.1 KB · Views: 657
 -
 IMG_0066.jpg153.9 KB · Views: 677
 -
 IMG_0070.jpg147.6 KB · Views: 745
 -
 IMG_0092.jpg133.8 KB · Views: 698
 -
 IMG_0067.jpg144.6 KB · Views: 692
 -
 IMG_0071.jpg149.3 KB · Views: 705
 -
 IMG_0093.jpg133.7 KB · Views: 627
 -
 IMG_0068.jpg148.1 KB · Views: 662
 -
 IMG_0090.jpg148.1 KB · Views: 455
 -
 IMG_0069.jpg147.7 KB · Views: 485
 -
 IMG_0091.jpg148.1 KB · Views: 686
 -
 IMG_0095.jpg148 KB · Views: 699