Deans are killing my fingers!!!

Breezemont

Member
On the EC5 bullet connectors there is also a small holde on the side. Most of the time when soldering the wire onto the connector this is where the solder spills out. I now always make sure when the bullet connector is inbetween the wood panels the hole is blocked by the wood so the solder does not spill out. This reduces a lot less greif trying to remove excess solder on the outside of the connector.

My first try I also managed to fit to the wrong bullet connector in the wrong housing. I did wonder why it seemed so tight lol. So the last lesson is to make sure you are fitting the right housing on the right bullet connectors!
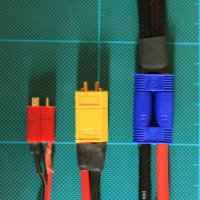
If you tilt the bullet 45 degrees and put the tip of the iron in the hole and feed the solder through the top next to the wire that works well too.

Of course, like Jes said, with A.P.P. it's simply "crimp, crimp, snap, snap" and you're done.
No "male/female" issue either. That's actually what pushed me over the edge, I copped a space and soldered on about 8 sets of ESC bullets backwards (female vs male), the next day I ordered a bunch of APP and haven't looked back.
The housings are easy to remove and re-use as well. I'm a big fan.

Anyone want to buy a big bag of used EC3's and bullets? :)
 
Last edited by a moderator:

Bartman

Welcome to MultiRotorForums.com!!
Today and yesterday I replaced all my power cables with 10 AWG wiring this also meant that I had to solder it onto my MK PDB. This was not hard to do although I have never liked the fact that the positive and negative pads are so close. A stray wire to could lead to trouble so double check to the connectors with a multimeter after.

Yesterday was a lot of greif with the EC5 connectors although now that I have learnt a couple of things I can avoid problems in the future.

As jes1111 mentioned dont get solder on the outside of the bullet connector otherwise the connector wont fit into the plug. If you managed to get a lot of solder on the outside you may be able to remove the solder but sometimes its easier just to use another connector and try again. Any small bits of solder I got on the outside I removed with desoldering braid and fine grit sandpaper.

If the wiring is short dont snap on the plastic housing until all soldering is done! One of my plugs housing melted. I didnt realise they have a pretty low melting point.

When soldering on the bullet connector I get a vice, 2 small sheets of wood and place them in between the vice. I then place the bullet connector between the two bits of wood and tighten the vice. This alllow the bullet connector to heat up properly so the heat does not transfer onto the metal vice.

On the EC5 bullet connectors there is also a small holde on the side. Most of the time when soldering the wire onto the connector this is where the solder spills out. I now always make sure when the bullet connector is inbetween the wood panels the hole is blocked by the wood so the solder does not spill out. This reduces a lot less greif trying to remove excess solder on the outside of the connector.

My first try I also managed to fit to the wrong bullet connector in the wrong housing. I did wonder why it seemed so tight lol. So the last lesson is to make sure you are fitting the right housing on the right bullet connectors!


Thanks for posting that. good info!
 

Bartman

Welcome to MultiRotorForums.com!!
i was watching this video

http://www.youtube.com/watch?v=y8ODI8fAU_k

trying desperately not to fall asleep but noticed that the contact tabs aren't very robust. how do they hold up to the sparking that goes on each time power is connected? the video is a lower AMP version of the connector, maybe someone could post a pic of the higher amps ones being used for multi's.
 

jes1111

Active Member

Attachments

  • pp-cutaway (1).jpg
    pp-cutaway (1).jpg
    36.3 KB · Views: 345

Malcr001

Member
A handy tip I found on another forum is, if you want to remove the plastic housing off the EC5 plug for whatever reason a good tip is to get a spare bullet connector and slot it into the male/female bullet. Place it in a vice and hammer the spare bullet connector until the connected bullet pushes out of the housing. This works without damaging the plastic housing.


Breezemont

Member
I've used crimpers like that since i was a kid..... theres one by Klein tools that's really nice. I've got blue point, few other cheap harbor freight type, but when i want to build something, i grab the kleins. Smooth

http://kleintools.links.channelinte...asp?nSCID=4&nCTID=4&sSKU=1006&nRGID=2811&sCT=
Kleins are great tools, I've had my linemans pliars since I climbed telephone poles building CATV in the 70's.
But the ones I linked to have the specific Powerpoles crimp area, which is different than your standard solderless crimps.
You can make them work with a bit of fiddling, but the chance for failure is higher.


Lifter

Member
Play it safe and go with EC5 that way you will hang in good with Jes1111 and Bart.


Sent from my iPhone using Tapatalk


Breezemont

Member
keep us updated in here... i'll give a set a shot on the next rig.....
Found out they are on backorder - it's gonna be a few weeks. :(
I have been using APP with a regular heavy-duty crimper, but it takes some tweaking and fiddling to get it right.
I think I'll give this method a try:
http://wh7da.wordpress.com/2007/12/24/crimping-anderson-power-pole-connectors/

Some really good information in this thread about crimping versus soldering:
http://endless-sphere.com/forums/viewtopic.php?f=1&t=41942&sid=c768991a8a43ae8601f17d6642f14bc3
 

jes1111

Active Member
I'd really, really advise getting the proper crimper. No amount of foodling about with a nail and a wimpy automotive crimper will get the same results as the purpose-designed tool. That thread you linked to (very interesting - thanks!) should lead anyone to this conclusion.
 

Top