Hi Paul,
Good Job ! superperb.
...unbelievable to see that the customers are still beta tester for the products of this company, cause they paid so less money for their A2 FC….or ?
Yeah, I have heard that so many times with DJI products. And I agree. I feel like my ~$12k I've spent on DJI equipment should get me on their payroll as a R&D engineer.
View attachment 21477
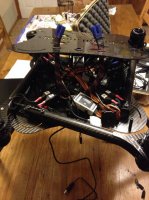
Does anyone else think the lg and cortex seems to flex a lot with a ton of weight under it?
Yup. I totally agree. I bet it would feel good with the standard length legs, but with the longer ones for the Zenmuse, it actually makes me a bit nervous. Definitely more "wiggly" forward/backward than side to side. Your Cortex is looking good btw.
check for a short. if the motor works with the other esc then most likely not the motor. imo- something in that area is shorting them out like that last time. check all motor wires/esc wires are insulated from anything conductive like the frame and screws.
Maybe a long shot, and I'm sure you'd have noticed, but I found a couple bullet connectors on the motor leads that were quite loose. I used a razor blade knife to "open" them up a bit to make them fit tighter. Doubt it's your problem, but wouldn't hurt to pay attention to. As you may know, 3-phase motor will turn with just 2 leads connected, but not very nicely.
Ok that makes me think is there anything wrong with the actual motor, so hooked it up to a spare hobbywing ESC and a servo tester and there seems to be no problems at all with the motor.
I really am at a loss not to mentioned a bit p*ssed off as it really should not be this hard.
I dont mind changing an ESC, but it is a right PITA trying to get a new one soldered on again each time, the holes in the PDB are really small.
Do I just buy a new PDB and start from scratch with new ESCs that I bought weeks ago.
I am losing the will on this one.
Yes it is the same motor (ESC) that went last time, but surely if there was a problem with the motor it would not work on the servo tester and hobbywing ESC?
After my unintentional meeting with the wall (again, my fault), I thought I ruined several of the motors, as they would kinda sorta spin doing the "motor test" function. So I ordered replacement motors along with the esc's. Yeah, didn't need a single motor, just six esc's. Like I've read other places, brushless motors these days are quite strong and the esc's are typically the weak link and pop like a fuse.
If you have a multi-meter (ohm meter at least), check for continuity between each motor wire and the frame (ground) of the motor. If you have continuity, then you probably have a shorted motor. Also, when you have the motor leads unplugged from the esc to do this, hold the bullet connectors of the motor together (alternate 2 together and then all 3 at once) and the motor should be physically harder to turn when the leads are touching each other.
Hope that helps. I'm not the expert on that, but that's just a few things that I've learned.
") .The MacOsx Software is still sending other gain settings to the FC as its shown in software.
.The MacOsx Software is still sending other gain settings to the FC as its shown in software.