You are using an out of date browser. It may not display this or other websites correctly.
You should upgrade or use an alternative browser.
You should upgrade or use an alternative browser.
HOW DO THEY DO THAT? - Product photos
- Thread starter Droider
- Start date
ChrisViperM
Active Member
The easiest way is in Photoshop...there are just 2 examples:
http://www.youtube.com/watch?v=8987BGD-EYE
http://www.youtube.com/watch?v=TZO5afHHGys
Just do a search on youtube: " Photoshop cut out objects " : http://www.youtube.com/results?search_query=photoshop cut out objects
Chris
http://www.youtube.com/watch?v=8987BGD-EYE
http://www.youtube.com/watch?v=TZO5afHHGys
Just do a search on youtube: " Photoshop cut out objects " : http://www.youtube.com/results?search_query=photoshop cut out objects
Chris
Aviator
Member
As it RAINING AGAIN here I thought I may try and get some of my new builds so Ill go check out the links, and try the tips.
Thanks guys
Dave
I know it`s depressing isnt it? I haven`t flown for days....
ZAxis
Member
How do they cut out images like the one below?
Whats the best way to photograph you builds?

You need more toys to do this properly ,Dave !
http://www.lastolite.com/cubelite.php
Just right for days like today !
andy
DucktileMedia
Drone Enthusiast
It's a tedious job to perfectly cut out a complex object like that. The better way is to make either a softbox or a backlit white screen. It takes a lot of experimenting but what you get is a more pro feel when there are subtle shadow details where the object comes in contact with the ground. You cant shine a light or 2 on the subject and get anything worth keeping without massive diffusion. My friend uses strobes and a soft back lie white screen/floor. He gets a really nice soft shadow and the he only has to key out most of the background. One of the harder parts of this is to get details of blacks an still retain the pop of all the other colors. Just grab a white felt or paper sheet and play with it. You will need some gels and at minimum some cheap halogen lights. That probably didnt help though did it?
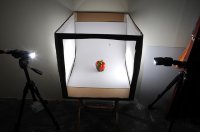
Something like this would be a great start.
View attachment 8505
Something like this would be a great start.
View attachment 8505
Attachments
Last edited by a moderator:
Vojec
Member
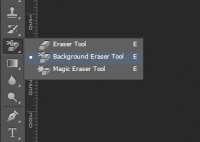
If you need a photo is the best way in photoshop using a tool remove background (magic tool) or something like that. Its remove very well and then just add some edge blur to blend enges with white background...
here is screenshot...
View attachment 8506
here is screenshot...
View attachment 8506
Attachments
Last edited by a moderator:
DucktileMedia
Drone Enthusiast
Yeah but that only works well if you have an even color background.
A simple way to do the photograph is to take a piece of large white paper and attach it to a wall at one end and then let it drape along the floor so you get a curve in the background similar to the apparatus Yuri has shown a photo of. The curve in the paper from the vertical to the horizontal creates the illusion of no horizon. So even if the background is not a perfect white you get an image which appears to have no horizon. You can even go as far as to use white card on either side so that you have made something that looks like a light tent. This will soften the shadows.
plingboot
Member
We often do large volumes of product shots which all need to be cut out.
i have a manfrotto table with a large, curved, rigid nylon surface, I light from below, behind and from each side - you'd be surprised how many lights and how much illumination is required.
this gives a shot which is on an almost completely white background, which I then manually cut out, via a bezier path.
20 years of practise makes this a quick-ish process. We never use any of the built-in short cuts though.
DucktileMedia
Drone Enthusiast
Stacky, I love the idea of the nylon to diffuse the light. never thought of that. There is this stuff we use in the sign industry called sign white. GE lexan but milky white instead of clear or fully opaque. It is designed to take out the hot spots of the lights behind a sign. That would be ideal for a box as back lighting seems to be one of the tricks to getting that soft shadow. Shooting black products is still a game of trial and error. I'm no expert by any means but I have tried it from time to time.
I use perspex as a diffuser to shoot through often. The distance your source light is from the diffuser (especially perspex) changes the contrast of the lighting. Further away the light source is from the perspex diffuser the softer the lighting, closer and it becomes a crisper type of lighting. Also if you have detail in terms of indenting on metal etc you can take small bits of black card and move them around on the diffuser till it is in the right place to bring out the indented details.
On my website you will see some shots of whine bottles, whose were done with perspex diffusers. Also there is a shoe shot for addidas which is underlit through perspex. Getting the balance between the underlighting on the shoe shot and the top light came down to making sure the light reading from the underlight was 1 1/2 stops brighter than the top light source. This gives a pure white for the background. Also not seen in that shot is all the black card surrounding the shoes to keep the edges relatively crisp.
http://www.michaelstephen.co.nz
I hope I explain this so you can understand but try this. On a cloudy day go up to a window and with the cloudy sky as the backdrop hold your hand up to the window. Keep note of the edge of your hand and how the light wraps around your hand. Now take a piece of black card and slowly slide it towards your hand but positioned so it will go between your hand and the wind as you move it in. As you get the card closer to your hand you will see the edge of your hand lose the effect of the wrapped around light and the edges of your hand will become crisper and more defined.
I think I should try and shoot a small demo of a simple lighting system anyone can do to photograph their multirotors using a few techniques I use for work.
Efliernz
Pete
I think I should try and shoot a small demo of a simple lighting system anyone can do to photograph their multirotors using a few techniques I use for work.
I'll just bring my machines to you to shoot
")
Pete
ksrimoungchanh
Member
they call this "blue screen". actually a green screen in the background. You can then overlay or just cut out background.