REBUILD: lessons & learning to follow (PT2)

SoCal Blur

Member
With the snow and cold moving back into the Northeast, I haven't made much progress on the testing. But I did want to mention a cool gadget I grabbed recently - which makes testing motor direction a bit easier. Technically it's made as a servo tester - but works fine with ESCs. It allows you to spin up 3 motors at a time (you need to do the last motor separately) without having to hook up the transmitter and receiver.


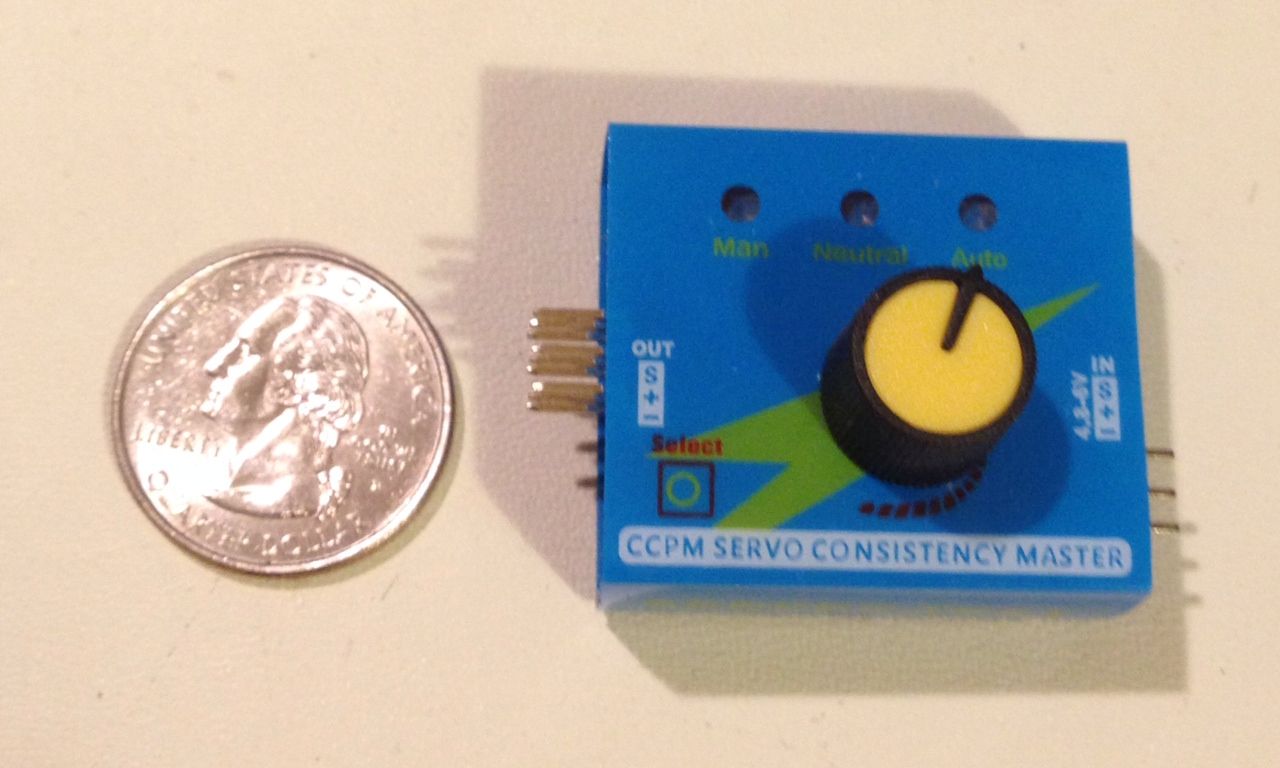
Power the ESCs from your PDB, plug in the 3 ESC servo wires to the output side of this little gem (which will provide power), and use the on-board pot to spin up the motors to test direction - all before you seal them into an enclosed, hard to get to location on your build. At only $4 shipped, its a nice addition to the small gadgets/tools to have on the bench.

I'm thinking of rigging up some sort of bench testing station for motors - and since I have some extra ESCs it should be easy. The fact that I could bench test motors without needing the Tx/Rx would be nice.

You can find them on eBay HERE: USA located for super fast shipping too.

I like this...of course all of my ESCs are OPTO so I would have to power it separately.

I'm wondering though, is it really a time saver? If you've got your motor/ESCs mounted to where you can access the bullet connectors on the motor wires, wouldn't it be easer to just fire up the rig (without props) and then swap motor wires as necessary? At least when you're done, you know that your ESCs are plugged in the correct order on your FC. With this gadget, you introduce an additional component for human error, i.e., unplugging your ESCs from your FC into this gadget and then, once finished, moving them back to your FC (hopfully in the correct order). Just thinking out loud. I still like it and will probably get one. One can never have too many "tools of the trade."
 

Motopreserve

Drone Enthusiast
Yes, the differences seem dramatic. I don't know how mine got so heavy. I do have the added battery tray - I think it's only 40 grams though. Also I'm running a 3S 5000mah battery which is a beast - but again, not THAT much heavier.
 

Motopreserve

Drone Enthusiast
PID Tuning Stand...FAIL...

I had been planning on making a tuning stand for quite some time now - and since the weather has promised to change just a bit for the better, I figured I'd better get on it. I had seen an example of what looked to be a decent one over on RCGroups, so I copied that idea pretty closely. It involves using a 360 degree swiveling Swiffer mop as the top piece, you make a base for the quad to sit on (I used wood), bungee cords for holding the quad level before you get started, and a stand to hold the whole shebang upright...


Well, I think I made it look pretty darn good. Problem is: it doesn't really work as designed. I think have the bungies too tight, because even though the quad will flop over if I let it, the bungees provide too much resistance when I try to push the quad in various directions to check the resistance of the motors. Ugh!


I am going to weak it - and if I can't get it to work, I will try the other method Jay showed me which is just a box frame using saw horses.

Not to be deterred, I headed out to the driveway today anyway, and tried my hand at tuning the Multiwii PIDs for flight. Test, land, adjust, write to eeprom, test, land, write to eeprom, test, land, write to eeprom, test, land, write to eeprom.... Not sure if I'm getting anywhere - but I did 3 batteries worth of testing and hovering.

More work and updates to come...
 

coreyperez

Member
Hey, I've seen something like that on the interwebs! I never got to build one, I just threw a battery in mine and started crashing. But what is the fun in that right?

One thing I've done for working out my KK adjustments was create a excel worksheet with all the menu options down the left side, and the baseline settings I was starting out at. I the made small columns with room to write at the top (as far as what he adjustments did for me). Then each time I made a change I'd write in that column alone and what the results were on the very top. The other VERY IMPORTAT aspect was I only changed one menu aspect per time so I knew what I was actually getting.

Now, once I get my stinking ESC issue worked out (I have one that keeps quitting/flashing red - AFRO 20a w/SimonK) I'll get back to it!

Corey
 

Attachments

  • Honey Badger KK trouble shooting.jpg
    Honey Badger KK trouble shooting.jpg
    19.6 KB · Views: 145

jbrumberg

Member
Welcome back from the "field" Corey. I used a "spread sheet" too- scrawled on the back of a piece of scrap of paper with the intentions of putting it on excel, but I lost the scrap of paper; maybe it was toilet paper? I forget. Anyways I am glad you are back and safe.

Scott- That testing stand looks pretty neat. Too bad it turned out that you had to tune the testing stand bungees. Who would have known? I am glad you managed to get some airtime this PM. I did not. That square frame test rig takes up some room, but should work ok if you can manage to tether your quad adequately to the rig frame. Good luck.
 

Motopreserve

Drone Enthusiast
Honestly, it doesn't matter how meticulous I am with documenting the changes - since I'm not really sure what I'm looking for. There is one video I've been using as a guide that sorta depicts what happens when it's right/wrong. But I'm having a hard time translating that into my real-world experiences.

I think ink I may need to make a stand that allows me to tie the 2 points if I'm going to try to do any tuning indoors. But at this point I need a real guide on what to look for when it's actually in the air.

I did only change one thing at a time. In fact I never got off the pitch PID setting. heres your argument for the SuperX :)
 
Last edited by a moderator:

Motopreserve

Drone Enthusiast
Scott- That testing stand looks pretty neat. Too bad it turned out that you had to tune the testing stand bungees. Who would have known? I am glad you managed to get some airtime this PM. I did not. That square frame test rig takes up some room, but should work ok if you can manage to tether your quad adequately to the rig frame. Good luck.

i think I'll wait until the weather gets better to make that other stand - and I'll do it at the shop. I have been planning on doing all my quad stuff there - but have been waiting on the weather. I have plenty of room there and should be able to get it straightened out, if the in-air tuning doesn't get me where I need to be.

All i know is that the idea of holding the quad with my hand while trying to tune is NOT going to happen!
 

SoCal Blur

Member
i think I'll wait until the weather gets better to make that other stand - and I'll do it at the shop. I have been planning on doing all my quad stuff there - but have been waiting on the weather. I have plenty of room there and should be able to get it straightened out, if the in-air tuning doesn't get me where I need to be.

All i know is that the idea of holding the quad with my hand while trying to tune is NOT going to happen!

On a completely different note but related to your build, I finally found a dome that will protect the Multiwii and GPS w/shield and not interfere with the GPS signal and it's only $25 + shipping. I got the largest one (174mm). Something to consider if you ever decide to give up the "handle" you've got now:

http://www.helifreak.com/showthread.php?t=506201
 

Motopreserve

Drone Enthusiast
It's funny you mention this. I was about to post that the handle was the single best thing I've done to this quad! :).

I find myself much more comfortable grabbing it to carry it around without smacking into the doors etc. thanks for the link though. Might have to grab one for when I can finally get out in the countryside and let loose!
 

Motopreserve

Drone Enthusiast
More testing...

Did a quick "un-mod" on the chopstick quad today, removing the battery tray I had made. I'm chasing down every last gram on this build, and sadly, I just can't get it down to 1700grams. I wrapped the batteries in clear packing tape (thanks Jay!) and attached Velcro to the battery, as well as the small 'battery carrier' that came with the frame. An additional Velcro strap and it felt pretty secure.

After reading MANY pages of Internet gobblygook about PIDs I headed back out for some more tuning and testing. The day was overcast - but the 35f weather felt like spring had come early. I ended up not messing with the settings much, instead trying out a couple flight modes. The basic level (horizon) mode works pretty well. I decided to slap the Mag on to see how that worked. Didn't change much, but it seemed to keep a slight yaw drift at bay.

Next up was the Baro mode (altitude). The last time I tried this the quad jumped in the air. Apparently cold weather is no good for it, but I had let it acclimate plenty. This time it seemed to work fairly well. The big difference is that it takes a lot of throttle control out of the sticks. Not sure what that's about. More research...

i made the mistake of getting carried away (I was having too much fun with these little victories) allowing the 2nd battery to drop too low. For some reason the warning light didn't go off - but on recharge, it took 4600 of 5000mah of charge. Not good! I'll be curious to see how it looks on the next flight.

Ironically, after all the reading and research about PID tuning , I really didn't feel any more informed. But after the flights today I somehow searched the right terms , and came up with (for me) the most helpful video yet. And wouldn't you know, it's in FRENCH!!!! Fortunately, there are subtitles. I highly recommend it for anyone struggling with what to look for while tuning.

Cant wait to get back out there and work on it some more. I need to get to a field. My goals have been met with what I can achieve in the driveway. Fortunately the field I go to had the parking lot plowed. Last time it was blocked by a 4 foot bank in the entrance.

Stay tuned...

 
Last edited by a moderator:

coreyperez

Member
The lesson for today:

When you THINK you are ready to give aerobatics a try...


You aren't....

Corey
 

Attachments

  • broken badger.jpg
    broken badger.jpg
    150.7 KB · Views: 156


Motopreserve

Drone Enthusiast
Oh no! Corey, that thing came flying back your way pretty damn fast. Be careful!!!!

What type of props are you running? They look like the cheap ABS type. You might want to think about an upgrade. Been reading reports about them coming apart mid-flight.
 
Last edited by a moderator:

jbrumberg

Member
So Corey, it appears that at one point you finally did get your PI gain settings tuned to your satisfaction for the Badger on the KK 2.1 board?

Scott- I have been reading reports and seeing visual evidence of Honey Badger arms breaking on hard ground impact and/or less than effective interactions with solid objects.

I get this impression that Corey saw this crazy guy fly a helicopter upside down once and he gets really "bored" flying around that government issue copter the government "lets" him fly so when he has an opportunity to fly a multicopter upside down he gets these irresistible urges.

Sorry about the Honey Badger Corey. I hope you can get it airborne soon.
 

Motopreserve

Drone Enthusiast
The Honey Badger definitely seemed like a fairly solid design - but then again, flying into the ground will put any design throuh it's paces! :)

The sky is clear as a bell here today...a bell sitting in 11 degree weather that is. I'm still going to be attempting to get some more serious PID tuning done. It seems I was adjusting the PIDs with the Horizon (stable) mode on - and that's not the way to start. I need to get the thing airborne in ACRO mode, and then adjust the PIDs from there. The problem is - with the wind we've had, the ACRO mode might as well be called "crash mode!" I'll give it a shot anyway...
 

jbrumberg

Member
Mine was sensitive to the wind in acro yesterday. When I activated self leveling the KK board appeared to lock on the Tx stick settings and took off. It appeared that I had left stick control only until I deactivated S-L. The quad was definitely going with what little breeze that existed.

It's pretty breezy at the moment around here, but I am ready to go if the wind calms down.

Scott- Be careful and good luck if you go out today.
 

coreyperez

Member
I had the pieces replaced in about 30 minutes but when I gave it a quick indoors test-run the motor on that arm wasn't really "happy". I'm not sure if its ESC or Motor. I've got replacements in either case, but I opted to put it aside and start working on my FPV equipment. I've had it for about a month and hadn't got around to putting it together (mostly because the APO/AP mail system decided after 7 months my address was "undeliverable" and sent the monitors back to Amazon...) So, re-ordered those and decided to wire it up to give it a test run.

Now if I have Monday off (not sure yet) I'll take the Honey Badger apart and replace the ESC / Motor. I just ordered the rest of the arm available through RMRC (3 more sets). I've already broke 2 arms, I've only got one (currently) in reserve. 2 Motors and 2 speed controllers...

I love having spares on hand!

I nearly had the flip but throttled it back into myself. I don't think I had it balanced quite right. It felt a little aft-heavy and that is the way it accelerated.

As far as getting the settings worked out, I'm getting there. I got bored with tuning and figure I'd go straight to smashing today.

Corey
 

jbrumberg

Member
Corey- So "hostile action" is what brought the Honey Badger down? Or will that be today? :highly_amused: Good luck. You should have every day off. All you service people; everywhere. Good luck

My KK board needs some serious self leveling tuning. I tend to fly and crash LOS ACRO, so I have not been focusing on the self level tuning. My gain settings of P = 0, Limit = 0 reflect that, and may be responsible for the nonresponsiveness of my quad yesterday. Apparently I get into and have been getting into trouble with the self leveling. I will be looking at this the next time out.
 

coreyperez

Member
I really started looking into the SL settings and realized there are numerous settings that need to be adjusted to actually make an adjustment. For instance, I read that the SL and the PI settings should be matched, and I had my stick scaling settings too low, thus not giving me the responsiveness I needed. If there is a way, I could send you the current excel sheet I've got my settings at. I'm not sure if it would REALLY help, but it may give you another place to start.

Corey
 

jbrumberg

Member
Thanks Corey for the suggestion. I got a similar suggestion from another builder/flyer at RCG. It does make sense. I will match my P and Limit settings before the next flight. I appreciate the offer of support too. Jay
 

Top