View attachment 13654View attachment 13655View attachment 13656
I just received a DJI A2 today. My first impression on opening the box was wow! Looking that the quality of the construction, gorgeous aluminum cases, and the size of the GPS, this is a worthy upgrade over the WKM! I did not have my WKM with me and compared my Naza V2 GPS to the A2. The Naza V2 GPS is 45mm in diameter the new A2 is a whopping 60mm. It just looks huge. The included GPS mount is now 5mm in diameter and 16 cm, 12 cm and 8 cm in length. The have also added some kind of filter inline on the can bus cable.
The MC contains a Futaba compatible FASST Rx and it has two small ports for Spektrum satellite receivers. They have added an inline can bus connection between the IMU and the MC along with the usual one on the connection between the GPS and the MC. They have also moved the micro USB port from the MC to the LED like the rest of their controllers. The LED has the BT module so you will be able to control the parameters from your iOS device the same as the WKM. It is a nice feature when first setting up the A2 and when flying in different environments. This should be important to the pros that fly to different locations. The App allows for IMU calibration and Compass calibration. No computer to carry around.
The PMU is the same size as the current but in aluminum
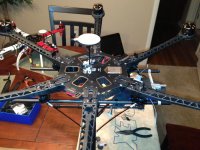
I have the A2 installed on my S800 now. I have the vibration isolation mount but I was told that with the A2 we can go back to the original mount on the main board. That is what I did. In order to make sure that I had space around the IMU, I wrapped it in tape until it was a tight fit in the hole then I stuck it down with the double sided tape from DJI.
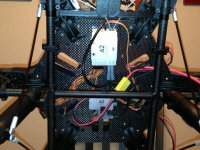
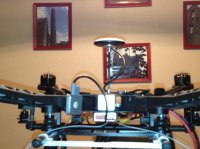
I have the MC and PMU mounted on the underside of the bottom plate. That way the antennas have a view to the rear and I have easy access to a can bus port for my iOSD, Zen15 or my Data Link. The BT LED is connected to the PMU and mounted on one of the rear arms with Velcro. The manual says to have the antenna mounted up, so the lead to the LED must be mounted up. Make sure that you follow the DJI connection guide to the letter. There is a note that many may overlook, “CAN 1 and CAN 2 ports are working independently, devices connected to them are not interchangeable. IMU and GPS Pro to CAN 1, LED-BT, iOSD, Zen 15, to CAN2, PMU to CAN 1 or CAN 2.” My edit to the manual to make it clearer.
Here are some pictures of my install.
I have done the updates to the various subsystems on the A2. It is no longer a single upgrade but you now have firmware for the IMU, the GPS Pro, the LED, the MC etc. I think that there are 6 separate subsystems now that have their own firmware. I am flying with a Futaba 8FGS and starting to set up the Tx for this controller. The binding process is very simple. Turn on your Tx in a new model and the power up the A2 and press the bind button. It could not be easier. Once I have it flying will with the Futaba I will try the Spektrum satellites that are supported with this MC. Equality for all.
If you have a Futaba, 8FGS or higher, you will love the A2. The channel mapping is huge. Some have complained that it is not 18 channel but I am happy with what I got. Make sure your Tx is set on Multi, there are different varieties so check your Tx manual for the appropriate one for you specific Tx.