shawdreamer
Member
after careful research and consideration I initially went with a Dji 450 clone frame kit from Chinaland that came with pretty much everything Id need to build my first quad (a complete ATF kit so to speak)
After following the in places rather badly translated instructions as best I could (being new to the whole multirotor scene I struggled once or twice with the tech lingo even when the translation was accurate )
)
soldiered on regardless and eventually got it all together and working like it should do, took it out for a few flights and was generally happy with it...........and this is were the "sorta" bit in the title comes in), due to a lapse in concentration of which I have no excuse for I accidently switched models on my transmitter and subsequently lost control of my new quad in possibly the worst fashion (It went straight up incredibly fast, turned over, came down incredibly fast)
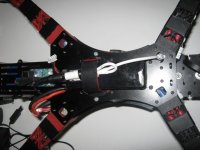
after salvaging what I could from the sorry mess that used to be my new quad I ordered replacements and a entirely new frame, there wasnt much real estate to play with on the 450 frame so Id pretty much been confined to fitting everything as was required, the X-mode Alien frame I replaced it with has a great deal more space to play with, which Ive used quite happily
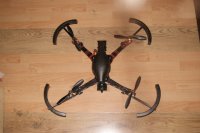
Dont have any actual "build" pictures to speak of but I can supply a few "finished" in the hope that some of the great deal more savvy builders on ere offer some pointers.
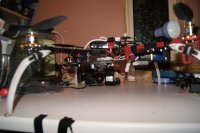
here she is in all her (not so glorious) glory..... albeit a bit muddy on the props after I flipped her over to check something and didnt wipe em off properly.
View attachment 23397
general spec.
What came with the Kit
F450 Clone FlameWheel Frame
A2212 1000KV Motors
JMT 30A ESC's
QQ Super Flight controller
JMT 11.1V 2200mah 20c lipo battery
10x45 cheapo props (my CF's are diligently awaiting their call on the left there)
RadioLink 6ch Tx & RadioLink 7ch Rx
What Ive added
X-mode Alien frame
Standard 450 landing struts
RGB led's front and back & controller
A battery screamer
A slightly "non-standard" FPV rig
A small supplementary battery for the lights and fpv
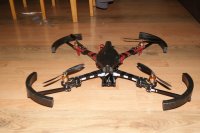
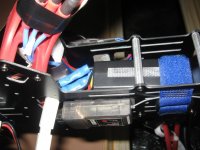
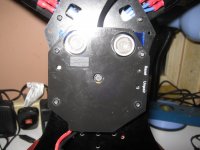
LED battery screamer set on the top rear of the frame just behind battery, Led controller ontop of battery (the white thingy), The wires over the screamer are the led feeds.
View attachment 23396 View attachment 23398
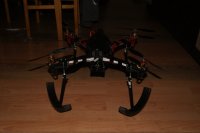
After the crash I decided Id much prefer having all the sensitive and less pretty looking stuff tucked away out of sight and easy damage so I extended the motor leads and moved the Esc's into the frames bowels along with the distribution board and FC (makes for better lines too....though purely cosmetic).
View attachment 23400
hint at what I meant by "non-standard" fpv in that photo
coincidently I just like to say how fortunate I was to choose a kit with the little known QQ Super FC, its a delight for a first timer, granted it doesnt have half the capabilities of some of the slightly more expensive FC's (single flight mode, no acro, no idle-up) but it makes up for that by having twice the benfits for a newcomer with zippo experience building, its an incredibly easy FC to set up with only on adjuster for gain and four DIP switches to select model..... the instruction used one side of a A5 sheet, it was that simple
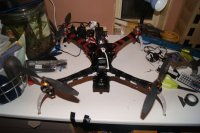
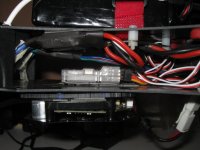
The frame has a extended rear top and bottom panel that appears to be purely for a battery (though anything bigger than a 2200 3s would probably be a squeeze)Using it for such however seriously over balanced the frame so I opted to have my Flight battery up top as its easier to swap out and with careful positioning I can offset any imbalance caused by adding and removing gear to the frame.
Instead Ive used the rear slot to house a much smaller and lighter 1100MAh 3s battery I liberated from my sons old AR.drone, this'll power any extra's added to the frame rather than sucking juice from flight battery thats much better served keeping me in the air longer.
View attachment 23401
I slung the Receiver underneath while I was at it as I figured that position would give it its best chance of maintaining a good signal (having no experience I could only assume that'd be how it works)
While I was "liberating" parts from the AR.drone I decided to try something out (on the off chance it'd work), I stripped out the Main & Navigation board from the drone and mounted it on a piece of clear perspex (to make mounting it somewhere else more easy) and then mounted the whole package to the underbelly of my frame (the battery was already along for the ride so I figured it might get lonely) plugged it all in and HEY PRESTO for what its worth I had a ready made fpv rig with onboard transmitter and dual cameras (one look down, one that can be placed at leasure, both can record and capture pictures) and limited telemetry (on-screen Battery level, altitude&speed while below 8meters, above that the ultrasonics cant receive and the look-down cam cant see clear enough to measure speed), there's also the added benefit of any Android, windows or Apple Tablet/phone/pc can be used as a monitor without the need for a seperate receiver.
View attachment 23402
I dont know just how limited the transmission range is gonna be (the AR.Drone manual claims 50m but thats probably only in perfect conditions) and the forward facing camera hasnt got the best of definition but its more than enough to get some FPV practice in before I sort a proper rig.
overall current weight is just shy of 1300g
well thats basically it really, I do have a little landing gear mod Ill be building and adding at a later date but that wont be happening till the bits arrive obviously......and dependant on wether it actually works out as good as Im hoping it will.
I have added pictures but until I hit that "create thread" button down there I wont know if Ive done it right so bare with me if I havnt and I hope you enjoy reading my first "complete and utter noob to this whole multirotor thing" build thread.
look forward to comments and will appreciate any pointers from those more wise than myself on the ways of the rotor'ed
ps........... before anyone points out that the landing struts are remarkably far from were they should actually be..... its done on purpose, I hate the bloody things, mainly because their ugly and imho look tacky but also becuase they offer next to no stability when landing or taking off (infact their crap even when the frames just sat motionless), were I attached them makes taking off without needing to "punch the throttle" a breeze and landing a much more gentle affair as theres less risk of a "topple over bounce"
After following the in places rather badly translated instructions as best I could (being new to the whole multirotor scene I struggled once or twice with the tech lingo even when the translation was accurate
)soldiered on regardless and eventually got it all together and working like it should do, took it out for a few flights and was generally happy with it...........and this is were the "sorta" bit in the title comes in), due to a lapse in concentration of which I have no excuse for I accidently switched models on my transmitter and subsequently lost control of my new quad in possibly the worst fashion (It went straight up incredibly fast, turned over, came down incredibly fast
)after salvaging what I could from the sorry mess that used to be my new quad I ordered replacements and a entirely new frame, there wasnt much real estate to play with on the 450 frame so Id pretty much been confined to fitting everything as was required, the X-mode Alien frame I replaced it with has a great deal more space to play with, which Ive used quite happily
Dont have any actual "build" pictures to speak of but I can supply a few "finished" in the hope that some of the great deal more savvy builders on ere offer some pointers.
here she is in all her (not so glorious) glory..... albeit a bit muddy on the props after I flipped her over to check something and didnt wipe em off properly
.View attachment 23397
general spec.
What came with the Kit
F450 Clone FlameWheel Frame
A2212 1000KV Motors
JMT 30A ESC's
QQ Super Flight controller
JMT 11.1V 2200mah 20c lipo battery
10x45 cheapo props (my CF's are diligently awaiting their call on the left there)
RadioLink 6ch Tx & RadioLink 7ch Rx
What Ive added
X-mode Alien frame
Standard 450 landing struts
RGB led's front and back & controller
A battery screamer
A slightly "non-standard" FPV rig
A small supplementary battery for the lights and fpv
LED battery screamer set on the top rear of the frame just behind battery, Led controller ontop of battery (the white thingy), The wires over the screamer are the led feeds.
View attachment 23396 View attachment 23398
After the crash I decided Id much prefer having all the sensitive and less pretty looking stuff tucked away out of sight and easy damage so I extended the motor leads and moved the Esc's into the frames bowels along with the distribution board and FC (makes for better lines too....though purely cosmetic).
View attachment 23400
hint at what I meant by "non-standard" fpv in that photo
coincidently I just like to say how fortunate I was to choose a kit with the little known QQ Super FC, its a delight for a first timer, granted it doesnt have half the capabilities of some of the slightly more expensive FC's (single flight mode, no acro, no idle-up) but it makes up for that by having twice the benfits for a newcomer with zippo experience building, its an incredibly easy FC to set up with only on adjuster for gain and four DIP switches to select model..... the instruction used one side of a A5 sheet, it was that simple
The frame has a extended rear top and bottom panel that appears to be purely for a battery (though anything bigger than a 2200 3s would probably be a squeeze)Using it for such however seriously over balanced the frame so I opted to have my Flight battery up top as its easier to swap out and with careful positioning I can offset any imbalance caused by adding and removing gear to the frame.
Instead Ive used the rear slot to house a much smaller and lighter 1100MAh 3s battery I liberated from my sons old AR.drone, this'll power any extra's added to the frame rather than sucking juice from flight battery thats much better served keeping me in the air longer.
View attachment 23401
I slung the Receiver underneath while I was at it as I figured that position would give it its best chance of maintaining a good signal (having no experience I could only assume that'd be how it works)
While I was "liberating" parts from the AR.drone I decided to try something out (on the off chance it'd work), I stripped out the Main & Navigation board from the drone and mounted it on a piece of clear perspex (to make mounting it somewhere else more easy) and then mounted the whole package to the underbelly of my frame (the battery was already along for the ride so I figured it might get lonely) plugged it all in and HEY PRESTO for what its worth I had a ready made fpv rig with onboard transmitter and dual cameras (one look down, one that can be placed at leasure, both can record and capture pictures) and limited telemetry (on-screen Battery level, altitude&speed while below 8meters, above that the ultrasonics cant receive and the look-down cam cant see clear enough to measure speed), there's also the added benefit of any Android, windows or Apple Tablet/phone/pc can be used as a monitor without the need for a seperate receiver.
View attachment 23402
I dont know just how limited the transmission range is gonna be (the AR.Drone manual claims 50m but thats probably only in perfect conditions) and the forward facing camera hasnt got the best of definition but its more than enough to get some FPV practice in before I sort a proper rig.
overall current weight is just shy of 1300g
well thats basically it really, I do have a little landing gear mod Ill be building and adding at a later date but that wont be happening till the bits arrive obviously......and dependant on wether it actually works out as good as Im hoping it will
.I have added pictures but until I hit that "create thread" button down there I wont know if Ive done it right so bare with me if I havnt and I hope you enjoy reading my first "complete and utter noob to this whole multirotor thing" build thread.
look forward to comments and will appreciate any pointers from those more wise than myself on the ways of the rotor'ed
ps........... before anyone points out that the landing struts are remarkably far from were they should actually be..... its done on purpose, I hate the bloody things, mainly because their ugly and imho look tacky but also becuase they offer next to no stability when landing or taking off (infact their crap even when the frames just sat motionless), were I attached them makes taking off without needing to "punch the throttle" a breeze and landing a much more gentle affair as theres less risk of a "topple over bounce"
Attachments

Last edited by a moderator: