Help with assembly

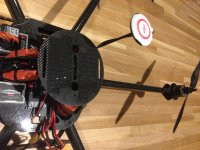
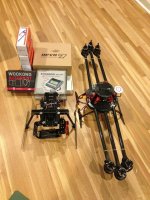
I bought a copter from rc-drones.com. It has arrived.

Could you please help with basic assembly?

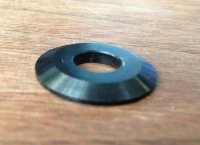
I have motors with bolts sticking up. I have washers, propellers, and nuts.
What goes on the bolt first? The washer? And which way do I point the washer, with the flat side down or the flat side up?

Does it matter which arms the "right" props and "left" props go on to, or just every-other-one has a right- and left-prop?

The 5000ma batteries are taking about 2 hours to charge, is that typical? I understand I will get 10-12 minutes of flight time with 2 batteries, so 4 hours of charge = 10-12 minutes of flight, WOW!

Thanks in advance for your help!
 

Tomstoy2

Member
Hmmm, let's see if I can shed a little light.

The sharp edge that you see on your washers is caused by the stamping process. It does not matter which side you use, the idea of a washer is to distribute the load. And, yes, the washer gets installed onto the bolt first.

As for the motors/props, yes, it is extremely important which boom and prop is designated #1 and the rotation of the subsequent props. You need to check your manual, ( probably an on-line manual ), for your flight controller to know which boom is number 1 and the rotation of the following motors.
Not knowing which controller you are using it is impossible for us to know to advise you.

I can't answer you about the charge time of your batterys unless you tell us which charger you have.
However, if this helps, I use an ICharger and run 4s 5000mah batterys. My charge time at 1c typically runs a little over an hour. I can do a rapid charge under 20 minutes, plus it has the capability to charge multiple batterys at the same time.
Considering that you did not list what multi rotor you have, which motors and the other details, I find it highly unlikely that you will get 10-12 minutes from a battery.

Once you are finally ready to fly, to compute how much flight time you can expect, do this.
With a fully charged battery, hover for 3 munutes and land, then recharge, ( I'm assuming that you have a charger that lets you know how many mah's it puts back in here ).
Take the recharge mah's number and divide by 3. This then tells you how many mah's you consume per minute.
Next, using the 20% rule, ( leaving 20% of charge left in the battery to prevent damaging the battery ), you have 4000 workable mah's.
Take 4000 and divide how many mah's per minute you consume.
This gives you how many minutes you can expect to fly in a hover.
After that, minus another 10% from that as you will be consuming more mah's flying around that in a steady hover. This then gives you a workable time to fine tune as you see fit as your experience with the system grows.
 

Hi Tom, thanks for the reply.

I got this system:
CarbonCore 950mm Hexacopter, 1.5mm Carbon Fibre
Wookong-M Flight Controller
AG550-NX Camera Gimbal
6-Turnigy Plush 40a ESC's
6-Rc Tiger Motors MT3515-15 Motors
2-Power Distribution Boards
6-Graupner 14" Propellers
6-Graupner Spacers


http://www.rc-drones.com/hexakong_6S_xl.php

When you say "sharp edge," do you mean that one side is slightly cone shaped, and the other side is extremely flat? Because that's what I am experiencing here. I just want to know if that slightly coned side should point towards the motor or towards the prop.
 

Attachments

  • IMG_3302.jpg
    IMG_3302.jpg
    96.3 KB · Views: 233

Tomstoy2

Member
It doesn't matter. The washer will deform itself to the material it compresses to. As a matter of preference, myself, I always have the cone'd side, as you say, toward the bolt head. Just remember, metal is malable. It will deform. even passing wire across stainless steel will eventually deform it.

Ahh, thanks for the picture! just saw it. In this case, the cone goes toward the bolt head.


Tomstoy2

Member
Face the multi rotor's tail toward you. The # 1 motor will be the front one in + mode, or the front right in x mode. The prop will be counter rotating.
The rest of the motors are the counter rotating and alternating props.

That's one hell of a system you have there!!! I just love CorbonCore.

I have a WKM myself, so can help you out all you need.
 

Thanks for your continued help.

I guess I still don't know which side is the tail. Here's the photo of the craft:
View attachment 8127

I guess I don't know which is + mode or X mode.

So if I figure out which is "front," then the front one is counter-clockwise, and then you just alternate as you go around the craft in a clockwise order? So 12:00 is CCW, 2:00 is CW, 4:00 is CCW, 6:00 is CW, 8:00 is CCW, 10:00 is CW?
 

Attachments

  • 3374.ece211a54bccb97d91695d45f887f939.jpeg
    3374.ece211a54bccb97d91695d45f887f939.jpeg
    130.9 KB · Views: 274

Tomstoy2

Member
Front is your determination. Your IMU has an arrow on it, and needs to be pointed toward the front. Decide whether youu want to fly in in a + or x configuration, then have the arrow pointed toward the exact front, either down the center of the #1 boom in the + configuration or between the # 1 and # 2 booms in an x configuration. Keep the front between the landing skids, of course.

In either configuration, the motor numbering sequence goes counter colckwise.
#1 motor gets the counter clockwise prop mounted, #2 gets the clockwise prop mounted, ect,,,.

Before you get to mounting the props though, it is extremely important to program the esc's individually.
Do you know how to do this? Do you have a program card?
There are only a few things you need to change from the default settings for the esc's.
Brake = off
battery type = nicd
motor timing = med, or high. Go with high for now.
Make damn sure you exit the programming properly or the settings will not be saved.

Connect each esc to the throttle port of your reciever, not the motor controller to do the programming. Have all the other motors unplugged from the esc's while programming.
First, do the high and low throttle calibration for the esc's, then enter the calibration mode and make the above changes.

After you do each esc calibration then you can connect the esc's to the motor controller module as per the instructions and mount. Props should be the very last thing you do. Do not mount the props until everything else in the wkm is set up properly, for your own safety.
 

Hi Tom, thanks. I got this built from rc-drones, and they flew it before sending it to me. Do I still need to program the ESCs, or is that something Tony would have done for me?

What else do I need to do to get the props spinning?
 

Tomstoy2

Member
Tony is a pro, I'm sure he had done it for you, so no need to worry. In this case, just mount the props, charge the battery and you should be ready to go.

Did you buy the transmitter from him also? If so, I would then check the expotential settings for roll pitch and yaw. Set them to 40% to begin with, to make it as stable as possible.

Take off in gps mode. When plugging in the battery, give it plenty of time to allow the gps to establish a good lock before taking off. Your led should flash red repeatedly, gradually slowing down from a rapid set of 3 flashes to a rapid set of two red flashes until it flashes purple and a single red. At this time it is ok to take off.

Don't dally around when taking off. You want to get off the ground rather quickly.

What I do is to bring the throttle up until it get just a tiny bit light on the skids, then do a gentle stir of the sticks to help get the gyros somewhat stable, then give authority to the throttle to get it 2 to 3 feet off the ground. The gyros will not fully stabilize until it it up in the air.
It might try to drift off slowly in one direction or the other, this is normal as the gyros are not stable yet. It it easily corrected by gentle input of the sticks, do not over compensate.

Be gentle with the sticks, keep he close, and take your time until your confidence grows.

If you have a camera, record your maiden and post it. It will help with fine tuning.

I'm sure Tony has done an excellent job of it, though. It's just a matter of getting her to your liking.

Before you do take off, Post some pics of your set up, focusing from above so we can double check your porp set up.

I think you will be amazed!
 
Last edited by a moderator:


My problem right now is getting the props to start spinning.

I have figured out which is the "front" - it's where the red arrow on the GPS points. I plugged it in to a computer, ran the software, and verified it is receiving signal in the Tx Calibration screen. I just don't know why I can't start the props.

I did the stick motions (both to bottom center, both to bottom outside, both to bottom left, both to bottom right) to start the props and nothing is happening.

I charged the batteries, turned on the transmitter, then plugged the batteries in to the craft. When I change the flight mode switch, the blinking light changes color, so I know the tx/rx are talking... I just can't seem to get the props spinning.

Am I doing something in the wrong order? Am I forgetting to do something?
 

YAY I got it working - the trick is, it has to have that "Combination Stick Command" at the same time it has GPS signal. I wasn't doing that exact combination. Once I lost daylight (and it started getting brrrrcold outside) I began trying to just get the props spinning inside the house. That didn't work out so well, because it didn't have GPS signal. Earlier, it had GPS signal, but I didn't know about the CSC. Now when I put it outside and CSC, the props spin right away.


I looked at the props as they slowed down ... the prop where the arrow on the GPS is pointing is spinning counterclockwise. And the prop there has the sharp edge pointing in that direction. And then I change it up every other prop. So that's all correct, right? This means the builder put the blinking light towards the back.


All that remains is to tighten the props (I only had them hand-tight until I was sure I had the right prop in the right place), then go hover it!


Thanks for your help, I couldn't have done it without you :) I can now think of a cool beginner's guide that would be helpful for near-first-timers like me...!
 

Tomstoy2

Member
No problem, Sean. Glad to help.

Gps has nothing to do with starting, though. It's all in csc. It will start in all 3 modes, manual, att, and gps.

As I said, just fly for now in gps.
That way, once you are up, if you get confused with orentation all you have to do is let go of the sticks and it will sit there and wait for you to get your act together.

Do not add any trim on the transmitter. This confuses the imu.

Any other problems just give out a shout.

Good luck and have fun!
 

Tomstoy2

Member
Also, as a way to help you with keeping orentation. get some yellow tape or something to put on the front boom. You'll need it.

In case you are wondering, you are in + configuration.
 

It won't take off. The props spin, VERY fast, but it is not lifting. Is it possible that the props are on the wrong arms, even though I was going with the arrow on the GPS?
 

Tomstoy2

Member
No, it's not the gps that determines #1, it's the imu, which is the big white fat box. It has an arrow on it that points to the front. GPS arrow only points north.

After getting that right, once again with props off, spin up the motors and determine that they are spinning the correct direction. #1 spins counter colckwise, # 2 clockwise, ect,,,.

Right now it sounds like your porps are orented incorrectly, spinning backwards, giving you down thrust instead of up.

Go to this site and download the 3.5 manual for the WKM.

http://www.dji-innovations.com/products/wookong-m/downloads/
 

Tomstoy2

Member
As a note, the gps and front should be the same unless something is totally wrong.

This could help you determine #1,
label each motor esc wire comming out of the motor controller,
then pull all the connectors except #1 and spin back up.
That motor should be spinning counterclockwise.

Look at page 49, I6 diagram of the manual.


Top