wayno complaino
Member
After the destruction of my Hoverfly Y6 I wanted something a bit more simple and cheaper to practice my piloting skills.
I already had a TMF AQ50 Pro and after seeing all of the test vids from Warthox I decided to use the same platform. What's the point of trying something untested when there are many videos of a perfectly good set up working awesomely.
So here's the setup:
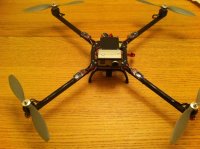
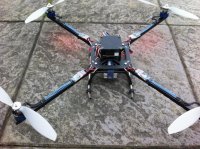
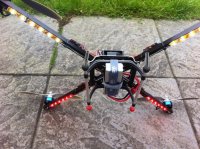
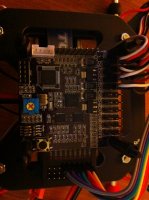
TMF AQ50 Pro - 1.2 Firmware with hardware mod
Flyduino.com 'Warthox' frame - 500 size
Flyduino.com cover plate and standoffs
Keda 20-50 motors
Hobbywing Fun Fly 10A esc's
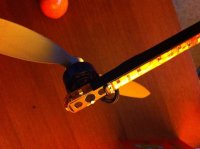
APC 8" 3.8 props
2200mAh 3s battery
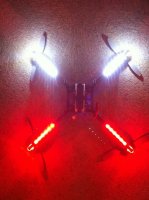
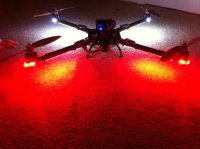
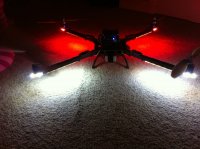
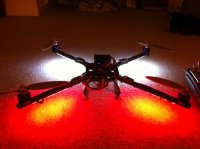
White and red LED strips
450 heli skids
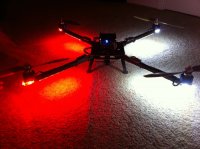
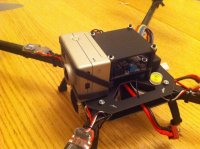
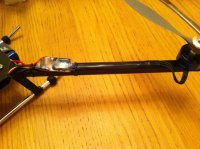
Once all the bits arrived I got it all built in one evening. I really wanted a clean build for this quad, I've learnt enough from the last MR that there is no excuse. The Flyduino frame really makes it easy as the power distribution is part of the frame itself so the esc's can be soldered straight to the frame next to the booms. Everything is soldered on this build as I was certain I wasn't going to make changes to the setup and I wanted it to be as reliable and crashable as possible. Since the images below I have even
Covered the esc/motor wires in black tape rather that zip ties so they are almost invisible against the black booms. The FC board is hard mounted but seems to be fine with it. The FC drillings are strangely slightly smaller than the 'standard' MK/KK sizing but luckily the nylon standoffs have just enough give in them so I don't need to redrill anything.
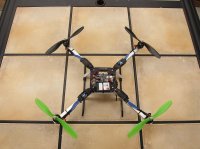
I'm very happy with the way this build had come out and I hope that my next build (X468 Hoverfly GPS AV Y6 or X8) will be equally as neat.
As to how it flys, well it's way too windy to have a relaxing fly, just keeping it hovering within/above my garden takes some serious effort. That said it does very well out there. In the house it's steady as a rock and will hover hands off easily. I updated the firmware and did the hardware mod (removing a resistor and shorting a jumper) to go along with it but I didn't have to. When I first used this board on my Y6 is was awesome, straight out of the box. If you want a simple install and set up it's hard to beat.
I'll keep you posted on how it flys / vids if the wind ever drops.
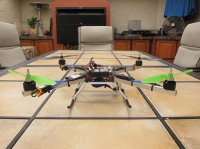
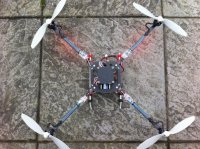
Some pictures...
I already had a TMF AQ50 Pro and after seeing all of the test vids from Warthox I decided to use the same platform. What's the point of trying something untested when there are many videos of a perfectly good set up working awesomely.
So here's the setup:
TMF AQ50 Pro - 1.2 Firmware with hardware mod
Flyduino.com 'Warthox' frame - 500 size
Flyduino.com cover plate and standoffs
Keda 20-50 motors
Hobbywing Fun Fly 10A esc's
APC 8" 3.8 props
2200mAh 3s battery
White and red LED strips
450 heli skids
Once all the bits arrived I got it all built in one evening. I really wanted a clean build for this quad, I've learnt enough from the last MR that there is no excuse. The Flyduino frame really makes it easy as the power distribution is part of the frame itself so the esc's can be soldered straight to the frame next to the booms. Everything is soldered on this build as I was certain I wasn't going to make changes to the setup and I wanted it to be as reliable and crashable as possible. Since the images below I have even
Covered the esc/motor wires in black tape rather that zip ties so they are almost invisible against the black booms. The FC board is hard mounted but seems to be fine with it. The FC drillings are strangely slightly smaller than the 'standard' MK/KK sizing but luckily the nylon standoffs have just enough give in them so I don't need to redrill anything.
I'm very happy with the way this build had come out and I hope that my next build (X468 Hoverfly GPS AV Y6 or X8) will be equally as neat.
As to how it flys, well it's way too windy to have a relaxing fly, just keeping it hovering within/above my garden takes some serious effort. That said it does very well out there. In the house it's steady as a rock and will hover hands off easily. I updated the firmware and did the hardware mod (removing a resistor and shorting a jumper) to go along with it but I didn't have to. When I first used this board on my Y6 is was awesome, straight out of the box. If you want a simple install and set up it's hard to beat.
I'll keep you posted on how it flys / vids if the wind ever drops.
Some pictures...
Attachments
-
 ImageUploadedByTapatalk1324753063.811032.jpg101.7 KB · Views: 279
 -
 ImageUploadedByTapatalk1324753087.181052.jpg97.3 KB · Views: 294
 -
 ImageUploadedByTapatalk1324753109.297911.jpg77.6 KB · Views: 323
 -
 ImageUploadedByTapatalk1324753140.763288.jpg98.1 KB · Views: 543
 -
 ImageUploadedByTapatalk1324753165.739767.jpg108.4 KB · Views: 331
 -
 ImageUploadedByTapatalk1324753195.750814.jpg126.9 KB · Views: 231
 -
 ImageUploadedByTapatalk1324753254.538575.jpg135.4 KB · Views: 256