Hi Guys
Please see my simple build thread for my BlueSkyRc xRotor FPV Quad.
First of all i want to say what great quality and great value this kit is.
It couldnt have gone together easier.

Here is the specification of my Quad.
CopterControl FC
25amp Tunrigy Plush ESC
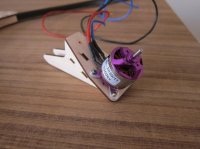
RCTimer 2830 1000Kv Motors
AR6200 with 1 Sattellite Rx
8.4 Props
3s 2200 Lipo 20C
10mm Square Carbon Tube
GoPro Hero HD for FPV and Recording.
5.8Ghz Video Tx and Rx. (not yet arrived)
IBCrazy CP Clover Leaf Video Tx Antenna
IBCrazy Skew Planer Video Rx Antenna (will build my own when Rx and Tx arrive)
Head Play Video Goggles (Im glad i bought my HP's direct from Dell during a promo!!)
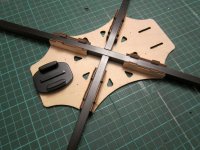
The Kit compomises of a simple main frame with a wooden cage over the top to protect electronics and four motor mounts with built in landing gear.
The main frame is drilled for 450 size heli landing gear for an easy fit and they also sell those if interested.
The main frame is also predrilled for the std 50mm FC and can bemounted at 90 or 45 degrees
Obviously this particular quad is design to be flown in X mode.
I had to drill additonal holes to mount my CC as it has a much smaller foot print
BlueSkyRc also have an adapter plate for the CC if you wish to make life super simple.
The arms of the Quad can be held in place with either the glue of your choice however this would make changing an arm very diffucult. Or they can be held by small screws using the predrilled holes. This would allow for very easy replacement in the event of a broken arm and is what BlueSky recommends.
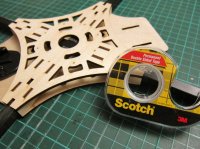
I chose a slightly different method and actualy used double sided tape to hold my arms to the main frame and my motor mounts to the arms.
This is super easy and very fast. With a firm constant pressure you can also easily remove a broken arm. I must admit that the screws holdong teh FC n place also go into teh arms helping to hold them in place.


The frame is Laser Cut from 1/8 lite ply and is a very good fit. All the parts kind of snap together and then only require some thin CA to be wicked into the joints.
It couldnt be easier or faster.
You can have a complete frame assembled ready for Electronics in 30mins easily even with time spent cutting your arms to the desired length.
BlueSky recommend an arm length of 26-30cm from the center of the frame to he end of teh arm BTW.
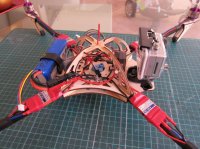
The frame has an extension in teh fornt on teh lower frame plate that allows space for mounting teh FPV camera of choice.
The BlueSkyRC demo quad has a GoPro removed from teh case and has a slot cut in teh frame for a simple velcro strap.
I decided to go with the GoPro case even though it adds a fair amount of weight.
I wanted the additonal protection it adds to the camera especialy considering my recent rekitting of my Tricopter from 50feet!
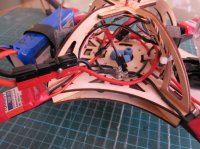
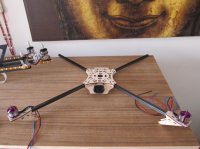
The Frame also has an extension out teh back of teh lower frame to allow mounting of a flight pack in the correct position for a well balanced COG. This areas is also very useful for ading teh FPV Video Tx and battery if you use a separate one.
I decided to mount my Flight pack across this rear deck on top to give me better ground clearance as i didnt want to use teh 450 heli landing gear and it also allows me super simple easy access to the battery connections.
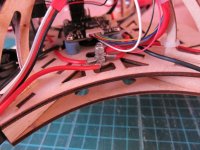
I used two M3 threaded studs as the basis for my power Distribution system. I added small crimp on ring terminals to teh ESc power leads and teh main battery connection leads.
It makes for a clean simple installaton that can be easily added to or modified.
However i still need to insulate the remaining post!


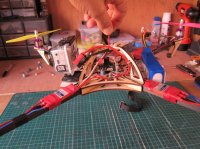
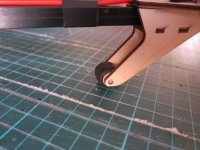
Another small addition i made was to the landing gear. I added a Skid Rubber from a 50size heli to a small 9mm round wooden dowl and screwed it between the legs.
This adds a small amount of cushioning to landings on hard surfaces and also adds some grip to stop it sliding around on hard smooth surfaces.

One more small modd i made I drilled a small hole right in the center of the wooden roll cage directly above where the CoG should be and added small piece of wire. This allows me to pick up the flight ready quad and double check teh CoG before every flight. This makes sure i have teh battery in teh correct place and means teh FC is constantly fighting a unbalance airframe. I liek to do it on all my Multis.


Unfortunelty my CC was damaged in the Tricopter accident and i am still waiting for teh parts to repair it from RS components. Or my new CC arrives. So which ever happens first i will be sure to report back with a flight report!.
Oh and i forgot to add that the All Up Flying weight inc FPV gear is almost exactly 1Kg
Thanks for reading
Ben
Please see my simple build thread for my BlueSkyRc xRotor FPV Quad.
First of all i want to say what great quality and great value this kit is.
It couldnt have gone together easier.
Here is the specification of my Quad.
CopterControl FC
25amp Tunrigy Plush ESC
RCTimer 2830 1000Kv Motors
AR6200 with 1 Sattellite Rx
8.4 Props
3s 2200 Lipo 20C
10mm Square Carbon Tube
GoPro Hero HD for FPV and Recording.
5.8Ghz Video Tx and Rx. (not yet arrived)
IBCrazy CP Clover Leaf Video Tx Antenna
IBCrazy Skew Planer Video Rx Antenna (will build my own when Rx and Tx arrive)
Head Play Video Goggles (Im glad i bought my HP's direct from Dell during a promo!!)
The Kit compomises of a simple main frame with a wooden cage over the top to protect electronics and four motor mounts with built in landing gear.
The main frame is drilled for 450 size heli landing gear for an easy fit and they also sell those if interested.
The main frame is also predrilled for the std 50mm FC and can bemounted at 90 or 45 degrees
Obviously this particular quad is design to be flown in X mode.
I had to drill additonal holes to mount my CC as it has a much smaller foot print
BlueSkyRc also have an adapter plate for the CC if you wish to make life super simple.
The arms of the Quad can be held in place with either the glue of your choice however this would make changing an arm very diffucult. Or they can be held by small screws using the predrilled holes. This would allow for very easy replacement in the event of a broken arm and is what BlueSky recommends.
I chose a slightly different method and actualy used double sided tape to hold my arms to the main frame and my motor mounts to the arms.
This is super easy and very fast. With a firm constant pressure you can also easily remove a broken arm. I must admit that the screws holdong teh FC n place also go into teh arms helping to hold them in place.
The frame is Laser Cut from 1/8 lite ply and is a very good fit. All the parts kind of snap together and then only require some thin CA to be wicked into the joints.
It couldnt be easier or faster.
You can have a complete frame assembled ready for Electronics in 30mins easily even with time spent cutting your arms to the desired length.
BlueSky recommend an arm length of 26-30cm from the center of the frame to he end of teh arm BTW.
The frame has an extension in teh fornt on teh lower frame plate that allows space for mounting teh FPV camera of choice.
The BlueSkyRC demo quad has a GoPro removed from teh case and has a slot cut in teh frame for a simple velcro strap.
I decided to go with the GoPro case even though it adds a fair amount of weight.
I wanted the additonal protection it adds to the camera especialy considering my recent rekitting of my Tricopter from 50feet!
The Frame also has an extension out teh back of teh lower frame to allow mounting of a flight pack in the correct position for a well balanced COG. This areas is also very useful for ading teh FPV Video Tx and battery if you use a separate one.
I decided to mount my Flight pack across this rear deck on top to give me better ground clearance as i didnt want to use teh 450 heli landing gear and it also allows me super simple easy access to the battery connections.
I used two M3 threaded studs as the basis for my power Distribution system. I added small crimp on ring terminals to teh ESc power leads and teh main battery connection leads.
It makes for a clean simple installaton that can be easily added to or modified.
However i still need to insulate the remaining post!
Another small addition i made was to the landing gear. I added a Skid Rubber from a 50size heli to a small 9mm round wooden dowl and screwed it between the legs.
This adds a small amount of cushioning to landings on hard surfaces and also adds some grip to stop it sliding around on hard smooth surfaces.
One more small modd i made I drilled a small hole right in the center of the wooden roll cage directly above where the CoG should be and added small piece of wire. This allows me to pick up the flight ready quad and double check teh CoG before every flight. This makes sure i have teh battery in teh correct place and means teh FC is constantly fighting a unbalance airframe. I liek to do it on all my Multis.
Unfortunelty my CC was damaged in the Tricopter accident and i am still waiting for teh parts to repair it from RS components. Or my new CC arrives. So which ever happens first i will be sure to report back with a flight report!.
Oh and i forgot to add that the All Up Flying weight inc FPV gear is almost exactly 1Kg
Thanks for reading
Ben
Attachments
Last edited by a moderator: