We have established this dedicated forum for you to talk about or ask questions to our experts on aerial video and aerial photography using drones
You are using an out of date browser. It may not display this or other websites correctly.
You should upgrade or use an alternative browser.
You should upgrade or use an alternative browser.
Aerial video and photography using drones
- Thread starter droneadmin
- Start date
Hey guys, let's get the conversation started with a nice sunset shot. This one is taken with DJI P3P, and it is a 5 photo bracketed shot (AEP) combined into an HDR picture. I love using the AEB function and HDR style photographs for my sunset and sunrise shots. This technique preserves a ton of detail in both highlights and darks, which really helps with editing and final result. It helps compensate for relatively narrow dynamic range of the consumer drone cameras. Do you guys use AEB for contrasting environments? Share your projects with us. Need help figuring out how to do this? Ask away....

Attachments
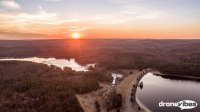
Hey guys, let's get the conversation started with a nice sunset shot. This one is taken with DJI P3P, and it is a 5 photo bracketed shot (AEP) combined into an HDR picture. I love using the AEB function and HDR style photographs for my sunset and sunrise shots. This technique preserves a ton of detail in both highlights and darks, which really helps with editing and final result. It helps compensate for relatively narrow dynamic range of the consumer drone cameras. Do you guys use AEB for contrasting environments? Share your projects with us. Need help figuring out how to do this? Ask away....View attachment 8
I'm new to phantom 3 and would love to learn how to do this
Can you click focus point (ie: the sun) then just take AEB photo?
I jumped right into litchi and haven't played with GO app too much. I was not able get 3 or 5 shot to work with that app.
I'll have to try this out. Any tips greatly appreciate for noob.
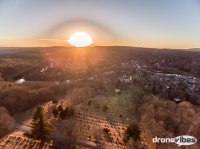
I used to use Photoshop, but now that the HDR Merging is available in Lightroom, I use that instead. 95% of my grading and batch photo management happens in lightroom, so I was happy to see this addition. One good advice - when shooting AEB, I set the exposure to -0.3 to -0.7 this protects the highlights from being burned-out, which lightroom has a hard time interpreting (just like in this picture)...Peter - are you using any special apps for the HDR or are you just using Lightroom's built in HDR function?
Attachments
Last edited:
I'm new to phantom 3 and would love to learn how to do this
Can you click focus point (ie: the sun) then just take AEB photo?
I jumped right into litchi and haven't played with GO app too much. I was not able get 3 or 5 shot to work with that app.
I'll have to try this out. Any tips greatly appreciate for noob.
Hi Booda, great question, Me and Erick are actually going to cover the AEB/HDR in next week's podcast, so stay tuned for more.
Touching the screen to set the exposure may work, you are better off setting the exposure yourself, especially with shots that have sun in them.
Set your camera to "Manual", your ISO to 100, and then adjust your shutter speed until the exposure value (MM on top of your screen) shows -0.3 to -0.7 (slightly under-exposed). Then set your camera to AEB mode, and take your 5 bracketed shots that will then get combined to your HDR shot. If you haven't yet, like us on Facebook or follow us on Twitter, so you don't miss next weeks HDR tips&trick podcast segment and tutorial video.
Excellent. Cant wait for episode.
I played around with p3p on table; outside my back door was getting blown out, inside living room very dark. Took two photos one exposed for door (clicked on door to expose for that). then exposed for living room. Will play with this later in photoshop.
This is mildest winter ever, usually few feet snow here by this time year. Instead I'm able to go flying right now. Gonna go practice AEB photos now. Thank you for reply Peter, really appreciate it.
You stated your first picture in this thread was a sunset, so the real question is whether the second picture is a sunrise or sunset? ")
View attachment 11
I used to use Photoshop, but now that the HDR Merging is available in Lightroom, I use that instead. 95% of my grading and batch photo management happens in lightroom, so I was happy to see this addition. One good advice - when shooting AEB, I set the exposure to -0.3 to -0.7 this protects the highlights from being burned-out, which lightroom has a hard time interpreting (just like in this picture)...
Last edited:
Wanna take a guess?You stated your first picture in this thread was a sunset, so the real question is whether the second picture is a sunrise or sunset?
I had quite a few people ask for long exposure night photography tips, so I decided to share some of my "secret sauce" in this Long Exposure Drone Photography How-to Article and Long Exposure Editing Video.
Hope you guys find them helpful, please, share your photos and tips with us!

Hope you guys find them helpful, please, share your photos and tips with us!
Attachments
Roger Apolinar
Member
Keep up the great work there!
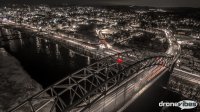
@Roger Apolinar Awesome, I know that a lot of work goes into these and can appreciate when someone invests the time. What shutter speed did you use in this one? Looks like 1.5 sec?
Roger Apolinar
Member
Close! Shutter was set to 2 seconds. I used 2 batteries to capture as many stills as I could. Should have used all six as I only got about 150 images. At 24 fps that's only 6 seconds. In post I made the image sequence 12 fps And it came out nicely. How do you maintain position consistency after a battery swap? Next time I plan to use the waypoint flight mode to record start and end position. Love your insights on the Podcast!@Roger Apolinar Awesome, I know that a lot of work goes into these and can appreciate when someone invests the time. What shutter speed did you use in this one? Looks like 1.5 sec?
Attachments
Two seconds is cool, at 2.5 you may get more blurred shots, but your light trails may be longer. You can use waypoints to return to the same spot after the battery change. I am now playing with Litchi and Autopilot as they also help point the camera at the same spot, which helps reduce the drifting. Slowing it down to 50% sure helps, I use frame blending function in FCP to smooth the motion out. Also, in some well lit environments, try shooting JPEG only, it saves faster, so you can get more shots per battery.Close! Shutter was set to 2 seconds. I used 2 batteries to capture as many stills as I could. Should have used all six as I only got about 150 images. At 24 fps that's only 6 seconds. In post I made the image sequence 12 fps And it came out nicely. How do you maintain position consistency after a battery swap? Next time I plan to use the waypoint flight mode to record start and end position. Love your insights on the Podcast!
Not sure if you have seen JLucan's Night Concerto Video, this is what Inspired me to get into this technique. This guy has a lots of patience, if I remember right, he used the Inspire and Autopilot app.
Roger Apolinar
Member
I haven't heard of Litchi so I'll check that out. A buddy of mine beta tested Autopilot and loves it. Pricey app in my opinion but I'm sure it's worth it. I purchased Airnest last November, for a discount code I got from them at Drone Wolrd Expo in Silicon Valley. Haven't played with it much. Wondering if you have and what your thoughts are about it. I am going to render another version using frame blending and see how that looks. Thanks for that. Great tip shooting JPEGs! I'm sure that will help get off more shots. And JLuncan's video...brilliant! I never though about doing hyperlapse with the bird. And you're right, he does have a lot of patience and very well thought out sequences and plotted flight paths. I'm inspired again! Shot another sequence last night. I'll post results soon.Two seconds is cool, at 2.5 you may get more blurred shots, but your light trails may be longer. You can use waypoints to return to the same spot after the battery change. I am now playing with Litchi and Autopilot as they also help point the camera at the same spot, which helps reduce the drifting. Slowing it down to 50% sure helps, I use frame blending function in FCP to smooth the motion out. Also, in some well lit environments, try shooting JPEG only, it saves faster, so you can get more shots per battery.
Not sure if you have seen JLucan's Night Concerto Video, this is what Inspired me to get into this technique. This guy has a lots of patience, if I remember right, he used the Inspire and Autopilot app.
@Roger Apolinar , awesome, can't wait to see it. No experience with Airnest, but as long as it does waypoints and can point the camera at one spot, I'm sure it'll work. Please, do post your work, I'm looking forward to seeing it
Roger Apolinar
Member
@Petr Hejl Here it is! The wind was much more turbulent at 350 ft AGL than I perceived. Other than that, I shot this at 1am and wish I had been out much sooner to capture more action on the streets.@Roger Apolinar , awesome, can't wait to see it. No experience with Airnest, but as long as it does waypoints and can point the camera at one spot, I'm sure it'll work. Please, do post your work, I'm looking forward to seeing it
Last edited:
Roger Apolinar
Member
Wanted to share another piece
Wow, @Roger Apolinar , pretty cool, like the music, little too long to my taste was this a P3?
was this a P3?Ian McDonnell
Member
Pretty cool stuff @Roger Apolinar - I really dig the rowing fly-by.