X8 coversion to MK - shopping list suggestions

Mactadpole

Member
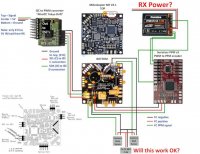
I guess the first question is where is the "front" on your frame in relation to the posted diagrams. I had mine configured per the first diagram and used the attached .mkm file.

View attachment 828

You can certainly have other orientations but you'll need to modify the .mkm file accordingly to get the motor spin direction correct, no guarantee on what that might/might not do to flight stability, I've never tried it myself.

Ken


I have the MK FC mounted like the last diagram (arrow on board [front] is straight up) and the rotation of my motors follows the last diagram as well. Basically the board orientation is the same but the motor direction is exactly opposite the first MK diagram below.

Octo-X.jpg


Is it the +/- values which control this?

Really hope I don't have to change things up.

Thanks,

Shawn
 

Mactadpole

Member
X8 .mkm file for my setup

So I found some rules for creating an X8 .mkm file and some help from over in the mikrokopter.us forums but now I want to know if it is right. Here are the instructions from user jim0eller (OMM) -

"...and for setting up mixers .. I used this ... found on rc groops

Gas- All motors that are used get +64. Motors that are not used get 0 for all their settings.

Pitch (Nick)- Draw a picture of your copter, then draw a horizontal line through the center. Every motor that is above the line gets +64. Every motor below the line gets -64. If the motor is on the line, then it gets 0.

Roll- Draw a vertical line through the center of the picture. Every motor on the left side of the line gets +64. Every motor on the right side of the line gets -64. Every motor on the line gets 0.

Yaw- Every prop that turns clockwise when looking down at it gets +64. Every prop that turns counter clockwise gets -64.

If you follow the above rules, you will be able to make a mixer table for any configuration you want to try

PS- Technically, not all numbers should be +-64. When this came out, they said to make them proportional to the distance the motor was from the center line. When you look through the pre-defined options, you'll see that they use +-64 for everything. I've tried it both ways, and if anything, I think it works better using +-64 than trying to make them proportional

This was put together by Rusty ... A.K.A. - OMM ... "


and here is the file I made -

[Info]
Name= X8 MK_HFP
Version=1
[Gas]
Motor1=64
Motor2=64
Motor3=64
Motor4=64
Motor5=71
Motor6=71
Motor7=71
Motor8=71
Motor9=0
Motor10=0
Motor11=0
Motor12=0
[Nick]
Motor1=64
Motor2=-64
Motor3=64
Motor4=-64
Motor5=71
Motor6=-71
Motor7=71
Motor8=-71
Motor9=0
Motor10=0
Motor11=0
Motor12=0
[Roll]
Motor1=64
Motor2=-64
Motor3=-64
Motor4=64
Motor5=71
Motor6=-71
Motor7=-71
Motor8=71
Motor9=0
Motor10=0
Motor11=0
Motor12=0
[Yaw]
Motor1=-64
Motor2=-64
Motor3=64
Motor4=64
Motor5=71
Motor6=71
Motor7=-71
Motor8=-71
Motor9=0
Motor10=0
Motor11=0
Motor12=0

The only thing that needed changing was yaw positives to negatives and negatives to positives. Did I do it right?

Here is a new diagram of my setup with MK FC orientation -

index.php
 

Mactadpole

Member
Two wiring questions?

I have been working on my diagram today to make sure I get things right and so I know what is what in the future. I would appreciate it if you all would take a look and let me know if you see anything wrong. Also, I have two particular questions:

1. Where should I connect the Futaba RX to power on the MK FC? I know there are several 5v sources but what's my safest choice?

2. With the HFP FC I used a CC BEC to supply the camera mounts nick and roll servos with 7.4v. Can I still use this setup with just the signal and ground going to the MK FC?

Thanks,

Shawn

attachment.php


View attachment 410
 

Attachments

  • MK_wiring.jpg
    MK_wiring.jpg
    78.7 KB · Views: 273

zorba

Member
Hi Mactadpole, The diagram here is wrong.
Here is the correct setup.
hi
top motors
top left motor no 1-clock wise
top right 3-anti
bottom left 4-anti (motor4)
bottom right 2-clock wise (motor 2)

bottom motors
top left 5-anti (motor 5)
top right 7-clock wise (motor 7)
bottom left 8-clock wise (motor 8)
bottom right 6-anti (motor 6)

for an X8 the fc should be pointing between 1 and 3
here's my 8X
http://www.youtube.com/watch?v=bkD9WZ4VV8M
Cheers
 
Last edited by a moderator:

zorba

Member
I have the almost the same setup as you except I don't use Futaba.
I connect the Spektrum sat to the 5V cause I am using the diversity board with three sats.
I also have the I2C converter from TC. It flys great. Do you power your converter from the FC?
I use the 1st ESC to power the board.

Cheers
 

Mactadpole

Member
Hi Mactadpole, The diagram here is wrong.
Here is the correct setup.
hi
top motors
top left motor no 1-clock wise
top right 3-anti
bottom left 4-anti
bottom right 2-clock wise

bottom motors
top left 5-anti
top right 7-clock wise
bottom left 8-clock wise
bottom right 6-anti

for an X8 the fc should be pointing between 1 and 3
here's my 8X
http://www.youtube.com/watch?v=bkD9WZ4VV8M
Cheers

I should have given more details...

This is my current motor/prop rotation configuration using a HoverflyPro FC. I am converting it to an MK FC but would like to keep my current rotation configuration so I can switch between FC's without having switch around motors and props. Since all the rotations are exactly opposite what you have I don't believe it should have any affect on stability. From what I have read as long as I have that .mkm file set up correctly it should work just fine.

I'm hoping to get confirmation on this. Otherwise, I will switch things around.

Thanks again,

Shawn
 

Bartman

Welcome to MultiRotorForums.com!!
Shawn,
I was just looking at your diagram. Are you using the CC board for your camera mount? Sorry I'm late to this thread and haven't been following it.
Bart
 

Mactadpole

Member
Shawn,
I was just looking at your diagram. Are you using the CC board for your camera mount? Sorry I'm late to this thread and haven't been following it.
Bart

Hey Bart,

Nope, sorry bout' that. Its a Castle Creations programmable BEC.

Shawn
 

Top