Wish I never bought this thing!!!!

bensid54

Member
I have a Futaba 7C 2.4ghz radio and a Naza light controller on a DJI 450 quad. I can't get it to work all I get is config error 8 and when I reboot it after all the flashing I get a very fast flashing red. On the screen the sliders are all green and the throttle slider is on the left side black is that right? How do I set up the channel 5 switch on this radio because I've never set it up for acro so I have no idea what I'm doing. I've tried reversing the elevator and throttle channels but no soap. What are the numbers I need to put in the radio and where do they go? What settings do I need on the computer, what numbers and where do they go? If I don't have any luck with this I'm sticking with the Blade QX and selling this thing in the classifieds. Someone said they were very simple HA that's a load if I had the KK board that one would have been floating in the river somewhere because from what I hear they are worse.
 

Can you tell us what you *have* done? I mean, how much ground do we have to cover?
- Have you hooked up all the wires from your receiver into the Naza as specified in the instructions?
- What did you start with for programming in your Futaba?
- What receiver are you using?

If you start with a blank sheet of paper with your transmitter (default channel settings, etc.), and you connect up per the 7C (page 14) and Naza (page 5) instructions, you should be able to control all 7 channels going into the Naza, and you should be able to control and see each of those channels move within the Naza Assistant Software. Your first steps are to ensure you can control the essential 6 channels for proper Naza operation (A, E, T, R, U, and X2) through your radio. Then next is to ensure the directions for each are correct. Then you may need to adjust the Endpoints for the U channel.

Again, without know what you have or have not done or got working, it's gonna be hard for us to help walk you threw it. If you're up to some tinkering and learning, great! You're in for some fun. If you're expecting this to be a no brainer setup, operation, and maintenance, then maybe this isn't for you. Getting MRs to function, and to keep them functioning over time, does require patience and willingness to tinker through issues.

We're here for ya to help you best we can.
 

bensid54

Member
The radio is set for acro or airplane, the wires are per instructions all five of them, the receiver is a Futaba Fasst 7 channel the controller will hook up to the computer. All settings that can be zero are zero. Now if someone can tell what their settings are on their Futaba 7C for the Naza I can work from there.
 
Last edited by a moderator:


bensid54

Member
I was informed by another member here that I can use Helicopter mode instead of acro mode if I choose. With that in mind I have no trouble understanding my radio because I've used that function many time but have never tried using acro till now. I will keep you all posted as to how well that works.
 

OneStopRC

Dirty Little Hucker
error 8, is that not a binding issue with the receiver?

CFG-ERR


  • Configuration error, this may be caused by firmware upgrade from the old version, or abnormal Tx calibration. Re-calibrate your transmitter, power cycle your controller, and check all of the parameters.

Also, how have you got this receiver set up in the assistant? did you set it for traditional, s-bus or ppm?
When you calibrated your sticks, did you then power cycle the naza?

You can use Helicopter mode, but the Naza instructions advise against that. Helicopter mode can introduce weird unneeded mixes, so keep it simple and stick with the Acrobatic mode of the radio.
 
Last edited by a moderator:

Deanot, I was the one that suggested he use the heli because he is confortable with it. I mentioned ensuring that he remove all mixes if there are any. I don't know the 7C, but on my 8FG I use heli for everything, and out of the box there wasn't any mixing of the channels. Maybe you know the 7C better... I don't know it other than the little reading I've done.
 

OneStopRC

Dirty Little Hucker
I am the same as you, I have the 8, but both the 8 and 7 should be identical less one channel. I do know that DJI do tell users not to use heli mode, they do not state a reason why and the only reason I can think of is the mixes, if any.

He might want to try a model reset on his radio and worry about setting things up after, just get the basic functions of the radio working to work with the Naza. The radio must be way out of calibration for this to be happening or it is not being calibrated properly.

I do know that I also had to reverse one of my channels, can't remember which or for what reason. Futaba I think as standard channel 3 is reversed, yes, just looked on my radio and reset a new aircraft. Did he reverse channel 3 which is the throttle channel, without this, it probably will not calibrate correctly.
 

OneStopRC

Dirty Little Hucker
Ohh, I just noticed where he said he tried reversing the throttle and elevator channels? why are you reversing your elevator? just do the throttle and try to calibrate on the assistant screen.
 

bensid54

Member
The screen that shows the sliders at one point looked like the elevator was reversed. I went to H1 on the helicopter settings that gives individual controls for each input function, on HR3 it is the CCPM mix which will operate all three servos at the same time and that can be deadly. I will set all Naza functions to default and the receiver to standard then start over. As far as I know you should turn on the TX first then power up the controller then do the settings after that you get out of the set up screen and recycle power to both the TX and RX, is this right?
 

Hi bensid54, I have the 10C futaba and the following is how I set my radio:-

Futaba T10CHG radio settings for DJI NAZA-M using S-BUS
Note! Bind Transmitter with Receiver.
Setting the Futaba T10C*G Radio

a) Create a new Model, (under Model menu). Give it a name say (DJI F550v2), then go to Parameter set Type to Acrobatic and then Execute a Reset. Enter your Name if you wish, all other settings in this menu can be left at default.

b) Set AUX channels (under AUX-CH menu) reverse CH6 (under Reverse menu) :-
“CH5” – Gain Adjustment – “VR(A)” Pitch & Role or Yaw or Attitude adjustment.
“CH6” {reversed} – Intelligent Orientation Control – “SwC” Off, Course Lock, Home Lock.
“CH7” – Flight Mode – “SwE” Manual, Attitude Hold, GPS Position Hold.
“CH8” – Variable Knob – “VR(C)”
“CH9” – Not Assigned – “Sw(B)”
“CH10” – Timer Reset – “SwA” Reset the Radio Timer to Zero.
In NAZA S-Bus:- CH5 = X1, CH6 = X2, CH7 = U - Fail Safe:- CH3 throttle = F/S 56%, CH7 Aux1 = +26%

c) Reverse channel 6 (under Reverse menu) :-
“CH6” Flap (SwC) – if not already done, (channel 6) needs to be reversed so that “Off” is in the switch UP position.

d) Set END points (under End Point menu) :-
“CH7” Aux1 (SwE) – Set both sides to 60% (highlight each side to adjust settings by switching “SwE”). Naza activates - Manual, Attitude Hold, GPS Position Hold with these End Point settings.

e) Fail Safe Auto Return to Home Settings (under End Point menu) :-
1. In “End Point” menu scroll down to select “CH7” (7: AUX1) (SwE)
2. Move (SwE) switch “E” to the Down position to highlight “H”
3. Rotate the Radio wheel to reduce the End Point on the right side to 29%
4. Now go to the “F/S” (Fail Safe) menu & select “3: THRO”, adjust throttle stick to just above centre (55%) & press on the “Push” button, this will change the “3: THRO” setting from “NOR” to “F/S 55%”.
6. In the same “F/S” menu scroll down and select “CH7” (7: AUX1)
7. Rotate the wheel to change from “NOR” to “F/S” then press on the “Push” button and “+ 26% should appear.
8. Now go back to “End Points” menu & change “CH7” (7: AUX1) on the right side back to 60%.

f) Return to Home on Demand (under Prog. Mix1-8 menu) :-
This will only work if (SwE) (Flight Mode switch) is in the Down position (GPS Position Hold).
To get to this menu highlight MODEL and press the mode button.
1. Press the “Push” button and then select Mix number one, scroll down to Master-Slave and select “CH7” on both.
2. Go to “SW” (switch) and select “SwD” (switch D) then go to “POSI” and select “Down”.
3. Go to “RATE” “H” and set this to -50% (highlight “H” by moving SwE to Down position).

g) Bind TX to RX (Transmitter to Receiver) When binding ensure that throttle stick is set above 10% most users set the stick to about 40%, I set mine to 50%.

Three Position Switches “E” Flight mode (FM) and “C” Intelligent Orientation Control (IOC)
Two Position Switch “A” Radio Timer reset
Two Position Switch “D” Return to Home on demand (only while “SwE” Flight mode is set to “GPS Position Hold”)
Switch “A” (SwA) is used to reset the Radio Timer.
Switch “C” (SwC) is used to switch to Modes :- Off, Course Lock, Home Lock (IOC).
Switch “D” (SwD) is used to switch to :- Return to Home on Demand
Switch “E” (SwE) is used to switch to Modes :- Manual, Attitude Hold, GPS Position Hold (FM).
Rotating knob “VR(A)” is used to remotely set gains in DJI Naza (Pitch & Yaw only at one time).
In NAZA S-Bus:- CH5 = X1, CH6 = X2, CH7 = U - Fail Safe:- CH3 throttle = F/S 56%, CH7 Aux1 = +26%
******* That is all for Futaba T10C*G Radio setup – Next DJI Assistant setup *******
 

DJI Assistant Software

DJI Assistant Software

a) Mounting
Enter Naza GPS sensor location relative to CG (Centre of Gravity) of Hex Copter X, Y, Z.
Green line = negative value – Red line = positive values
CG for Z should be from the centre of propeller horizontal plain or just below this level, to the centre of the Naza sensor. My settings are :- X = 8cm, Y = 0cm, Z = -5cm.
Values could be left at zero if desired.

b) Motor Mixer
In my case “Hexa Rotor V” orientation.
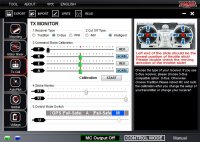
c) TX Calibration
1. Receiver type in my case “D-BUS” same as (S-Bus)
2. Cut off Type “Intelligent”
3. Check throttle, Rudder, Elevon, Aileron – that they function and operate in the right
direction. Elevon slider should move left when stick is moved down.
4. Command Sticks Calibration if all is correct do a “Calibration” by clicking the “Start”
button, move both sticks in a circular motion to all four corners several times and when
finished release the sticks and click on the “Finish” button.
5. Control Mode Switch “E” (SwE) check that in “Up” position “Manual” is highlighted
“Middle” position “Attitude” Hold is highlighted
“Down” position “GPS” position hold is highlighted
6. Sticks Monitor X1 – VR(A) knob check that slider moves left when knob is rotated anti-clockwise & moves right when rotated clockwise.
7. Stick Monitor X2 – SwC switch “C” check that slider positions are as follows :-
Switch is “Up” slider should be on Manual “Right Side”
Switch is “Middle” slider should be on Attitude “Middle” position
Switch is “Down” slider should be on GPS “Left Side”

View attachment 13193

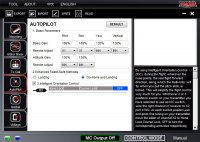
d) Auto Pilot – settings are as per image below (“Attitude gain” defaults were 140% & 140%)
“Basic Gains” adjust how the craft reacts to environmental agents, wind, movement etc.
“Attitude Gains” have to do with how Naza reacts to stick movement.

View attachment 13194

Check that (SwC) switch “C” is set as follows :- "Up” = OFF (slider is on right hand side)
“Middle” = Course Lock (slider is in middle)
“Down” = Home Lock (slider on the left side)

e) Gimbal – Not used at this time
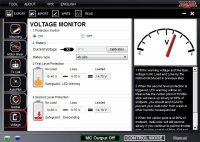
f) Voltage – Select battery type being used & leave voltages set on defaults

View attachment 13195

I am using S4 LiPo battries.

g) Fail Safe Auto Return Setup
1. Go back to “TX Calibration” screen
2. Move (SwE) switch “E” to the Down position to highlight “GPS”
3. Then go to the Radio “End Points” menu & select “CH7” (7: AUX1)
4. Rotate the Radio wheel to reduce the End Point to 29% (Until “Fail-Safe” is highlighted”)
5. Then go to the Radio “F/S” (Fail Safe) menu & select “3: THRO”, adjust throttle stick to just
above centre (55%) & press on the “Push” button, this will change the “3: THRO” setting
from “NOR” to “F/S 55%”.
6. In the same “F/S” menu move down and select “CH7” (7: AUX1)
7. Rotate the wheel to change “NOR” to “F/S” then press on the “Push” button & “+ 26%
should appear.
8. Now go back to “End Points” menu & change “CH7” (7: AUX1) back to 60%, this will
highlight “GPS” again.

h) Timer set to start at 5% throttle-up
Timer (1) is set to 6 minutes, “Mode” is “Up”. To enable timer to start switch “A” must be in the Up position. To reset the timer move (SwA) to Down position and then back Up.
Timer “On” is set to “St-Thr” (start with throttle stick) when throttle stick is moved above 5% timer will start, if moved below 5% timer will stop.
Reset (Rset) timer set to (SwA) “Down” (move switch lever “A” towards me to reset timer)
(Futaba state that the switch lever settings are:- Up is away from me and Down is towards me).
 

Attachments

  • TX Monitor.jpg
    TX Monitor.jpg
    116.4 KB · Views: 367
  • AutoPilot.jpg
    AutoPilot.jpg
    107.6 KB · Views: 272
  • Voltage Monitor.jpg
    Voltage Monitor.jpg
    112.6 KB · Views: 229

bensid54

Member
Bruce thank you very much for all the work and effort you put into helping a fellow quad pilot out I realize it was quite an undertaking to do that list. So from what I'm seeing I need a ten channel Futaba radio system and my seven channel radio won't work would that be correct?
 

bensid54

Member
I read your post again and it looks like you use 8 channels can I place the timer function on a switch that has already been assigned another function?
 

OneStopRC

Dirty Little Hucker
You can use a 7 channel, but you will loose either (1) failsafe, (2) ioc functions.
Seriously, I have seen your selling it, but don't give up on it. Forget about radio settings because most people's settings will not apply to your radio. If you was local to me I would sort it out for you, if you want to send it to me, I will sort it for you, if you have a dealer, ask them to look at it... but don't give up on it.
Sent from my SAMSUNG-SGH-I317 using Tapatalk 2
 

OneStopRC

Dirty Little Hucker
Get the basics working, programming for failsafe can come after and I can show you a good YouTube video for setting failsafe up.

Sent from my SAMSUNG-SGH-I317 using Tapatalk 2
 

bensid54

Member
Thanks Deanot but all I want to do is fly it with the GPS working. I don't know maybe my radio is no good for the GPS and if that's the case I'll sell the antennae and forget about doing any FPV which was what I wanted in the first place. Think I should have bought the Hobby King RTR one that can carry a Fat Shark that is if I'm lucky enough to sell this headache. Enough of my ranting I would like that video to at least have a look at. Thanks for the reply, Jim
 

bensid54

Member
Bruce 365 thanks again but I'm not using S-BUS nor do I have an AUX-CH menu on my radio so can't really copy your settings. I should have researched whether my radio would work before I bought the Flamewheel. Thanks for your trouble.
 

OneStopRC

Dirty Little Hucker
You can use your radio with the gps, the only thing you will have to choose between is failsafe or IOS. Personally I would take the failsafe over IOS any day. Walk away from it for now, come back to it with a clear mind, no use being mad at it and I can tell you.... once you get it working, you will love it.. trust me they are great fun.

Sent from my SAMSUNG-SGH-I317 using Tapatalk 2
 

OneStopRC

Dirty Little Hucker
When you are ready, default or reset the model on your radio, the only channel you need to reverse is the throttle. Don't touch any other setting at this point, let's just get the radio to play nice with the naza.
Check all of the connections on the rx to the naza, make sure the naza is facing to the front of the 450. Esc outs goes to the front.... turn on your radio, start the assistant, plug in the usb into the computer, power up the 450. The light on the vu should go to a solid green, make sure of two things at this point... the naza has a little red light which you should see from the top of the naza, your rx should be a solid green light also.
First thing you need to do is now go into the assistant, click calibrate to calibrate your sucks, make sure your trims are all centered before hand (very important). Follow the instructions, when you are done, click the same button to tell it you are done. Make sure when calibrating the sticks you take both sticks and rotate the axis in circular motions.
When done, power off your naza, shut down the assistant, unplug the usb, and fire the assistant up, plug back in the usb and plug the naza back in (battery). In the assistant, move your throttle to 50% and see if you are centered on it, the others should already be centered. This is the first step, see if this can help...

Sent from my SAMSUNG-SGH-I317 using Tapatalk 2
 

Top