Product Review...DJI H3-2D brushless GoPro gimbal

Bartman

Welcome to MultiRotorForums.com!!
Rumor has it this gimbal has been discontinued which I think is a big mistake for DJI to make. Here's the review anyway, I'll let DJI know what I think of their decision and we'll see about changing their minds..............and away we go

DJI H3-2D gimbal review

The last time I flew a dedicated GoPro heli it was a first generation Xaircraft X650 with a GoPro Hero HD and the footage looked more like the camera was mounted to a paint shaker than a stabilized multi-rotor heli and gimbal. It was bad! Surf the internet for only a few minutes though and you’ll find video after video demonstrating how far we’ve come (and to be fair to Xaircraft, they’ve come a long way also!) in a relatively short amount of time. We’ve got the pioneering AlexMos brushless gimbal controller to thank for much of this which has led to advancements by other designers using the same basic concepts with very impressive results.

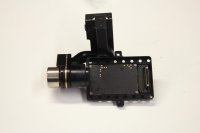
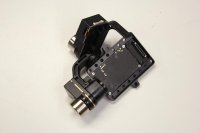
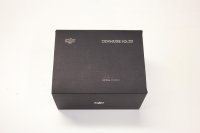
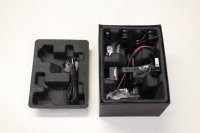
DJI’s H3-2D camera gimbal for the GoPro 3/3+ is an example of a non-AlexMos 2D gimbal and, for DJI flight control users, it’s an easy way to get smooth GoPro footage almost immediately. Note that the H3-2D is only compatible with DJI flight control systems (NAZA-Lite, NAZA-M V2, NAZA-M V1 with V2 mods, WKM with V2 mods, and A2). The V2 mods include the PMU, Remote LED, and Can-Bus cable from the NAZA-M V2. Without those V2 components the NAZA-M V1 and WKM are not compatible with the H3-2D.

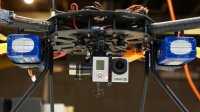
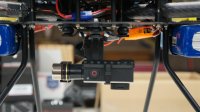
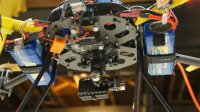
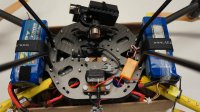
The H3-2D offers two axis stabilization, tilt and roll, and provides the user with the ability to remotely adjust the camera’s tilt. The mount does not allow the user to pan the camera (left-right movement) as it is rigidly mounted to the helicopter pointing forward.

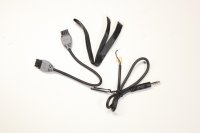
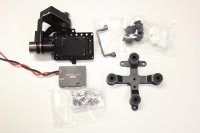
View attachment 17572View attachment 17573View attachment 17574View attachment 17575
 

Attachments

  • IMG_1522-001.jpg
    IMG_1522-001.jpg
    142.1 KB · Views: 413
  • IMG_1523-001.jpg
    IMG_1523-001.jpg
    127.7 KB · Views: 401
  • IMG_1525-001.jpg
    IMG_1525-001.jpg
    139.3 KB · Views: 369
  • IMG_1527-001.jpg
    IMG_1527-001.jpg
    136.1 KB · Views: 360
Last edited by a moderator:

Bartman

Welcome to MultiRotorForums.com!!
If you’re already flying other camera gimbals with larger cameras your first impression is going to be that the H3-2D is quite small and very efficient in its design. There are a minimum of attachments, visible wires and external structures. If your H3-2D is your first gimbal purchase, you just scored a major jump in performance that guys like me would have killed for just a couple of years ago! Seriously, bang your head against the wall for a few weeks (sometimes months!) and you’ll begin to understand the price we paid for smooth footage before AlexMos and the AlexMos derivatives came along!

OK, now that I’ve vented a bit it’s time to make note of a few important details;
* DO NOT APPLY POWER TO YOUR H3-2D WITHOUT YOUR GOPRO MOUNTED TO IT. This is really important and will ruin the gimbal very quickly if not followed.
* The parts of the H3-2D are delicate and will damage easily, handle them with care and keep your finished product away from humidity/moisture when not in use.
* Your heli and gimbal are now a complete system, the Flight Control and the H3-2D need to be at the same firmware revision level at all times.

ASSEMBLY AND INSTALLATION
Assembly should be easy for just about anyone as there are only a few components to join together. Note that the included ribbon cable needs to be plugged into the gimbal before the arm is attached to the Damping Unit (see Fig.3, Page 6 of the manual).

Mounting the H3-2D to your helicopter is as easy as determining a good place for the mounting bracket (technically speaking, it’s the top of the Damping Unit) on your frame, drilling a few holes, and then bolting it into place. For my XY-4 quad frame, I used three 3mm bolts/nuts to attach it to the lower frame plate and it seems quite happy there. The four vibraton isolators that attach the gimbal to the mounting bracket are arranged in the shape of a square so the mounting bracket can be mounted frontwards, backwards, however you need it to be and the isolators will still line up with its four holes.

The H3-2D comes with its own Gimbal Control Unit (GCU) for gimbal stabilization and power management. The GCU can accept 3S to 6S LiPo power and in most cases you should be able to power the GCU (and therefore the H3-2D) from your flight packs by attaching the GCU’s two power wires where the FC’s PMU pulls power.

Double sided foam pads are provided to attach the GCU to your frame and it needs to be mounted on a flat surface, horizontally or vertically, and aligned with the X and Y axis. For my installation I’ve also loosely wrapped the GCU with a velcro strap to keep it from popping free. This might not be as necessary where the GCU is sitting on top of a frame plate but with my installation it is hanging onto the underside of a frame plate so the extra velcro strap seemed like a good idea. Just keep in mind that if you choose to add a velcro strap, don’t make it so tight that it will keep the underlying foam layer from blocking vibrations to the GCU. To have the absolute best results from the H3-2D the GCU needs to be as free from vibrations as possible.

Regarding vibrations, the H3-2D comes with three sets of rubber vibration isolators, White is the softest, Black is the hardest and Gray is in between. The gray isolators are mounted at the factory and swapping them out is easy. The manual says to use the white ones with an F450 FlameWheel, none at all with an F550 (I don’t have an F550 handy but I’d be very curious to see how well that works), and any of them with a Phantom. For other installations a little bit of trial and error will be necessary to determine which dampers will provide the best overall video quality.

View attachment 17576View attachment 17577View attachment 17578
 

Attachments

  • IMG_1533-001.jpg
    IMG_1533-001.jpg
    117.9 KB · Views: 379
  • IMG_1532-001.jpg
    IMG_1532-001.jpg
    121.7 KB · Views: 355
  • IMG_1530-001.jpg
    IMG_1530-001.jpg
    139.7 KB · Views: 329
Last edited by a moderator:

Bartman

Welcome to MultiRotorForums.com!!
The H3-2D is nice in that the electronics are already mounted and out of sight when you get it so there won’t be very many wires to run or details to figure out. The downside to this is that the H3-2D isn’t user serviceable so any damage incurred when flying/crashing will require that you send the unit in for repairs or simply replace it outright with a new one.

Anyone who has already figured out FPV and wireless video will appreciate that the H3-2D is pre-configured to export analog video from your Go-Pro 3/3+ to your wireless video transmitter via a wire from the GCU. Other gimbals will require an external video wire from the GoPro which can interfere with the performance of the gimbal depending on how heavy it is and how it’s mounted. With the H3-2D the video signal is routed internally, just snap your GoPro into the gimbal and secure it with the included bracket and you’re ready to export video to your VTx.

It’s worth mentioning that with the way that the GoPro is attached to the H3-2D you may find it a bit of a nuisance to remove it when you want to use it somewhere else. This would be especially true if you are frequently going to swap back and forth between aerial and non-aerial useage. The best solution might be to buy a second GoPro but if it’s only going to be necessary to occasionally remove your GoPro then you shouldn’t be too bothered by the few steps involved. Over time, the electrical contacts between the H3-2D and your GoPro may weaken and affect the video signal out of the camera if it is frequently attached and removed but I don’t have enough time operating it at this point to say for sure.

On a side note, DJI relies heavily on individual components attached via multiple wires and connectors to make up their systems. Overall this works well for DJI but with any electrical connector there is the potential for vibration to degrade the quality of the connection. With this in mind, once your installation is complete and your components are all permanently located on your helicopter, it’s a good idea to put a dab of hot glue on each plug-component connection to minimize the possibility of them vibrating or coming loose.

View attachment 17579View attachment 17580View attachment 17581View attachment 17582
 

Attachments

  • DSC08308.jpg
    DSC08308.jpg
    141.6 KB · Views: 399
  • DSC08309.jpg
    DSC08309.jpg
    137 KB · Views: 384
  • DSC08312.jpg
    DSC08312.jpg
    146.2 KB · Views: 449
  • DSC08314.jpg
    DSC08314.jpg
    151 KB · Views: 353
Last edited by a moderator:

Bartman

Welcome to MultiRotorForums.com!!
SET-UP
By default, if you’re installing an H3-2D then you’re already familiar with one of DJI’s Assistant software utilities. I’m pretty familiar with the DJI NAZA-M Assistant so I’m comfortable saying H3-2D Assistant will be a virtual no-brainer to set up by comparison. There is one page (Basic) for the one setting that needs to be configured, one page (Upgrade) for firmware status and upgrade information, and one page (Info)for a few details about your registration status and the Assistant revision status. There is also a newsletter button that I hadn’t noticed before so I’ll have to try clicking it when I’m back in range of an internet connection.

Like all of the Assistant softwares, the H3-2D Assistant will check for your registration status and the firmware status of the unit when you power it up and connect it the first time. With the H3-2D there are three firmware files running in the GCU and they all need to be updated to the same revision level. As mentioned earlier, your heli and camera mount are a complete system so if any one module prompts a firmware update you’ll have to check all of the components to make sure their firmware is at the compatible revision level.

In the BASIC page of the H3-2D you can set-up and check the configuration of your tilt control. With a NAZA-M controller the tilt channel is actually run from the radio receiver to the NAZA-M main controller using the X1 port. Tilt commands are then routed to the H3-2D via the Can-Bus port of the NAZA’s PMU. Once this is wired up, you should be able to observe movement of the tilt channel in the H3-2D Assistant via the Basic page. There’s nothing to adjust, if it’s set up correctly it should work and indicate correctly in the software.

I was a little disappointed to find out that the range of tilt movement of the H3-2D is fixed and will not exceed a range from level (forward) to straight down. With the arms/motors of my frame positioned out to the sides and out of view of the camera I usually like to have twenty to thirty degrees of up tilt but found this wasn’t possible with the H3-2D.

With the gimbal mounted to the heli, the firmware updated and configured, and the mount confirmed to be operating correctly it was time to give it a try. Being used to very substantial camera mounts that have survived an assortment of creative (some might say abusive!) flying and landing episodes, I was half expecting the H3-2D to be more hype than honest to goodness silky smooth camera stabilization and boy was I wrong! It’s the real deal; simple to install, easy to set-up, and ready to deliver very nice video almost immediately. You might have to try swapping out the vibration isolators to determine which works best for your installation but I was able to get some of the best video ever from my GoPro ON THE FIRST FLIGHT!

Keep in mind, the gimbal is so smooth that if your footage is dodgy then you might have to do some tuning of your FC or seek out sources of airframe vibration like motors and/or props. Get your heli flying as smoothly as possible though and the reward will be video that gives the impression of a GoPro, strapped to a chicken’s head, floating around in space nary a wobble or stutter to be seen.

My flying so far hasn’t included any dynamic fast flight so I can’t say how the H3-2D will keep up. If/when the weather breaks I’ll be able to fly this heli more and will continue to add to this review with additional comments and suggestions. So far though, I’m left wondering what I might have captured if I had had this gimbal three years ago! As the GoPro continues to be a staple of aerial media and FPV flyers everywhere, the H3-2D will have a comfortable place under the heli’s of many pilots.
 
Last edited by a moderator:

Bartman

Welcome to MultiRotorForums.com!!
Flying footage to follow in the coming days. It's finally spring in the Northeast!
 

Top