Portable FPV/AP Radio/Rx tray

Bartman

Welcome to MultiRotorForums.com!!
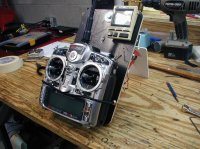
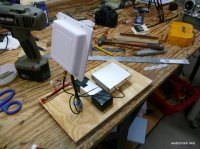
RTRyder asked in another thread about portable receiver set-ups for flying FPV or AP/AV. I had been thinking about my own tripod based set-up and how I didn't love being tethered to something that can't move with me so I got to work on a tray for my radio to which I could also fasten my Rx gear.
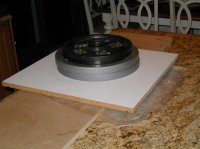
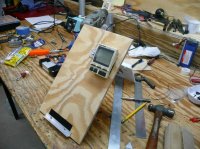
I began with a piece of 3/8" plywood and got it to a size I could be comfortable with. I fly with my thumbs only so I didn't want the tray extending much past the radio and rubbing against my knuckles. I'm going to mount the radio to the tray by the metal handlebar which will elevate it off the flat surface so I can still wrap my fingers around the underside when I'm flying. The whole thing will be suspended by my neck strap clipped to the radio's normal strapping spot.
Here are a few pics to get things started.
 

Attachments

  • p1010263.jpg
    p1010263.jpg
    138.6 KB · Views: 328
  • P1030568.jpg
    P1030568.jpg
    138.7 KB · Views: 283
  • P1030569.jpg
    P1030569.jpg
    122.1 KB · Views: 263
  • P1030566.jpg
    P1030566.jpg
    106.2 KB · Views: 274

Bartman

Welcome to MultiRotorForums.com!!
With the dimensions worked out I started by laminating two layers of 1/8" balsa together with woodworker's glue. It sat in a press overnight and by the morning was ready to be cut to the final size of 7 1/2" by 11 1/2". Once the wife was done getting the kitchen straightened up after dinner I made reservations for some prime counterspace and got to work wetting and laying-up two layers of carbon fibre and a layer of fiberglass. The balsa was pretty flimsy by itself so I included a layer of fiberglass for a little extra stiffness. The carbon fibre was to be used for composite wingtips for a Pitts project I was building but I sold the Pitts to fund the AP business so now I've got CF for little projects like this.
Anyway, after wetting the fabrics and both sides of the balsa I layed it all up together and set it on the countertop with some weight to dry for the night.
In the morning it came out of the press nice and flat and ready for a trim. Excess was removed with a bandsaw set up with a metal cutting blade and then final trimming was done with a small belt sander and sanding blocks. I don't know about you but I've been building balsa planes since I was a kid so manual sanding with blocks seems to be the final step in everything I do (except making breakfast and a few other things ;)).
With the trimming and shaping done, I'll mount everything later tonight.
The first pics shows the tray blank with most of the excess rough trimmed. One side is shown with the excess still attached.
I may still paint the edges black but I kinda like the bare balsa showing under the CF.
 

Attachments

  • p1010265.jpg
    p1010265.jpg
    139.3 KB · Views: 253
  • p1010270.jpg
    p1010270.jpg
    148.2 KB · Views: 235
  • p1010268.jpg
    p1010268.jpg
    153.1 KB · Views: 248
  • P1010266.jpg
    P1010266.jpg
    150.5 KB · Views: 252

Bartman

Welcome to MultiRotorForums.com!!
I had some time this afternoon so I got some more work done on the radio/rx tray.
Like I said in the last post I'm planning to have the whole shebang hang from my radio strap so I position things on the bottom so the balance wouldn't be much different than having the radio alone hanging from my neck. To hold everything together I've got a strip of velcro under the radio and I also put a small bungy cord over the top of it. You can see in one of the pictures that I epoxied two #6 washers to the bottom of the tray for the bungy cords to hook into. Other than that detail, everything else was pretty straightforward. I cut two slots with a Rotozip tool for the velcro strap to thread through for the battery and the rest was just drilling holes and making things tight.

I bought the bungy cords from Home Depot and the flex arm for the patch antenna mount came from a light similar to this one from Harbor Freight

http://www.harborfreight.com/2-piece-flexible-shaft-led-light-95414.html

To mount the arm I drilled halfway through a 5/16" threaded coupling and epoxied the arm into the hole. The other end is a piece of 1/4" ID copper tubing. I flattened it on one end and drilled 1/4" for the antenna's mounting bolt, the other end was drilled out for the flex arm which was also epoxied into place. You can see it better in the first pic of this thread.

All that's left to do is to wire everything. What's nice is the antenna and arm are stiff enough to hold the radio upright so I can place the whole thing on the ground and then just drape the video goggles over it keeping it all off the dirt.

Regards,
Bart
 

Attachments

  • P1010273.jpg
    P1010273.jpg
    150.8 KB · Views: 236
  • P1010274.jpg
    P1010274.jpg
    147.7 KB · Views: 254
  • P1010272.jpg
    P1010272.jpg
    141.4 KB · Views: 255
  • P1010275.jpg
    P1010275.jpg
    138.7 KB · Views: 243


Bartman

Welcome to MultiRotorForums.com!!
not to toot my own horn here but those rigs make mine look like it was designed by Sony. the helmet in that first video is pretty cool though, even if it does make the guy look like he's half pterodactyl.
 

Bartman

Welcome to MultiRotorForums.com!!
i was just thinking, i wonder if the carbon fibre will bounce radio signals from the transmitter and screw things up.....:confused: maybe i can just angle the tx antenna up a bit so it's not so close to the tray surface?
 

zorba

Member
Just to brag this is my tracker. Diversity Rx 5.8gHz
with a patch antenna. I will be using it with the eZOSD.

Bill
 

Attachments

  • tracker.jpg
    tracker.jpg
    84.3 KB · Views: 255

Top