LiPo cell failure midflight destroys my F450. Some questions.

Gary Seven

Rocketman
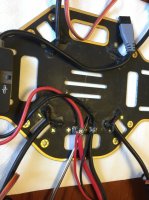
Hello everyone. Well, it had to happen sooner or later, so I guess last night was my turn. It was one of those perfect sunset evenings here with no wind and clear skies. So I got out my F450 and decided to run it more or less full throttle in an oblong course with my custom LED's and strobes lighting her up as well.

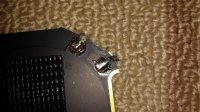
After about 14 minutes of this, my wife pulls up in the car to talk to me, so I put my quad in GPS mode and just let it sit there hovering (at about 50m altitude) while discussing what to buy at the the supermarket. At that moment, I hear my voltage alarm going off so I turn to look up and bring my machine down. It then instantly drops like a lead weight, falling into my neighbor's yard and breaking all four arms plus two ESC's (and I assume, the motors as well). From my point of view it clearly looked like a cell failure.

Because I just received a new iCharger 406duo last week, I was able to take IR measurements on my batteries whilst tinkering with it and exploring its various functions. I'd like to get an opinion or two on the IR readings I took on this battery last week and then after the accident today.

Zippy FlightMax 4000 maA, 20C, 3S. Approx. 30 flights
IR (mΩ) last week: 3.5, 3.6, 2.7
IR (mΩ) today: 4.8, 9.2, 6.9

Does anyone else concur that cell-2 in my 3S battery failed?

Anyway, FWIW to anyone from an education standpoint, this failure was brought on by the pilot (me) not using good LiPo management practices. As a matter of fact, it was last week when I ran this very same battery way down (had my voltage alarm set at 3.4V instead of my usual 3.6V), and upon recharge it took 4000mA! Yep, I ran it down, damaged a cell, proceeded to run my F450 through a full throttle course for almost 15 minutes on the SAME battery, and as a result lost my beautiful, light customized machine which I spent hours and hours tricking out and fine tuning. :mad:

Just a word to the inexperienced and new fliers out there: Treat your LiPo's with kid gloves and be good to them. A cell failure in a single, non-parallel setup will destroy your bird at altitude, or you may lose it altogether!

Going to start another thread with some questions on a hex build. Thanks for reading this.
 

Motopreserve

Drone Enthusiast
Sorry to hear about the crash Gary.

In terms of the IR, I would think a completely failed cell would read higher than what the iCharger shows. But I could be wrong.

Seems like you realize that running it low was a dicey move - and I'm sure you won't be doing that again. One thing I've done when I ran a battery abnormally low (happens to the best of us) is run it through a few charges and discharges on the charger in succession. Checking the IR and the way it takes a charge can possibly tell us if the battery will behave normally while in flight, although not absolute since the charger isn't mimicing flight load. I always hope to see odd behavior on the bench before it becomes catastrophic failure.
 

Gary Seven

Rocketman
Hey Moto. Yeah, I have no idea of the significance of those IR values, other than they were much higher than before. To be honest I completely discharged this battery on more than one occasion, and I think the abuse finally caught up with me. At least it didn't happen last week when I was flying over the water (at the beach, again at sunset). There would have been NO recovery of my expensive Naza-M gear.

I'm thinking about building a F550 hex with the DJI E310 system (as I have a set sitting here at home), but want to do power differently this time. I think I want to go with a parallel battery setup (probably 3S), using for example, two 2500's or something similar. I just don't "get" how to do this WRT space. Where would one mount two LiPo's plus still have room for all the required electronics? Is there some way to mount two batteries on the bottom of the craft? So many questions! :confused:
 

Motopreserve

Drone Enthusiast
I think 2 batteries in parallel ease the mind a bit, especially after the experience you just had.

It really depends on how much you have shoved onto the craft, and the space you have left. You could figure out a tray to mount them to a rail system below. 2 plates across booms on opposite sides. Maybe build a tower over the electronics and mount them directly in the center? Plenty of options, just need to get creative once you determine the other stuff that will be eating up real estate.
 

cootertwo

Member
Gary, we've all done it, if we're honest. I've had batteries so hot, I've put them in the fridge for a few minutes, until they settle down, then do a slow, low amp balance, and charge. I have a special steel ammo can I keep all my "puffy's" in. I'm lucky I don't fly with a lot of altitude most of the time, and have had several instances where my bird just runs out of juice, and slowly settles to the ground. I use a battery beeper when I can, but I have a couple of birds that use the balance lead for something else. I need to get some splitters I guess. I also have the timer setup on my Spektrum radios, but different sized batteries, well, you know..... Most of the batteries I've abused, usually come back to life, just not the same as they were before. A few will charge, but will drop off very fast, so I just keep them for future flashlight use?, or something that stays on the ground!
 

Gary Seven

Rocketman
@cootertwo What burns me up the most is that I knew I was flying with a battery that had previously shown signs of unhappiness, and I ignored it and "damn the torpedoes." It's quite the sickening feeling watching your investment (talking more about the time setting it up, not so much the money) terminate in a matter of seconds. The more I think I know about LiPo's, the more I realize how ignorant I am. Totally bummed out at myself! :(

Still strongly leaning towards buying the Iris+, but I also want to build another sUAV from scratch. Think I'm going to do the F550 this time. I just need to find the freakin time to do it!!
 

cootertwo

Member
I bought the Iris+, cause it seemed the least expensive way to get the Pixhawk with all the added goodies, and a decent quad to boot! I messed mine up, tinkering with some settings, but got it back to normal, after hours and hours of reading, and trying this, and that. Now I'm dieing to try my first "auto" flight, but want to go to a big open field for the first try.
 

Old Man

Active Member
Just make sure you have all your fails ages and Geo fences set before executing an automated flight. You'll do just fine.


Sent from my iPhone using Tapatalk
 

hexhome

Television Broadcast Engineer, SUSA operator
If my f450 flew full throttle for 14 minutes with a 4000mah battery and then hovered for a few more minutes, I wouldn't accuse it of being faulty!
 

Gary Seven

Rocketman
UPDATE

FWIW and in case anyone's interested, I disassembled my wrecked quad today to salvage the the Naza-M and other electronics, and made this rather "slap in the face" discovery. The positive power lead (from battery to PDB) failed, and down she went. Posted a couple of pics just for interest.

Bummer. Thought my soldering skills were better than that. Will take more care on my F550 build. :(

View attachment 23778 View attachment 23779
 

Attachments

  • PDB_closeup.JPG
    PDB_closeup.JPG
    79.1 KB · Views: 327
  • PDB_view1.JPG
    PDB_view1.JPG
    61.6 KB · Views: 323

hexhome

Television Broadcast Engineer, SUSA operator
Vibration! Soldered connectors are bad news in this application. Crimped would be better.
 

Gary Seven

Rocketman
Well, I don't know what to say about that, @hexhome. I'd definitely like to hear what the consensus is among the serious and experienced builders here. I have no idea how you go about setting up a crimped connection to a PDB. In theory, a soldered connection if done right should hold for years.

I'm almost sure I did damage to the original solder joint when I went back and soldered on a lead to supply my LED's and other gadgets. Anyway, if you're willing to lay out a "How To" video to do crimped connections instead of solder joints to primary power points, I'm all ears!
 

navycut81

Member
UPDATE

FWIW and in case anyone's interested, I disassembled my wrecked quad today to salvage the the Naza-M and other electronics, and made this rather "slap in the face" discovery. The positive power lead (from battery to PDB) failed, and down she went. Posted a couple of pics just for interest.

Bummer. Thought my soldering skills were better than that. Will take more care on my F550 build. :(

View attachment 23778 View attachment 23779


THERE COLD SOLDERED!!!!! You can see it in the negative pdb attachment point. Your solder is suppose to flow into ONE UNIFORM BLOB not it separate balls of solder laid on top of one and another. Try liquid flux with lead based solder instead of solder with a flux core its easier to reflow the solder once you add a little drop of liquid flux to your connection before you solder your connections together. Just make sure to clean it after because the flux is corrosive.
 
Last edited by a moderator:

Gary Seven

Rocketman
THERE COLD SOLDERED!!!!! You can see it in the negative pdb attachment point. Your solder is suppose to flow into ONE UNIFORM BLOB not it separate balls of solder laid on top of one and another. Try liquid flux with lead based solder instead of solder with a flux core its easier to reflow the solder once you add a little drop of liquid flux to your connection before you solder your connections together. Just make sure to clean it after because the flux is corrosive.
@navycut81 OMG. I DID use liquid flux while soldering, in addition to solder flux core. When I tinned the PDB pads, they were perfect. In fact, once I soldered the ESC's and the main power leads, I thought they were as good as it gets. Throughout my process I used liquid flux because I really do understand the basics. Clearly however, I botched the job and I believe (as posted above) I screwed everything up when I went back a month later and soldered in a lead on top of my Pos/Neg power points. You're right, it does look like a cold solder issue. Of course, I always clean up afterwards with 99º alcohol before covering the solder area with "liquid tape."
 

navycut81

Member
if your using liquid flux DO NOT use flux core solder because your just adding unwanted flux and generally the liquid does a lot cleaner job with less splatter with just standard lead based solder.

Wish you all the best on your next build :)
Also don't be scared to turn up your iron when soldering to the pdb it can take quite a bit of heat especially with larger gauge wire
 

hexhome

Television Broadcast Engineer, SUSA operator
It would not be easy to modify an f450 to crimp connection. Mine is also soldered. I have had soldered joints fail, fortunately not mid air. Generally in aviation, soldered joints are avoided. My comments were aimed at the designer.
 

Bartman

Welcome to MultiRotorForums.com!!
UPDATE

FWIW and in case anyone's interested, I disassembled my wrecked quad today to salvage the the Naza-M and other electronics, and made this rather "slap in the face" discovery. The positive power lead (from battery to PDB) failed, and down she went. Posted a couple of pics just for interest.

Bummer. Thought my soldering skills were better than that. Will take more care on my F550 build. :(


did you add that second wire after the first was already on there or at the same time as the first/larger wire?
 

Gary Seven

Rocketman
did you add that second wire after the first was already on there or at the same time as the first/larger wire?
Hey Bart. The second lead was added about a month (or two) after the first. I guess I caused the original solder joint to fail by the addition of the second lead.
 

fltundra

Member
If your solder joints fail, you're doing something wrong. My joints either rip the wire, or pull up the traces in a crash. Good rosin core solder, (Kester 63/37) and a good soldering iron is important. Pre fluxing is a waste. Just clean pads with alcohol and pre tin the pad and wire.
View attachment 23790 View attachment 23791
 

Attachments

  • 20150315_100301.jpg
    20150315_100301.jpg
    138.5 KB · Views: 352
  • 20150315_100502.jpg
    20150315_100502.jpg
    154.6 KB · Views: 311

Bartman

Welcome to MultiRotorForums.com!!
Hey Bart. The second lead was added about a month (or two) after the first. I guess I caused the original solder joint to fail by the addition of the second lead.

i'd guess that the flux from the original joint was already boiled out and the new solder didn't have enough to reflow the entire joint. lack of heat down into the original joint might also have left the underlying wire/pad joint weakened after you added the second wire.

when the flux has boiled out of a joint and the solder starts sticking to your iron and getting clumpy it's time to dab additional flux onto the solder and to add heat to let it all flow throughout the joint
 

Top