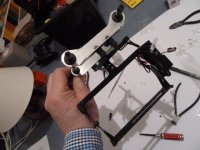
Just managed to get a HiSite IISE mount on to my ADX3. It was a bit expensive as a temp until the DW ProMini is available but I was desperate to get my camera on it.
I will post more on how I did it but now I need to know how to connect it to the FC and what the best configs are in MKTools?
 View attachment 98
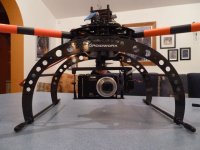
Home made frame mounts
View attachment 99
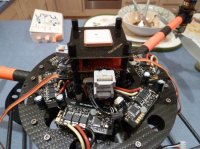
Now to connect it!
HELP!
You'll need to look at the proper connections for the servos here, about half way down the page...
http://mikrokopter.us/MKDocs/FlightCtrl_ME_2_1.htm
And you'll find this somewhat useful also...
http://mikrokopter.de/ucwiki/en/MK-Parameter/Camera
Quickly, make sure the servos are centered and the arms connected for full travel of the respective axis on the HiSight, I use a servo programmer for the initial setup and it can also be done by plugging the servos into a receiver with a flight pack battery for power.
In the camera tab of MKtool you will want to assign a Poti to Nick servo control so you can change the angle of the servo from the TX.
Servo control on the roll axis is used to set the centering/level of the platform on that axis, strictly trial and error, use a small bubble level if you have one and make sure the airframe is level when doing the adjustment.
Invert is self explanatory, if the servo moves the wrong way when you move the airframe, invert it.
Servo min and max on both axis are essentially endpoint adjustments, again trial and error depending on the servos and capabilities of the mount you're using.
The nick and roll compensation settings determine how much and how fast the servos respond to changes in level as sensed by the flight controller board. 40 is a good starting point for each but you'll need to do a couple test flights and evaluate the video results to see if it needs to go higher or lower. With the Pro mini I think I'm down to 30 on roll but 40 is working pretty good for tilt. For the HiSight it will be determined by the servos you're using and the weight of the camera on the mount, so yeah, more trial and error.
That should at least get you started and in the ballpark.
Ken