Aerial Media Pros
Member
DJI S1000 Review
First impressions
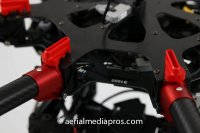
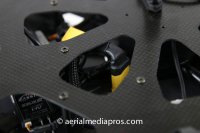
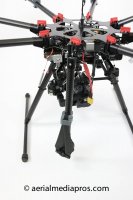
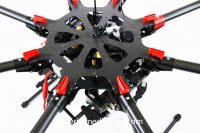
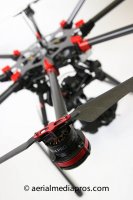
When first opening DJI’s newest flagship Octocopter, the S1000, the first thing we noticed was the number of carbon fiber components. Everything from the arm booms to the center frame, H-Frames, to the (vibration dampening mounts.) The other components of the copter are a high quality aluminum. We really like the Aluminum boom mounts on the frame, especially the two Red ones. Everything on this copter seems to be well machined and thought out. DJI did not compromise any bit of quality when making this frame.

Power Distribution
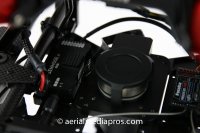
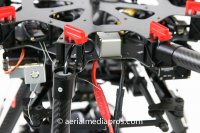
DJI has created a new power distribution board for this new frame. All of the ESCs are connected to a central hub in the middle of the frame using a proprietary plug. Due to the design of the plug, the likelihood of it coming loose or unplugged due to vibration, becomes very unlikely. This PDB will allow for quick and easy installations of the power system.

Along with the power distribution board, DJI has made it extremely easy to power other components via XT60 power plugs, such as the A2, Zenmuse Z15-5D, iOSD, etc. There are a total of three places where one can retrieve power from. Two inside the center frame and one below the center frame. To power individual component such as the IOSD, or Zenmuse, you simply plug into one of the available power sources. In the S800 and EVO we use to use a Y harness to tap power and run the IOSD in line with the Zenmuse power plug. This is an improvement over the S800 and the S800 EVO, By tapping and drawing power from individual points on the board, it reduces the chance of complete power failure. For example, if the power plug for the Zenmuse failed, you would only loose power to the zenmuse, rather than loose power to everything. The female XT60 connecters are soldered straight onto the board, unlike the original S800 and S800 EVO. So there is no chance of any power wires rubbing against the carbon and causing a short.

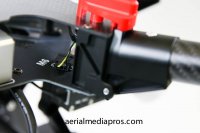
DJI chose to use a high quality power connector for the new flagship octocopter. The XT150 Connecters are perfect for high power applications and offer a spark-less connection. I really like the XT150 connectors and have now ordered a lot of them, so that I can switch all my lipos over to this newer style plug. They go together effortlessly and really do prevent the loud POP and SPARK that the XT60 would create when plugging power in.
A2 Optimization
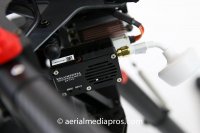
From a building perspective, the S1000 is optimized for the flagship flight controller, the A2. The power distribution board makes it very easy to power the flight controller. There is no soldering necessary.

In other frame designs, including the S800 EVO, the servo cables used to connect the motor wires to the flight controller were lengthy and obtrusive. DJI decided to use a much simpler cable that is less confusing and makes for a much cleaner look. It utilizes only the signal wire of each ESC.
The A2 has a lot of features and upgrade options. The S1000 frame has plenty of space to mount anything from an iOSD Mark II to the new 2.4GHz Bluetooth Datalink, or the new HD Lightbridge Downlink coming soon from DJI. This frame will accommodate anything you throw at it.
Frame
Although the S1000 is a completely new frame design, it was well thought out and seems to be extremely firm and durable. There are a total of 36 points of support between the top and bottom plates. First thing that was on my mind was “FLEXING”. I went right to work to test this. I took two booms opposite of each other and tried to bend them upwards (Towards each other) seeing If I could get the frame to Flex. There was no flex at all, If I bent the top of the GPS puck, you could see just a little flex In the top plate. I seriously doubt that the little flex seen there would downgrade or question the integrity of the frames strength. For all practical application purposes,I think this frame is more than solid enough to handle whatever we throw at it. That was also tested by doing some strenuous, fully loaded testing flights.

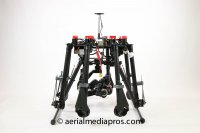
Below the center frame, the S1000 uses two H-frames assemblies to suspend and support other components like the AVL58 Video Transmitter, Bluetooth LED, and Zenmuse Z15-5D. The smaller H-Frame directly below the center frame mainly used to mount the Retractable Landing Gear modules. There are also four drop bars that hold the larger H-Frame. The lower H-Frame is for the battery tray and the Zenmuse gimbal. We find the drop bars provide a very practical location for the LED. The LED placement is very important when flying because the LEDs give the operator some important information in direct relation to the copters performance. Including current GPS Lock info, what flight mode you’re in, along with low voltage warnings. These LED sequences can greatly help in understanding the current state of the aircraft and knowing when to land the craft. The larger H-Frame is connected to the drop bars via compressed vibration dampeners. These seemed to really conquer vibrations getting to the camera. We didn’t see any vibrations in our footage while flying the 5D. DJI has also used Anti-Drop screws to help keep the bottom H-Frame in place.
Arms
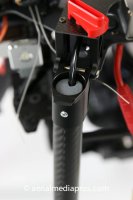
The S1000 uses thick cylindrical carbon fiber tube for the Arms. These Carbon Booms are a wider and thicker carbon when compared to other makes and models using similar technologies for arms. It seems that in most cases, these new S1000 arms will not flex or fail.

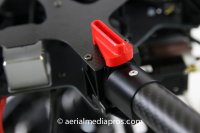
Unlike the S800 and S800 EVO arms, the S1000 keeps all of the arms attached to the center frame using Aluminum Knuckles attached to the center frame. I was wandering about the aluminum knuckles and thought there would be some slop or play in their connections. I was very pleased to see that they are a solid fit, and allow only enough movement to fold the arms down or up into locking position. Once “Locked” in the up position, the Joint was very firm and solid. The aluminum knuckles or arm mounts allow us to fold the arms down for transportation and travel. The S1000 will fold down from a diameter of about 43 inches to a box size of approximately 21x21x21 inches. This makes for easy assembly, breakdown, and transport. There is no longer a need to take arms on and off. The way that these arms snap in and out of place is a very easy and smooth process. The arms lock into place by a quick release mechanism and when it gets locked, there is a very audible snap. The operator will know when each arm is locked into place.

DJI has once again decided to incorporate the power and signal wires connected to the ESCs within the arms. This means that each arm does not have any loose wires around the arm. Everything travels through the center of the arm, directly to the center frame. At the threshold of the arm, DJI utilizes a single piece of foam to keep the wires from vibrating and snagging on other components.
Motors/ESCs/Props
The S1000 is using the same high quality motors and ESCs that DJI introduced with the S800 EVO. Similar to the EVO, these motors are placed directly above the ESC and heat sink. This placement helps with the cooling and performance of the ESC and in turn, supports the performance of the motor.
The signal, ESC, and power wires connected to the motors and ESCs, travel through the carbon arms as one simplified cable. When the cable exits the end of the arm, it splits into a power and a servo cable, both cables simply connect directly to the bottom board or the power distribution board. This reduces the cable mess inside the center frame, allowing for a very clean layout.
Out of the box, the S1000 motors are using the new 1552 style propellers. In past tests, DJI has stated that these new propellers have a new advanced airfoil design and utilize stronger materials that will give an S800 EVO a 10% efficiency boost. In our own testing, these propellers have given us extended flight time and improved performance, especially in climb outs and other advanced maneuvers. DJI includes more robust propeller holders that are easy to install and uninstall.
Retractable Landing Gear
Like the S800 EVO, the Retractable Landing Gear comes stock. Although the entire landing gear module looks like the one on the EVO, the S1000 looks to have much more heavy duty servos. The retract servo has an aluminum case, and includes a built in heat sinks for better cooling. The servos certainly look like they can take care of retracts without issue. Also the servo wires connect to the bottom board, which helps reduce the cable mess and overall makes for a more attractive build.
Flight Test
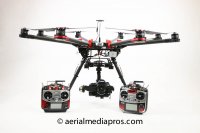
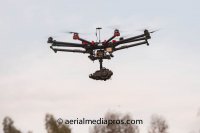
Now for the real deal. Is the S1000 the answer for cinematographers and filmmakers looking for a professional rig? A fancy review with pics and such do us all no good, unless the product actually performs in a real world application, on set, in the dirt. Our initial test flight at night went without a hitch. The copter was extremely stable, and flight performance was very nice. I could maneuver the copter in any way I wanted, and the S100 never got upset. After test flights we went back and installed the 5D Mark III Zenmuse.
The following day we had a shoot for Insider MX, so we opted to take the S1000 and 5D out on set for a real test. First thing I liked right away, was how easy it was to transport, travel, and set up on location with the S1000. Those that have traveled with large Octos knows it is a real pain. The S1000 quickly compacts down into transportation size. Once arriving on set, I quickly grabbed the S1000 out of the back. Set it down, and clicked all 8 arms into place. I grabbed a 6S 16000 mAh lipo and clicked it into place. I did some quick setting on the gimbal controller (Added some Expo and D/R) to slow the Pan and tilt movements, and was ready to go. After a quick safety brief with the riders and staff, we were ready to begin shooting.

I powered up the copter, waited for a GPS lock, and lifted off. I was expecting a little delay in lift off due to the added weight of the 5D and Zenmuse, but the copter popped right off the deck. A smile immediately came onto my face cause I could feel there was plenty of power and thrust left in reserve and ready to be used.
We had been tasked with following a couple of riders, so I took off after them. This was the perfect shoot for testing, because I had to really push the copter to its limits to keep up with the riders. There were plenty of times that I would be tracking back and just blast into a full power climb to gain altitude quickly. I had the Altitude gains down to 160 and the S1000 still climbed pretty fast. Something that I really liked was the descending shots. Typically, you will get a lot of shake and wobble when descending down, especially when at a high rate. The S1000 really handled this like a champ. There were a few shots where I would cut power almost completely and flow right down onto the subject. It created a really sweet shot that was similar to using a tall crane, but at the same time you know it’s impossible to do with a crane. There were plenty of shots where I would be tracking backwards or sideways tracking a rider. I would have the collective stick pulled full back and the S1000 would just fly beautifully at a max speed of about 45mph. The altitude hold worked flawlessly. In one shot, I was staged in front of the starting line, when the racers took off; I applied full elevator and a little throttle to gain speed. The S100 didn’t drop a bit and maintained a perfect altitude at where I had initially set it. We would often get a drop or variance in altitude when performing something like this with other copters. The combination of the S1000 and A2 flight control worked amazingly.
For the rest of the day, I flew the heck out of the S1000. I was using Full power, and full cyclic almost all the time. There was one shot that required me to fly down a stretch at low altitude and high speed. Problem was the tree line at the other end. I had to fly it hard in one direction, the hit full throttle cyclic in opposite direction to stop it before hitting the trees. That is one of the harder things to put a heavy copter through, and the S1000 handled it like nothing at all. I can confidently say I haven’t flown any other copter harder than I flew the S1000 on this shoot.
We finished the day rather quickly with just 6 Flights. Flights seriously felt like a long time. I had to keep double checking the IOSD and the Telemetry on the radio to be sure we were not low on voltage. When it felt like it had been a long time, we were only at 50% use of the lipo, so we just kept going. Shot after shot after shot. Flight time on the 6S 16000 mAh lipo was right at 15min. At 15min we had 3.70 volts per cell left. Personally I set the timer to 13 min and give myself some extra time in reserve just in case it’s needed. 15 min really gave us all the time needed to get the shots that were planned for. I found myself coming up with more things to shoot, simply because we still had flight time left. We were able to capture more usable shots in one flight, than we would have done in 4 flights using other equipment. As far as flight time goes, I think we all will love the 15min. You can get 20min if you use dual 10000’s or a single 20000. But I really like the performance using a 16000. I think by sticking with a single 16ooo lipo, you will help keep weight down, performance high, and still get plenty of flight time.
Final conclusion
The S1000 hands down is a performer. I will be using this rig nonstop for our shoots. Being able to fly a 5D with this level of stability will open many doors for cinematographers out there. We now have a platform 100% capable of creating shot after shot, all while filming in HD. The S1000 is going to be the copter to have for any professional, serious about getting into aerial filming. With the simplicity, portability, and performance of flying a 5D, I don’t see anything else competing against the S1000. If the S1000 can pass through our tests, I know it will fit well into our customer’s hands.
Patrick Smith
Aerial Media Pros
Videos
http://youtu.be/8GMs58ihaJ8
http://youtu.be/4jwDXPHfFAo
http://youtu.be/UAL41rN6LeU
http://youtu.be/rn_Dbo--P0M
View attachment 16185View attachment 16198View attachment 16197View attachment 16196View attachment 16195View attachment 16194View attachment 16193View attachment 16192View attachment 16191View attachment 16190View attachment 16189View attachment 16188View attachment 16187View attachment 16186View attachment 16199
Attachments
-
 s1000-4948.jpg92.8 KB · Views: 462
 -
 s1000-4961.jpg105.7 KB · Views: 434
 -
 s1000-4971.jpg87.9 KB · Views: 405
 -
 s1000-4972.jpg83.7 KB · Views: 494
 -
 s1000-4973.jpg91.5 KB · Views: 410
 -
 s1000-4975.jpg87.7 KB · Views: 405
 -
 s1000-4978.jpg134.3 KB · Views: 389
 -
 s1000-4982.jpg85.9 KB · Views: 405
 -
 s1000-4984.jpg110.3 KB · Views: 419
 -
 s1000-4985.jpg91 KB · Views: 438
 -
 s1000-4999.jpg102.9 KB · Views: 609
 -
 s1000-5004.jpg112.3 KB · Views: 600
 -
 s1000-5008.jpg146.5 KB · Views: 731
 -
 s1000-5021.jpg100.5 KB · Views: 529
 -
 s1000-7413.jpg70 KB · Views: 550
