Blade Chroma with CGO3 4k

Old Man

Active Member
Folks,

This is a consumer review of another consumer drone. No manufacturer or distributor contributed anything to the creation of this review, the entire system was bought and paid for on my own. I have no personal or professional association with Horizon or Yuneec, so this is totally independent and unbiased with the exception of personal likes and dislikes, which will be noted. This review is a work in progress so I'll be adding photos and videos as I have time to get them done. For a quick pictorial description of the Chroma and some of its features click the link for the usual information provided by distributors. http://www.horizonhobby.com/media/chroma/support.html

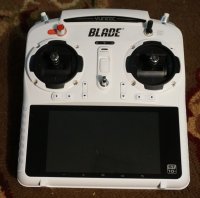
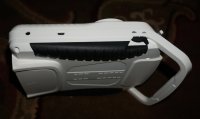
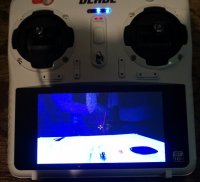
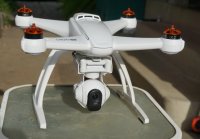
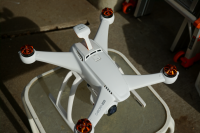
With all the consumer drones on the market, with more popping up every day, I decided it might be nice to have something I could toss or keep in the vehicle for quick use but without a lot of set up work. For those that might suggest I should have looked at a DJI product, please don't go there. I have a long standing beef with those guys and don't have any desire to go into that debate again. However, I did consider, very briefly considered, the Phantom 3, the 3DR Solo, the Yuneec Q-500+/Typhoon, and the Chroma CGO2 in 1080p and the Chroma CGO3 in 4k. Walkera was never in the running. Both the CGO2 and CGO3 use the same ST-10 transmitter, which has a video screen to display the camera view. The Chroma can be obtained RTF or in bind and fly format if you have a desire to use your own transmitter.

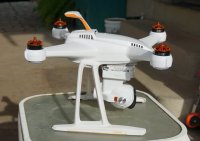
I eliminated any unit that required an additional iOS or Android device for operation to keep expense and complexity to a minimum. Another item that rode high on my list of desirables was/is customer service. That alone almost put the Solo back in contention but higher price, lack of gimbal inclusion, combined with the need for a separate control device put it out of the running. Horizon has always had pretty good customer service and by all reports over the last year or so Yuneec has been extremely responsive to product issues and customer inquiries. Final choice went to the Chroma CGO3 in 4k. The Typhoon almost made it but it's too slow, is larger than the Chroma, and has shorter flight times because of the additional size and weight. However, the Typhoon does provide more user flexibility in FC programming. Note that although made by Yuneec, Horizon Hobby is the dealer/distributor for the Chroma. You can not purchase it from Yuneec.

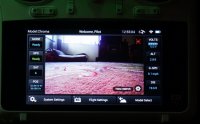
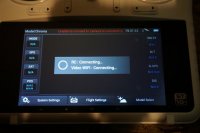
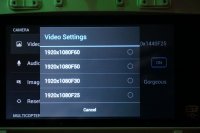
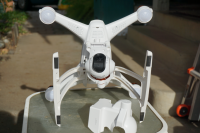
If this review sparks a desire to purchase a Chroma there are two things that one needs to do before making the purchase. The first is to visit the Horizon website and download the Chroma GUI and RAR file that's inside the GUI download. The second is to visit www.knowchroma.com and download the light code sheet. Like other makers, Yuneec makes heavy use of LED's light codes. Each of the 4 arms on the Chroma has a single light lens on the bottom of the arms and their colors are indicative of the state the system is in. You will also need to have a laptop or tablet that has USB ports, and have web connectivity when making the first connection between the MR and the system. You'll need the internet to review the short instructional videos at "knowchroma" that will answer some of the start up questions you'll undoubtedly have.

Important!

Something I cannot stress enough is for the new user to the Chroma (or any other copter) to take the time to read the instructions, fully explore the contents of the box it arrives in, and review the numerous videos at manufacturer sites and You Tube referencing operation. You cannot ever know enough and to buy it and try to immediately fly it is tantamount to certain disaster. Get to know the basics before setting out on your first aerial adventure.

The Chroma has extremely broad functionality in many aspects of its design and programming and you cannot possibly recognize many of them without looking further than what's in the box. Failure to explore and increase your knowledge base puts you at a severe disadvantage.
 
Last edited by a moderator:

Old Man

Active Member
I'll get some pictures up a little later. I left the camera I use for macro stuff at work and won't be getting back there for a few weeks, so I beg some pardon in advance for photo quality. I will not do an "unboxing" video. If people can't figure out how to open a box and remove the contents Lego's might still be a little advanced for them.

The Chroma is a "cute" little copter, measuring ~493.22mm on the diagonal and 285.75mm in length and width. Those measurements were taken motor shaft center to center. The landing gear and gimbal are both easily removed, and the Chroma can be flown with or without camera. The camera does not separate from the gimbal with either the CGO2 or CGO3 set ups. One can also order a Go Pro gimbal from Horizon for the Chroma should they desire to use a camera they already have. The software for gimbal recognition is stored in the gimbals and "found" when linking the WiFi between the transmitter and the Chroma gimbals. This is done during the initial set up of the copter. During the initial power up and connection to my laptop and Chroma GUI the CGO3 was not shown on the GUI until the WiFi link process was initiated. Prior to linking the GUI only showed a Go Pro and CGO2 gimbal choice. It's a pretty simple process but one must follow the directions in both the printed and on line instructions exactly.

After removing the landing gear and gimbal the body is only 3-1/2" top to bottom so it can become a very compact unit for transport. None of the measurements include mounted propellers. With the landing gear in place the Chroma stands 9" tall to the top of the motor shafts. There's ~3/4" of clearance between the lowest portion of the camera and the ground so a little thought to where it will be taking off and landing is worth a moment of your time. There are no antennas attached to the landing gear so removal of the gear requires only the depression of a snap/pressure tab. Replacements are available from Horizon if one is broken. The GPS antenna has it's own folding mount that fits nicely into a formed area at the top of the body. It must be raised prior to aircraft power up. Weight w/o battery, but with the CGO3 gimbal and camera, is under 1lb. Sorry, but my scale is at the same place my macro camera is.

Unfortunately, like some other consumer drone makers, Yuneec has elected to make the Chroma body from white plastic. This permits the possibility of confusing it with a Phantom for those not cognizant of the differences. Although great for minimizing thermal absorption on a sunny day, it would not require much additional expense to manufacture a hull in some "soft" color that would not gain and retain heat while providing an appearance that would be distinctive and provide improved visual reference. The body shell halves are not designed to be separated without experiencing some damage. Portions of the body are "bonded", making separation extremely difficult. There is already an aftermarket producer of a black carbon fiber body for the Chroma, while some owners have elected to paint portions of the body different colors for visual orientation.

I have one early gripe that I believe to be significant, and that's the need to go to several different places for instructions. It's certainly cheaper and more convenient for a manufacturer/distributor to make a series of videos for on line reference but a comprehensive set of printed instructions is invaluable to the user when seeking operating or trouble shooting references in an environment where tools to access the web may not be present. Lack of instruction reference is a great reason for a user to "wing it" if reference material is not available and such actions are conducive to flight safety issues.

I'll be back with more via an edit a bit later...
View attachment 26843 View attachment 26844 View attachment 26845
 

Attachments

  • DSC01750.JPG
    DSC01750.JPG
    61.1 KB · Views: 542
  • DSC01754.JPG
    DSC01754.JPG
    61.9 KB · Views: 548
  • Bottom.png
    Bottom.png
    788.4 KB · Views: 554
  • DSC01753.JPG
    DSC01753.JPG
    61.5 KB · Views: 495
  • Top.png
    Top.png
    724.1 KB · Views: 577
  • Battery and Charger.png
    Battery and Charger.png
    739.2 KB · Views: 841
  • Comm Ports.png
    Comm Ports.png
    616 KB · Views: 632
  • Gimbal Release.png
    Gimbal Release.png
    728.4 KB · Views: 638
  • Vibration Dampeners.png
    Vibration Dampeners.png
    710.6 KB · Views: 516
Last edited by a moderator:

Old Man

Active Member
In another thread I posted my thoughts about the printed instructions that are included with the Chroma. I tried several times to attach the manual PDF to this post but only the light codes PDF would transfer. Those that want to review the Chroma printed instructions will need to go to http://www.horizonhobby.com/pdf/BLH8675-manual-EN.pdf to take a peek. Although my personal opinion has the printed instructions falling a little short I have to consider the Chroma is designed for people that know nothing about multirotors that are looking to participate in aerial photography with minimal effort. On that basis the instructions are successful in intent, and purpose. Better still, some of the things noted in those instructions have to be complied with before the Chroma can be flown, so the buyer has to at least read them to get into the air. The front of the transmitter has a large sticker to remind the user to read and comply with those instructions. Don't do this with the CGO2 or 3 gimbal attached.

The first two posts of this review likely presented a somewhat negative opinion of what I was seeing as things came out of the box. I need to mitigate that sense by mentioning I'm a "high end" user of sUAS and associated products and as such set some pretty high standards. Those standards are well above what the general Phantom/Inspire/Solo/Yuneec/Go Pro user would be expected to have. It took me a while to consider that and revise this review to provide notes from a much simpler, easier to satisfy, and more general consumer level perspective. For those I may have been taking down the wrong road, I apologize. The Chroma is indeed a cute little copter that has the ability to make a lot of people pretty happy, and it has its share of surprises that can add to a positive flying experience. From this point forward the review will look at the Chroma from a "newbie" perspective, at least as much as I can in that respect. If something could be better, it will be mentioned, with a recommendation where appropriate. Because of personal beliefs relative to flight safety there will not be mention of how to extend flight range or where to purchase after market products that might assist that desire. If someone wants to do that stuff, it's on them.

Being one that does not believe the wheel needs to be constantly re-invented I'll provide links to videos made by others that provide good examples of various Chroma aspects. At some point I'll take the Chroma out and shoot a flight with no breaks in the video to provide reasonably accurate representation of what the camera and gimbal will do. I won't guarantee anyone will like the subject matter not we'll all know what it will do with the resolution and stability. An early tease about flying this thing, it can be a lot more agile than most would expect from a consumer drone, and there will be times when the user may want to leave the camera on the ground to maximize certain types of flying. I'll make use of my earlier mention of posting links to videos made by others at this point.

Flight Modes
 

Attachments

  • BLH8600-Chroma_LED_reference_card-EN.pdf
    3.4 MB · Views: 672
Last edited by a moderator:


Old Man

Active Member
I'm starting to like some aspects of this jewel more and more. I purchased this Chroma "second hand" but unused from a gentleman in Texas so some of the included items were not as visible as they might have been.

There are light code sheets included with the "kit" in a couple of languages, providing a smaller document that can be carried in the users pocket. Even better, and for me eliciting a tremendous "Well Done" to Horizon, is a pamphlet that discusses safe operating practices, differences between hobby and commercial operation, and provides links for the AMA, Small UAV Coalition, AUVSI, and FAA for additional information. Absolutely wonderful in my opinion. The only thing missing was a link to Multirotor Forums;) Knowledge is obtained through access in this age of the internet and Horizon made the effort to provide that access. A new operator can gain enlightenment with very little effort:)
 
Last edited by a moderator:


Old Man

Active Member
Battery Charging

The Chroma uses a proprietary outer shell battery that may be labeled as a 3s, 5400ma battery. It's not, it's 6300ma and labeling will be corrected in the future. The unit is shipped with an E-Flite 10.5v-15vDC battery charger, a battery adapter, a 110v-240V AC-DC charger power supply, and DC power connector for those days you want to charge from a DC power source like a car battery. The charge rate is set at 3.5A max, and obviously designed to protect the user from themselves. You have no options using the factory charger. Plug it into the wall outlet, plug in your battery, and wait...and wait. A pair of LED's on the face of the charger indicates what phase the charge cycle is in. With a 6300ma battery the charger does the job at just over 1/2C. Those that have been at this for awhile might prefer to charge their batteries at 1C, or some other user definable rate while also having a means to place batteries in a storage state if desired. For the newbie the stock battery charger works just fine but as their knowledge and understanding increases (along with their supply of batteries) it's likely their desire for a better battery charger will too.

A fully charged battery is good for up to 30 minutes of flight time, depending upon how you fly. Someone flying hard all the time in agility mode will not obtain a 30 minute flight on a charge, but the function of flight time has always been dependent on how you fly.

Horizon sells a charge adapter (PN BLH-8624) for $9.99 that permits connecting the Chroma battery to a charger that has balance ports. I highly recommend this option but they are currently on back order status at Horizon. I have spoken to one individual that has 6 Chroma batteries and he mentioned that 3 of them had weak cells. Use of a balance charger seemed to have remedied that issue for him. Balancing charging multiple cell Lipos is always the best way to charge them, and those that already have high quality battery chargers can make use of them with the optional adapter.

The transmitter is charged via a micro USB to USB cable, meaning it has to be charged through a computer or other USB power source. Charging the transmitter, to be blunt, is slow, but according to various users I been in contact with a full charge on the transmitter is good for several hours of flight time. Once connected to a power source it takes a few seconds for the transmitter to show that it sees power input. The Yuneec emblem appears on the transmitter monitor and then a blue light near the top of the transmitter slowly flashes while charging, changing to a solid blue when the charge is complete.

View attachment 26861
 

Attachments

  • Battery and Charger.png
    Battery and Charger.png
    739.2 KB · Views: 657
Last edited by a moderator:

Motopreserve

Drone Enthusiast
Really glad to see you posting this @Old Man

I've been curious as to its capabilities, after seeing a quick overview from the NAB show.

Thanks for all the updates.
 

Old Man

Active Member
You're most welcome.

Although it's coming piecemeal I hope to provide a relatively accurate overview of it. No denying it will be interspersed with personal likes and dislikes but if it was all good everyone would know I was lying about something;)
 

Motopreserve

Drone Enthusiast
You're most welcome.

Although it's coming piecemeal I hope to provide a relatively accurate overview of it. No denying it will be interspersed with personal likes and dislikes but if it was all good everyone would know I was lying about something;)

Your personal opinion is what makes the review have any value at all. Keep it coming!


Old Man

Active Member
I didn't want to be the one to say that, although even at 6.3A it's still only a 69.93 watt hour battery, well under the 100 watt hour/battery cap they put on bulk battery shipments. However, it is interesting they make it a point to state it's a 59.94Wh battery on the label as it currently exists. Nobody puts Wh ratings on their battery labels. At least for the moment...


Motopreserve

Drone Enthusiast
I think if you hard reset (power button hold) you should be able to choose "safe mode" when it reboots. It should be an option while it looks like the old DOS windows.
 

Old Man

Active Member
Nope, auto returns to start up repair. Not an available option with F2 or F12 keys during boot either. Thanks though.

Just went out looking at new laptops since the other one is 4 years old. Bad part of that is everything is now Windows 10 and the Chroma GUI software does not like Windows 10.
 

Motopreserve

Drone Enthusiast
Damn. I'm not a windows guy - but I do keep that one Windows 7 machine for several programs. I think from 8 on seem to cause some real issues with the programs I've dealt with.

Sorry I couldn't be more help. Good luck!
 

Old Man

Active Member
Thanks for trying. Managed to get out of the start up repair and into a memory check. It may well be hopeless but I can't give up without trying. Hedged my bets and bought another laptop. Downside has it out 6 days from pick up. Then all the wonderful tasks associated with starting over loading software. Did get 4k screen and a terrabite HD though.

Managed to get the old laptop working again but only after a complete reformat, meaning everything that hadn't been backed up is lost forever. There will be a short setback in this review as some work is recreated and software downloaded again. At least I get to keep a Win7 laptop...
 
Last edited by a moderator:

Old Man

Active Member
Back on topic. Getting to this point presumes the user has read the instructions, visited Horizon's Know Chroma website, and taken the time to review one or more videos there about the Chroma. Hopefully they will have charged the batteries for both the transmitter and receiver (completely charged, no hurry up partial charges) and followed the instructions for connecting to the GUI the first time. While there they should check the transmitter and receiver have achieved bind, and the system now recognizes the camera installed on the Chroma. While connected to the GUI they can use the system to perform motor rotation checks by clicking the appropriate motor representation. All of this is done before props are installed. Always perform your basic functions checks for the first time with the propellers removed from your multirotor.

Mounting Propellers


The Chrome arrives with two sets of propellers, which is pretty handy for not just the new user but also those that push the performance envelope. The propellers are self threading onto a motor that has a cast threaded shaft incorporated into the motor case. If you break a prop shaft you'll be replacing a motor. After being threaded on the propellers are set "finger tight" and retained on the prop shaft via tension from a silicone rubber O-ring. The Chroma also arrives with two sets of propeller shaft O-rings. A word of caution here, the Chroma videos mention that propeller continue to self tighten when in use and this has already been shown to cause propeller/O-ring combinations to become so tight they would not release later. It's very likely the plastic propellers and the O-rings bond under compression so the use of an O-ring lubricant is, IMO, highly desirable to permit easier separation later. I would not recommend anything that was not specifically intended for O-rings. There's a product called "O-Lube" available at auto parts stores that works extremely well for lubricating O-rings and assisting gas/liquid sealing in harsh use environments. One tube will last a Chroma user a couple lifetimes.

Horizon/Yuneec makes it very easy for the new user to identify and mount the propellers on their new Chroma. Each motor/propeller/boom is marked either A or B to associate propellers and motor rotation correctly. There's even a rotation arrow embossed on each propeller to assist the user in rotating the prop in the correct thread direction. Installing them is easy and nearly impossible to get wrong.

The propellers themselves are very soft and flexible. This is both a boon and a bane. It's good for the user that runs into things, in some cases preventing a propeller from easily breaking. It's great for the manufacturer because they will sell a lot of replacement propellers. It's a bane to better performance levels. Since the blades bend and twist easily a lot of motor/propeller thrust performance is sacrificed, and current loading on the system will be increased due to the need to run at higher RPM to offset loss of propeller efficiency. There's also "flex cycles" to consider, where at some point a propeller blade will separate simply because it has flexed too many times. Then we have the possibility of decreased quad stability in winds due to blade flutter. There's a lot of room for improvement in the propeller design, and great opportunities for after market manufacturers to come up with a better propeller for the Chroma.

View attachment 26876 View attachment 26877 View attachment 26878
 

Attachments

  • Motor_Prop Association.jpg
    Motor_Prop Association.jpg
    51.8 KB · Views: 369
  • Prop Orientation.jpg
    Prop Orientation.jpg
    48.1 KB · Views: 395
  • Flexibility.jpg
    Flexibility.jpg
    82 KB · Views: 386
Last edited by a moderator:

Old Man

Active Member
The Controls

If there's one place with the Chroma that definitely hits the mark, it's at the ST-10 transmitter. When we consider the market this unit is targeting it would be difficult to have done better. Any attempts to improve on this entry level product would have over complicated the Tx and provided the means to easily confuse the user. The available controls are easy to access,understand, and use while navigation of the view screen is pretty simple. What looks like "buttons" on the left and right side of the view screen most certainly are not. They are information windows.

In today's "innovation" rich environment there's really only one change in transmitter design I'd like to see the next time around. Put the view screen at the top of the transmitter, not the bottom. Bottom screen transmitters are "old school", originally designed to serve RC flying as a means to perform radio programming, and not as suitable to video work as a top screen would be. A higher screen would bring the operators eyes back to the copter faster.

The transmitter is slightly longer than a standard 6+ channel transmitter, and lacks any antennas to be broken off or damaged by the user. It's actually quite comfortable to hold, and not heavy by any means. It has a reasonably sized FPV/telemetry screen at the bottom that's bright, easy to see and a glare shield is provided for those that want to make use of it. The transmitter has the usual two control sticks and associated trim tabs. Since there is no provision to "tune" the FC via software the user may have a need to make use of the trims. Flight telemetry is overlayed on the view screen and quite informative. Double tapping the screen turns the telemetry overlay on and off for those that prefer.

At the top left of the Tx face there is a red arm/disarm button that has to be depressed for a few seconds to get a flight started and to stop the motors at the end of the flight. Arming the quad starts the motors spinning at a low RPM level. One thing sort of odd is the throttle stick is spring loaded for a "mid stick" position, and is the position the stick will be at when arming.

At the top right of the Tx face is a 3 position toggle that establishes the basic flight modes. Those positions are Smart, Angle, and Home and can be changed in flight. Other flight modes are available using the Tx software but those should be done with the copter on the ground and disarmed. On the right side of the Tx there is a slider that changes flight speeds from Turtle to Rabbit. On the left side of the Tx there is another slider that handles gimbal tilt. The only gimbal control possible is tilt, the user will need to use yaw for panning. Gimbal control is handled through WiFi and there is significant lag between control input and control response. That response is also quite slow once the gimbal receives the signal so the user should plan shots around what appear to be a 1/2 second lag and a couple second top to bottom gimbal travel.

At the top left of the Tx there's a button to trigger the shutter, and at the top right is another button to start and stop video. Camera or video mode is selected in the transmitter software accessed from the view screen. You cannot trigger the shutter in video mode or shoot video in camera mode.

An item of what might be some importance is to always remember to remove the gimbal lock before powering up the copter. I've made this mistake a couple times and each time the gimbal has gotten kind of uppity and refused to function after removing the lock until the power switch was cycled off and on again. Oh, there's a power switch, you don't have to connect or disconnect battery terminals once the battery is plugged in.

Attached are a few photos of the transmitter screen to get a feel for what it looks like. Note the available video settings.
 

Attachments

  • ST-10.jpg
    ST-10.jpg
    51.1 KB · Views: 410
  • Gimbal Control.jpg
    Gimbal Control.jpg
    45.9 KB · Views: 391
  • Fast or Slow.jpg
    Fast or Slow.jpg
    49.6 KB · Views: 357
  • Screen View_Info.jpg
    Screen View_Info.jpg
    74.5 KB · Views: 370
  • Screen View_Sans Info.jpg
    Screen View_Sans Info.jpg
    45.5 KB · Views: 354
  • Connecting.jpg
    Connecting.jpg
    58.1 KB · Views: 408
  • General Flight Modes.jpg
    General Flight Modes.jpg
    36.4 KB · Views: 555
  • SD Warning.jpg
    SD Warning.jpg
    59.4 KB · Views: 485
  • Vid Settings_1.jpg
    Vid Settings_1.jpg
    59.3 KB · Views: 503
  • Vid Settings_2.jpg
    Vid Settings_2.jpg
    61.9 KB · Views: 362
  • Vid Settings_3.jpg
    Vid Settings_3.jpg
    65.1 KB · Views: 532
Last edited by a moderator:

Motopreserve

Drone Enthusiast
Interesting that they would put the screen at the bottom. Doesn't seem to make sense if using it for an FPV screen....or any intricate functions while in flight really.

Also a little strange the choice of wifi for controls. Seems an added expense when the Receiver would handle it just fine without the lag you're experiencing.

Great write up!
 

Top